PVE疑难解答,有需要点击链接闲鱼与我联系
PVE8开启6-15代Intel核显虚拟化SRIOV/GVT-g技术--应用于fnOS/WinOS场景
英特尔持续推动英特尔®图形处理器上的图形虚拟化技术。这些技术中的最新技术是单根 IO 虚拟化 (SR-IOV),它取代了之前的 英特尔® Graphics Virtualization Technology –g (GVT-g)要了解每个英特尔®显卡家族支持哪种显卡虚拟化技术,请参阅下表:注意,代号为 Battlemage | Lunar Lake | Meteor Lake | Alchemist | Tiger Lake 这5款图形处理器并不支持SR-IOV,也不支持GVT-g
PVE基本设置
安装PVE过程略过,提前将pve安装好,推荐安装PVE8版本,如要正常使用11-15代核显SR-IOV,需要将内核更新到6.8及以上。并在BIOS提前开启VT-d(必须),SR-IOV(如有可以开),Above 4GB(如有可以开),和关闭安全模式Secure Boot
本篇文章将大量使用nano文本编辑命令,至于怎么使用自行百度,这里不重复造轮子了。 知道如何保存就行Ctrl +X 输入“Y”回车保存
更换系统源
国内清华源
# 编辑sources.list
nano /etc/apt/sources.list
# 将原有的源链接在句首加 # 注释掉,更换以下清华源信息
deb https://mirrors.tuna.tsinghua.edu.cn/debian/ bookworm main contrib non-free non-free-firmware
deb https://mirrors.tuna.tsinghua.edu.cn/debian/ bookworm-updates main contrib non-free non-free-firmware
deb https://mirrors.tuna.tsinghua.edu.cn/debian/ bookworm-backports main contrib non-free non-free-firmware
deb https://mirrors.tuna.tsinghua.edu.cn/debian-security bookworm-security main contrib non-free non-free-firmware
更换企业源
国内清华源
# 编辑pve-enterprise.list
nano /etc/apt/sources.list.d/pve-enterprise.list
# 将原有的源链接在句首加 # 注释掉,更换以下清华源信息
deb https://mirrors.tuna.tsinghua.edu.cn/proxmox/debian bookworm pve-no-subscription
修复源401错误
# 编辑ceph.list
nano /etc/apt/sources.list.d/ceph.list
# 将原有的源链接在句首加 # 注释掉,添加中科大ceph源
deb https://mirrors.ustc.edu.cn/proxmox/debian/ceph-quincy bookworm no-subscription
执行更新软件源
apt update LXC容器更源
国内清华源
# 备份APLInfo.pm
cp /usr/share/perl5/PVE/APLInfo.pm /usr/share/perl5/PVE/APLInfo.pm_back
# 替换为清华源:
sed -i 's|http://download.proxmox.com|https://mirrors.tuna.tsinghua.edu.cn/proxmox|g' /usr/share/perl5/PVE/APLInfo.pm
# 重启服务后生效
systemctl restart pvedaemon.service
intel 11-15代开启SRIOV核显虚拟化
以下设置是11-15代开启SRIOV核显虚拟化的设置,以PVE6.8.12-10内核为例。6-10代的GVT-g核显虚拟化技术往下翻
安装headers头文件
apt install pve-headers-$(uname -r)安装构建工具
apt install build-* dkms开启直通和i915 sriov
需要提前在主板BIOS开启虚拟化功能,才能开启硬件直通。在BIOS开启vt-d,SR-IOV(如有可以开),Above 4GB(如有可以开),和关闭安全模式Secure Boot。
使用nano命令编辑/etc/default/grub
# 编辑grub文件
nano /etc/default/grub
# 开启iommu分组和i915guc,在里面找到:GRUB_CMDLINE_LINUX_DEFAULT="quiet"项将其修改为
GRUB_CMDLINE_LINUX_DEFAULT="quiet intel_iommu=on iommu=pt i915.enable_guc=3 i915.max_vfs=7 module_blacklist=xe"
# 更新grub
update-grub
加载内核模块
编辑nano /etc/modules
vfio
vfio_iommu_type1
vfio_pci
vfio_virqfd
执行更新initramfs
# 更新initramfs
update-initramfs -u -k all
# 重启
reboot
验证是否开启直通
# 验证是否开启iommu
dmesg | grep iommu
或者
dmesg | grep -e DMAR -e IOMMU -e AMD-Vi
出现如下例子。则代表成功
[ 1.341100] pci 0000:00:00.0: Adding to iommu group 0
[ 1.341116] pci 0000:00:01.0: Adding to iommu group 1
[ 1.341126] pci 0000:00:02.0: Adding to iommu group 2
[ 1.341137] pci 0000:00:14.0: Adding to iommu group 3
[ 1.341146] pci 0000:00:17.0: Adding to iommu group 4
此时输入命令
find /sys/kernel/iommu_groups/ -type l
#出现很多直通组,就代表成功了。如果没有任何东西,就是没有开启
lsmod | grep vfio
# 检测模块是否加载
vfio_pci 16384 4
vfio_pci_core 94208 1 vfio_pci
vfio_iommu_type1 49152 2
vfio 57344 17 vfio_pci_core,vfio_iommu_type1,vfio_pci
iommufd 73728 1 vfio
irqbypass 16384 41 vfio_pci_core,kvm
#出现这类信息,就代表成功了。下载i915-sriov驱动
国内访问github很慢,建议给PVE挂上代理再下载,或者手动到github下载下来再上传到PVE
i915-sriov版本发布页
# 适用于6.8 ~ 6.16内核的i915-sriov驱动,下载到临时目录/tmp/
wget -O /tmp/i915-sriov-dkms_2025.07.22_amd64.deb "http://dl.yangwenqing.com/webos/link/8f592d04d4be4194a8fe5a2fff6446f6/i915-sriov-dkms_2025.07.22_amd64.deb"
# 适用于6.17 ~ 7.0内核的i915-sriov驱动,下载到临时目录/tmp/
wget -O /tmp/i915-sriov-dkms_2026.05.03_amd64.deb "https://dl.yangwenqing.com/webos/link/00a1844f9ee340eb84c3a6920775d840/i915-sriov-dkms_2026.05.03_amd64.deb"
安装i915-sriov驱动
如果你的PVE内核是Linux6.8 ~ 6.16的版本则安装i915-sriov-dkms_2025.07.22_amd64.deb;如果你的PVE内核是Linux6.12 ~ 6.19的版本则安装i915-sriov-dkms_2026.02.04_amd64.deb;
dpkg -i /tmp/i915-sriov-dkms*.deb如何安装6.8内核?
# 安装6.8.12-10-pve内核
apt install pve-kernel-6.8.12-10-pve
# 查看当前安装的内核
proxmox-boot-tool kernel list
# 如 6.8.12-10-pve
# 将装好的6.8内核设置成第一启动项,重启PVE即可进到新内核
proxmox-boot-tool kernel pin 6.8.12-10-pve
# 别忘了更新内核后给内核安装头文件再打驱动
apt install pve-headers-$(uname -r)
经过漫长等待完成后,检查安装是否成功,运行
modinfo i915|grep vf
# 反馈如下表示成功:
parm:           max_vfs:Limit number of virtual functions to allocate. (0 = no VFs [default]; N = allow up to N VFs) (uint)
如安装不成功建议删除无用的旧内核和头文件再进行安装,直至有以上成功反馈信息。
安装sysfsutils
apt install -y sysfsutils添加VFs核显数量
按需设置最高7个,设置1个时性能最强。
# 开启3个VFs核显数量
echo "devices/pci0000:00/0000:00:02.0/sriov_numvfs = 3" > /etc/sysfs.conf
# 重启
reboot
验证是否开启核显SRIOV
使用lspci命令查看核显信息,有如下内容则成功开启核显注意:物理核显02.0不能直通,否则所有虚拟核显消失
00:02.0 VGA compatible controller: Intel Corporation Alder Lake-S GT1 [UHD Graphics 770](物理核显)
00:02.1 VGA compatible controller: Intel Corporation Alder Lake-S GT1 [UHD Graphics 770] (虚拟核显1)
00:02.2 VGA compatible controller: Intel Corporation Alder Lake-S GT1 [UHD Graphics 770] (虚拟核显2)
00:02.3 VGA compatible controller: Intel Corporation Alder Lake-S GT1 [UHD Graphics 770] (虚拟核显3)
温馨提示
如果你的处理器是最新的Arrow Lake架构,安装了i915-sriov-dkms,没法看到7个VF。可以另外加上i915.force_probe=7d67参数到grub。
使用nano命令编辑/etc/default/grub
# 开启iommu分组和i915guc,在里面找到:GRUB_CMDLINE_LINUX_DEFAULT="quiet"项将其修改为
GRUB_CMDLINE_LINUX_DEFAULT="quiet intel_iommu=on iommu=pt i915.enable_guc=3 i915.max_vfs=7 i915.force_probe=7d67 module_blacklist=xe"
# 更新grub
update-grub
创建核显SR-IOV的Win虚拟机参数
按以下虚拟机参数模板建立好虚拟机,打上核显驱动就能正常使用核显了。
创建win10虚拟机(22H2)
名称:自定义
光驱0挂载:Win安装ISO镜像
光驱1挂载:virtIO驱动ISO镜像
显示:VirtIO-GPU
机型:q35
BIOS:OVMF
EFI分区:UEFI(OVMF)需要
磁盘:SCSI 大小200G(按需设置,或硬盘直通)
CPU:host 核心数量6(按需设置)
内存:8G
网络:virtIO(半虚拟化或网卡直通)网卡
添加PCI设备:核显SR-IOV(勾选ROM-Bar和PCIE)
音频设备:ich9-intel-hda/后端驱动器:无


创建核显SR-IOV的飞牛OS虚拟机参数
按以下虚拟机参数模板建立好虚拟机,打上核显驱动就能正常使用核显给飞牛影视硬解。
创建飞牛虚拟机(fnOS)
名称:自定义
光驱0挂载:fnOS安装ISO镜像
显示:默认
机型:q35
BIOS:OVMF
EFI分区:UEFI(OVMF)需要
磁盘1:SCSI 大小64G(系统盘,或硬盘直通)
磁盘2:SCSI 大小100G(数据盘,或硬盘直通)
CPU:host 核心数量6(按需设置)
内存:8G
网络:virtIO(半虚拟化或网卡直通)网卡
添加PCI设备:核显SR-IOV(勾选ROM-Bar和PCIE)
由于采用UEFI模式安装需要关闭Secure Boot 才能正常安装飞牛,开机时按esc键即可进虚拟机BIOS,将安全启动关闭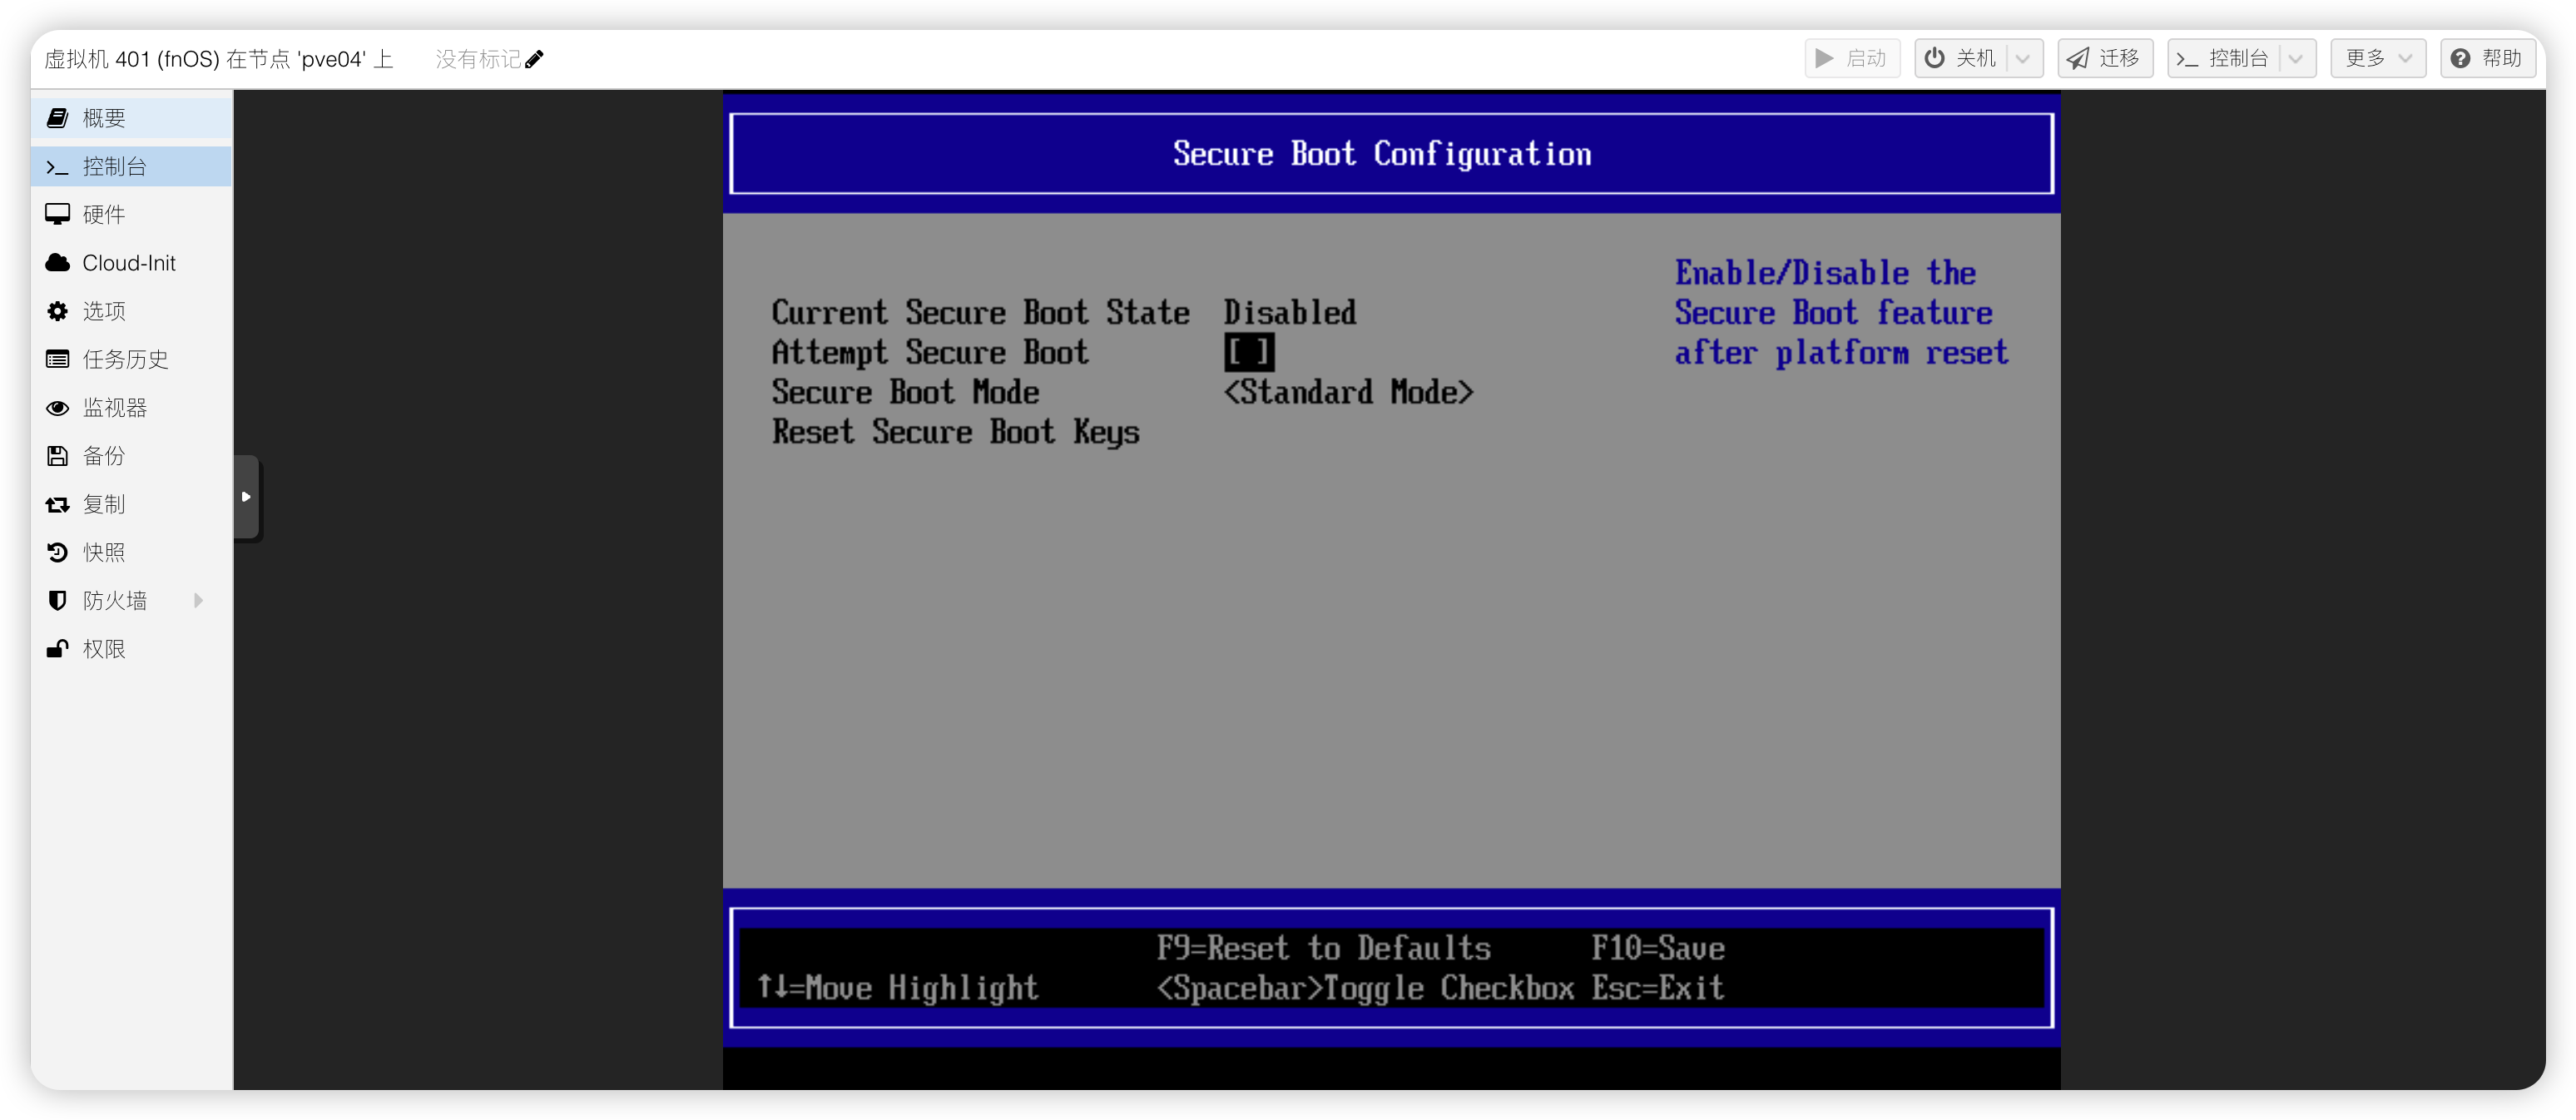
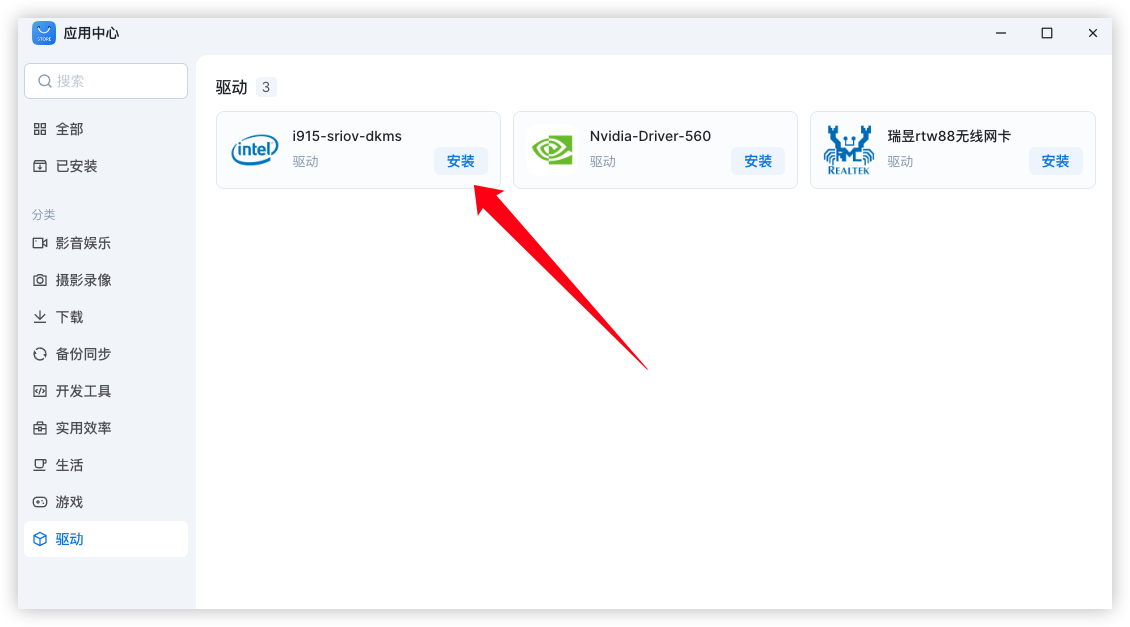
飞牛已经将intel-i915-sriov驱动上传到应用商店,直接到商店下载安装即可。
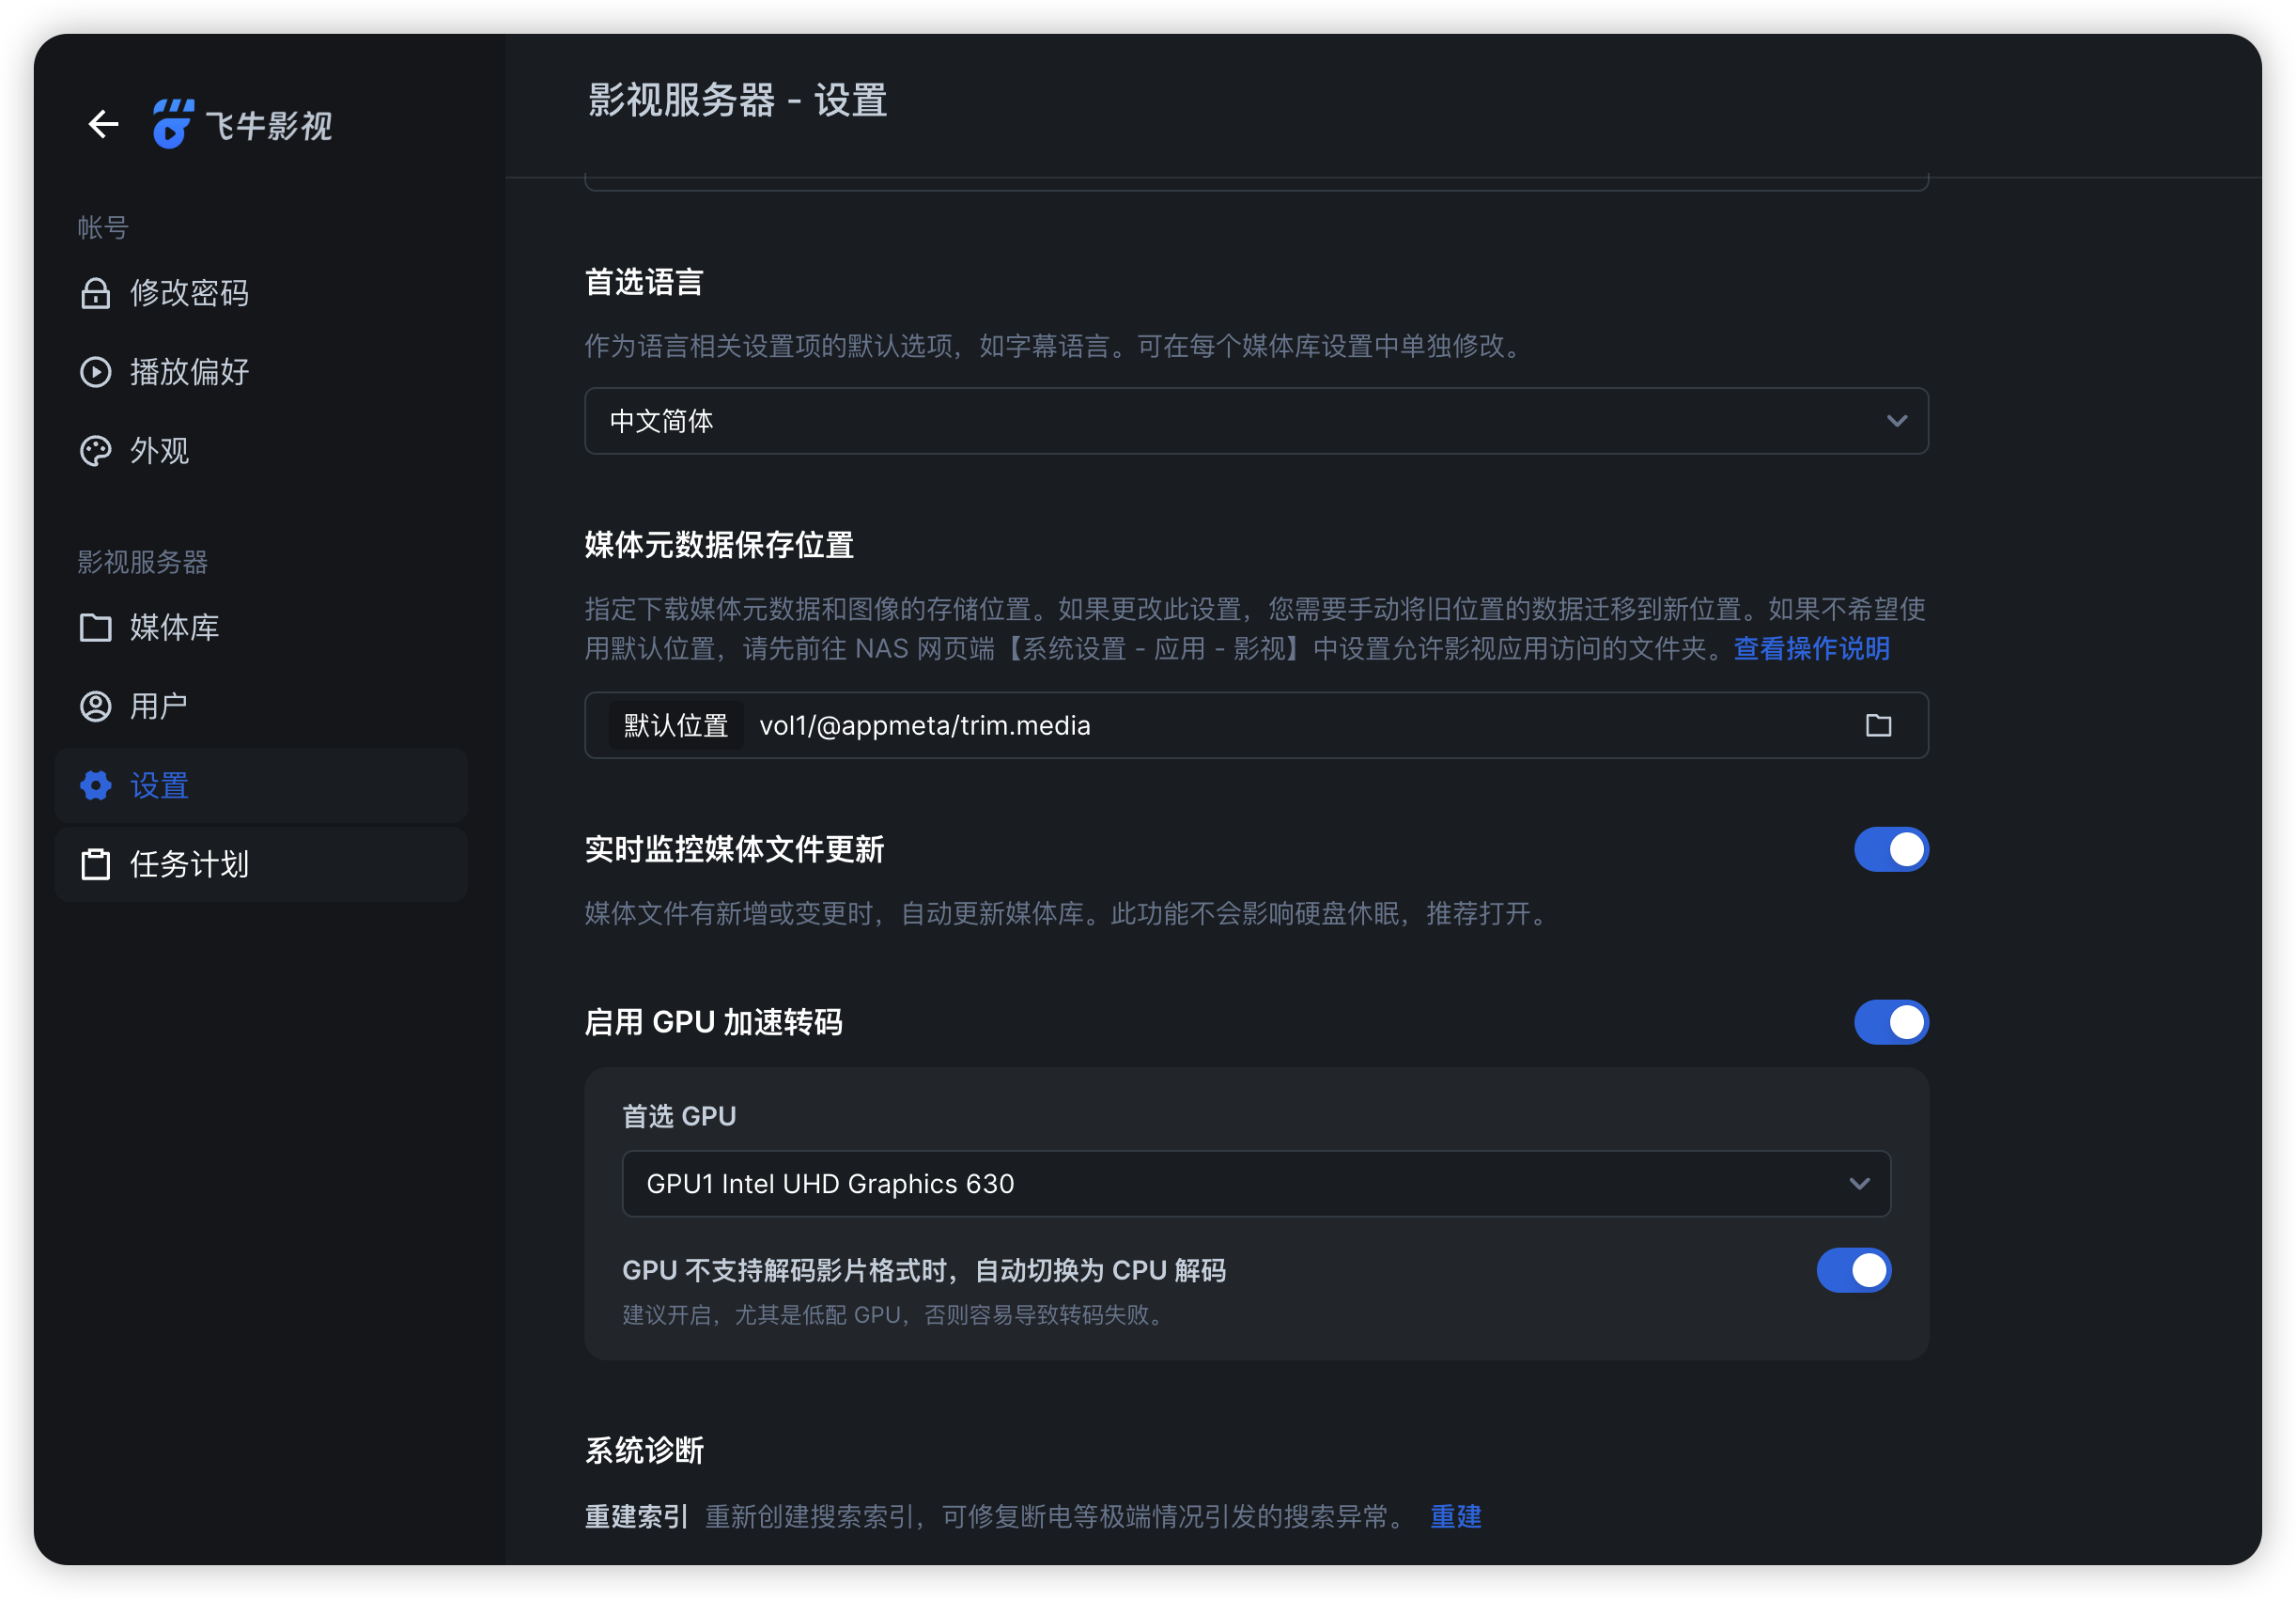
打开飞牛影视开启硬件加速就能正常硬解了。
正常转码

intel 6-10代开启GVT-g核显虚拟化
开启硬件直通和GVT-g
需要提前在主板BIOS开启虚拟化功能,才能开启硬件直通。在BIOS开启vt-d,SR-IOV(如有可以开),Above 4GB(如有可以开),和关闭安全模式Secure Boot。
使用nano命令编辑/etc/default/grub
nano /etc/default/grub
# 开启iommu分组和GVT-g,在里面找到:GRUB_CMDLINE_LINUX_DEFAULT="quiet"项将其修改为
GRUB_CMDLINE_LINUX_DEFAULT="quiet intel_iommu=on iommu=pt i915.enable_gvt=1 pcie_acs_override=downstream,multifunction"
# 更新grub
update-grub
加载内核模块
编辑nano /etc/modules
vfio
vfio_iommu_type1
vfio_pci
vfio_virqfd
kvmgt
执行更新initramfs
# 更新initramfs
update-initramfs -u -k all
# 重启
reboot
验证是否开启核显GVT-g
ls /sys/bus/pci/devices/0000:00:02.0/mdev_supported_types
# 显示有2个或者更多即成功,UHD630核显最多可以开2个
i915-GVTg_V5_4  i915-GVTg_V5_8
创建核显GVT-g的Win虚拟机参数
按以下虚拟机参数模板建立好虚拟机,打上核显驱动就能正常使用核显了。
创建win10虚拟机(22H2)
名称:自定义
光驱0挂载:Win安装ISO镜像
光驱1挂载:virtIO驱动ISO镜像
显示:VirtIO-GPU
机型:q35
BIOS:OVMF
EFI分区:UEFI(OVMF)需要
磁盘:SCSI 大小60G(按需设置,或硬盘直通)
CPU:host 核心数量4(按需设置)
内存:4G及以上
网络:virtIO(半虚拟化或网卡直通)网卡
添加PCI设备:核显GVT-g(勾选ROM-Bar和PCIE在Mdev类型中选择vgpu设备i915-GVTg_V5_8)
音频设备:ich9-intel-hda/后端驱动器:无


资源驱动下载
# virtIO驱动ISO:
https://yun.yangwenqing.com/Proxmox/Windows/VirtIO_Drivers/virtio-win-0.1.240.iso
# 7-10代核显驱动:
https://www.intel.cn/content/www/cn/zh/download/776137/intel-7th-10th-gen-processor-graphics-windows.html
# 11-13代核显驱动:
https://www.intel.cn/content/www/cn/zh/download/785597/intel-arc-iris-xe-graphics-windows.html
创建核显GVT-g的飞牛OS虚拟机参数
按以下虚拟机参数模板建立好虚拟机,进飞牛ssh配置核显就能正常使用核显给飞牛影视硬解。
创建飞牛虚拟机(fnOS)
名称:自定义
光驱0挂载:fnOS安装ISO镜像
显示:默认
机型:q35
BIOS:OVMF
EFI分区:UEFI(OVMF)需要
磁盘1:SCSI 大小64G(系统盘,或硬盘直通)
磁盘2:SCSI 大小100G(数据盘,或硬盘直通)
CPU:host 核心数量6(按需设置)
内存:8G
网络:virtIO(半虚拟化或网卡直通)网卡
添加PCI设备:核显GVT-g(勾选ROM-Bar和PCIE在Mdev类型中选择vgpu设备i915-GVTg_V5_8)
由于采用UEFI模式安装需要关闭Secure Boot 才能正常安装飞牛,开机时按esc键即可进虚拟机BIOS,将安全启动关闭飞牛安装好后在系统开启ssh,登录到飞牛ssh终端来屏蔽英特尔核显,飞牛影视就能正常硬解了。
# 切换root权限
sudo -i
# 编辑i915.conf,(nano命令: Ctrl+X保存)
nano /etc/modprobe.d/i915.conf
# 把里面的options i915 enable_guc=3,改为0即可。
options i915 enable_guc=0
# 更新initramfs,然后重启飞牛
update-initramfs -u -k all
重启飞牛后重新打开影视就能开启GPU进行硬件解码了。
正常转码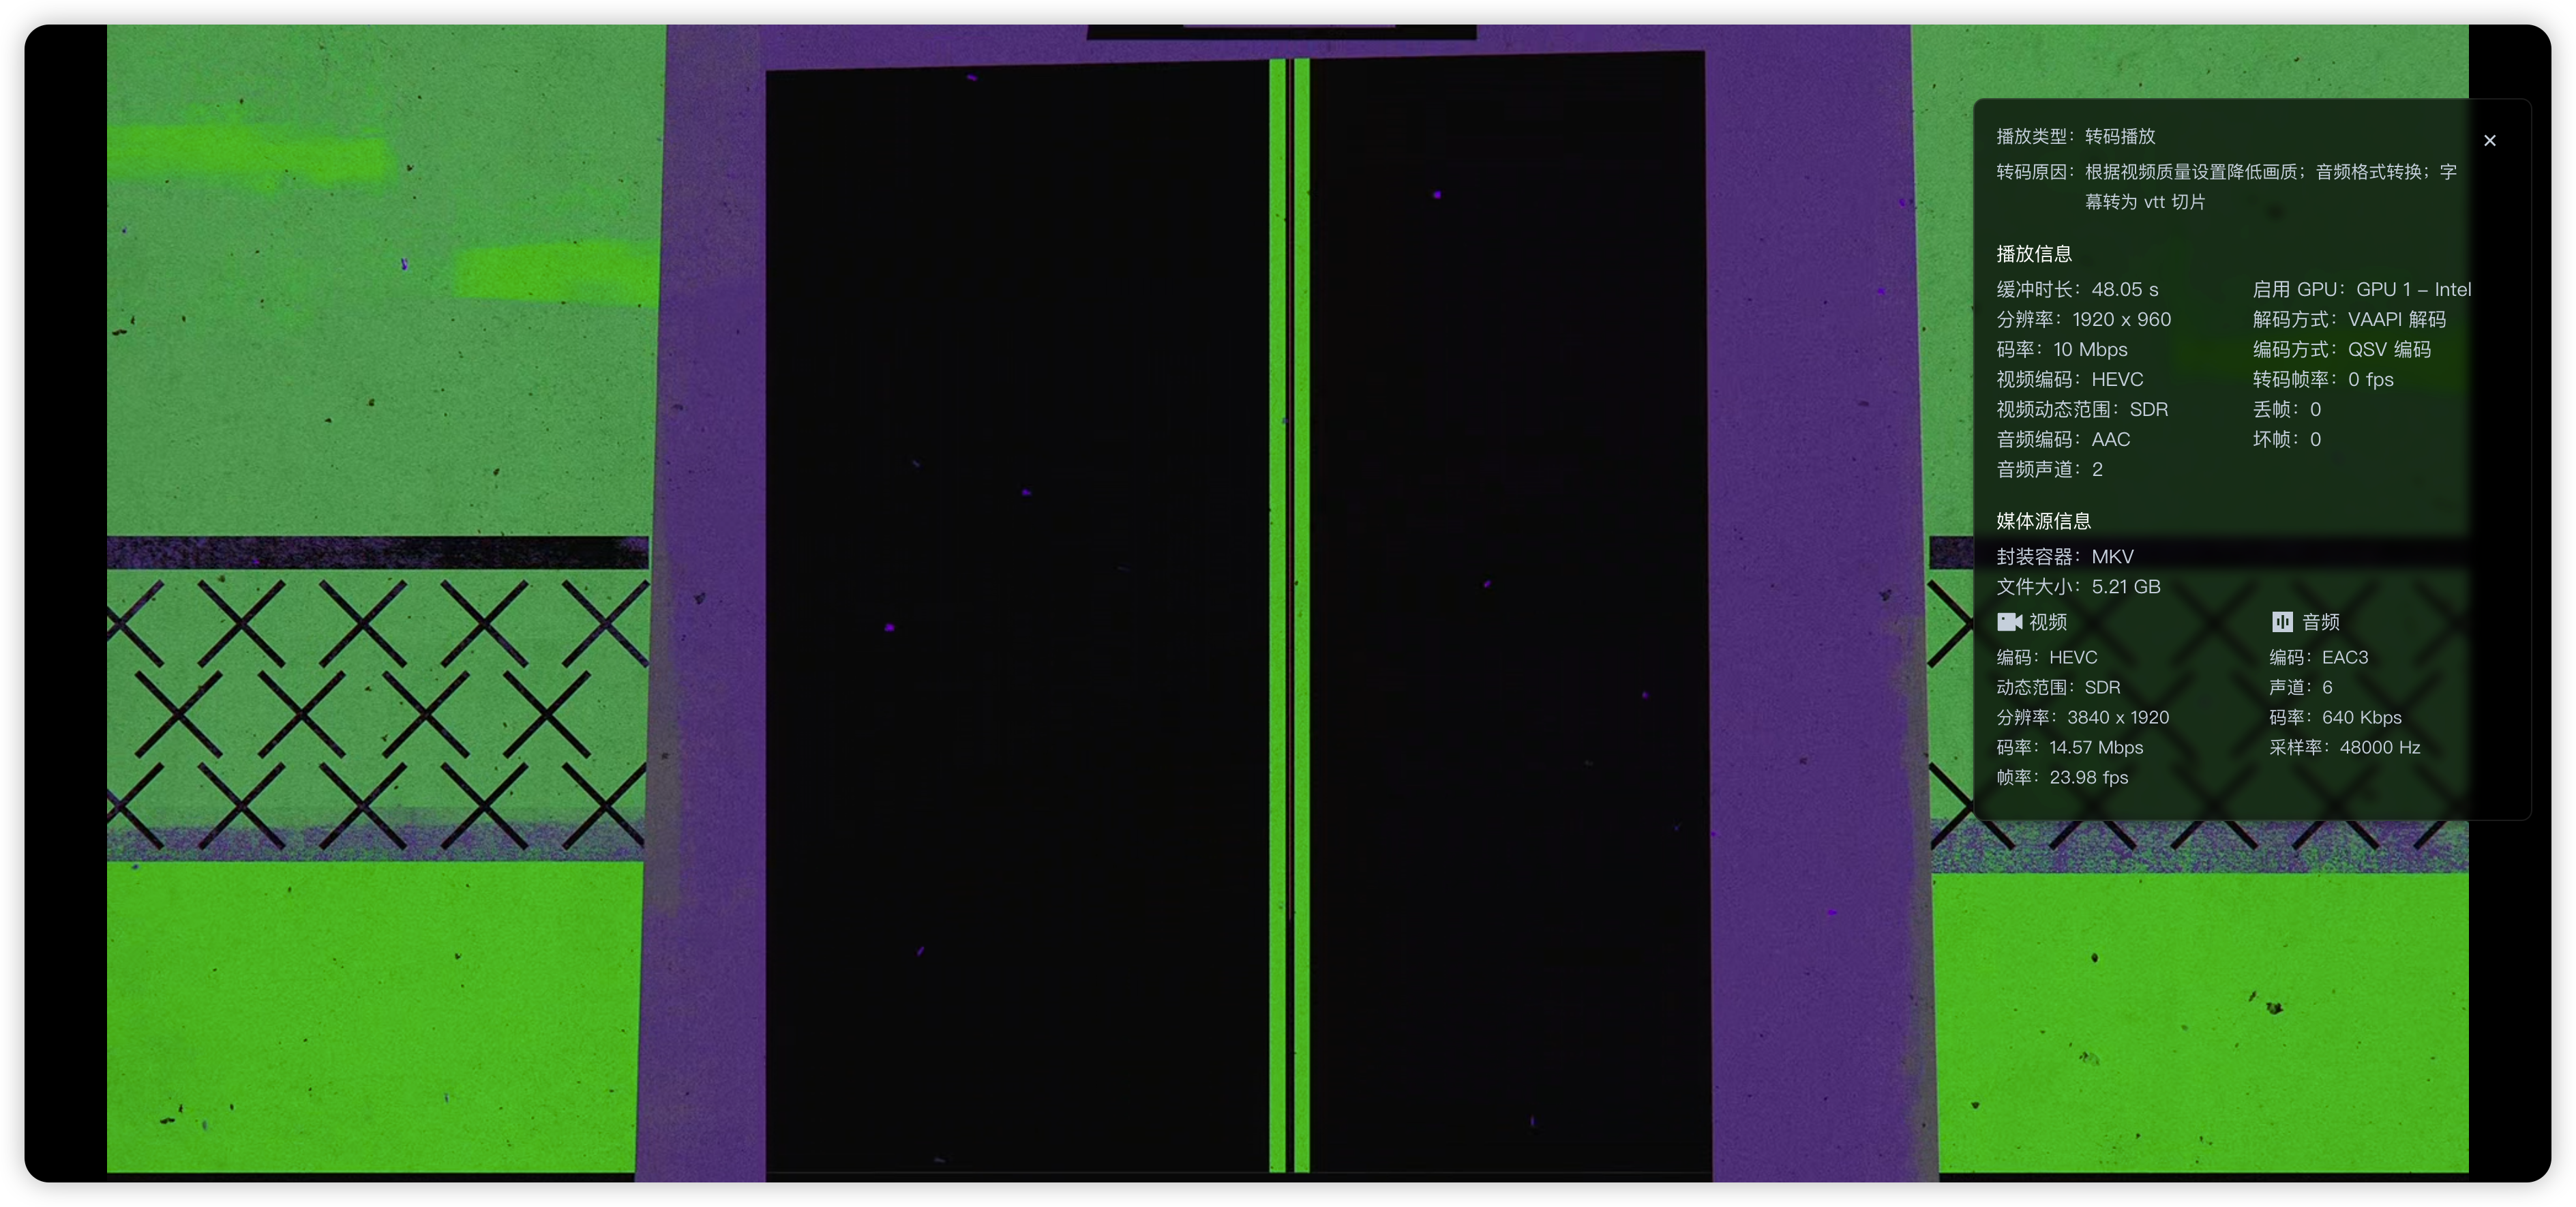


24 条评论
神贴 简单明了
有用 感谢
成功了,感谢
图片都绿了,还正常转码呢?
hahahaha
6,画面截图的是新乌托邦片头曲哇
老哥威武!请教下sriov给飞牛后能正常启用相册的ai模型么?
fnOS直通 i915-GVTg_V5_8成功解码,单独运行OK,
win10直通i915-GVTg_V5_4 成功,单独运行OK,
但如果开启了fnOS,win10则无法启动:
pci device '0000:00:02.0' has no available instances of 'i915-GVTg_V5_4'
TASK ERROR: could not create mediated device
跪求fnOS和Win10同时调用核显方法。
FnOS和win10 都设置为i915-GVTg_V5_8
intel ultra7255h核显直通了,但是列表有问题又停止了,问下那里没有弄好
pve8.3, 给win10 分配gvt-g 显卡后,进去运行一会儿 总是会死机win10。但不影响pve,另一个gvt-g分配给fnos,就正常运行。
如果我想取消核显虚拟化要怎么做?
mbr 选i440fx 也成功了
赞一个
i915的驱动编译成功,但是分割不成功,换了好几个内核版本都是这样
可能BIOS没设置好
步骤写的很详细,然后按图配置就能够开启。复制代码也很方便。支持一瓶可乐OωO
能刷到写得这么好的文章是我福报。
补充一点,有些主板的BIOS,没有SR-IOV选项,要打开所有和虚拟化相关的功能。我的技嘉需要额外打开
resize BAR support滴!访客卡!请上车的乘客系好安全带,现在是:Sat Jan 04 2025 14:25:26 GMT+0800 (香港标准时间)
我开了也没成功,能显示创建出虚拟核显,但是不能用,fn 也是能识别,不能勾选硬件加速
谢谢你的文章,不过其中有一个pve优化脚本换源 居然是换成了pve7.x版本的源,我手贱去用了一下,可能版本不匹配,建议不要使用(╯‵□′)╯︵┴─┴
我勾选了pcie,win下就看不到核显设备,不勾选才能看到,不过有错误代码43
强,太强了。非常实用
赞赏码刷不出来
谢谢支持