记录在VPS安装PVE8跑LXC容器体验
尝试在UCloud云厂商的轻量主机安装个PVE来跑LXC容器,UCloud的轻量VPS没有开启VM-x/AMD-V的支持,不能在VPS创建虚拟机,但能玩玩LXC容器。
--------------------- A Bench Script By spiritlhl ----------------------
                   测评频道: https://t.me/vps_reviews
VPS融合怪版本:2025.03.29
Shell项目地址:https://github.com/spiritLHLS/ecs
Go项目地址:https://github.com/oneclickvirt/ecs
---------------------基础信息查询--感谢所有开源项目---------------------
 CPU 型号          : Intel Xeon Processor (Cascadelake)
 CPU 核心数        : 2
 CPU 频率          : 2992.968 MHz
 CPU 缓存          : L1: 64.00 KB / L2: 4.00 MB / L3: 16.00 MB
 AES-NI指令集      : ✔ Enabled
 VM-x/AMD-V支持    : ❌ Disabled
 内存              : 1.31 GiB / 3.83 GiB
 Swap              : [ no swap partition or swap file detected ]
 硬盘空间          : 4.36 GiB / 78.58 GiB
 启动盘路径        : /dev/vda1
 系统在线时间      : 0 days, 0 hour 27 min
 负载              : 0.53, 0.24, 0.11
 系统              : Debian GNU/Linux 12 (bookworm) (x86_64)
 架构              : x86_64 (64 Bit)
 内核              : 6.8.12-9-pve
 TCP加速方式       : cubic
 虚拟化架构        : KVM
 NAT类型           : Port Restricted Cone
 IPV4 ASN          : AS135377 UCLOUD INFORMATION TECHNOLOGY (HK) LIMITED
 IPV4 位置         : Los Angeles / California / US
----------------------CPU测试--通过sysbench测试-------------------------
 -> CPU 测试中 (Fast Mode, 1-Pass @ 5sec)
 1 线程测试(单核)得分:          1164 Scores
 2 线程测试(多核)得分:          2302 Scores
---------------------内存测试--感谢lemonbench开源-----------------------
 -> 内存测试 Test (Fast Mode, 1-Pass @ 5sec)
 单线程读测试:          22803.37 MB/s
 单线程写测试:          17498.46 MB/s
------------------磁盘dd读写测试--感谢lemonbench开源--------------------
 -> 磁盘IO测试中 (4K Block/1M Block, Direct Mode)
 测试操作               写速度                                  读速度
 100MB-4K Block         13.2 MB/s (3223 IOPS, 7.94s)            15.8 MB/s (3850 IOPS, 6.65s)
 1GB-1M Block           209 MB/s (199 IOPS, 5.02s)              394 MB/s (375 IOPS, 2.66s)
---------------------磁盘fio读写测试--感谢yabs开源----------------------
Block Size | 4k            (IOPS) | 64k           (IOPS)
  ------   | ---            ----  | ----           ----
Read       | 102.05 MB/s  (25.5k) | 214.17 MB/s   (3.3k)
Write      | 102.32 MB/s  (25.5k) | 215.30 MB/s   (3.3k)
Total      | 204.38 MB/s  (51.0k) | 429.47 MB/s   (6.7k)
           |                      |
Block Size | 512k          (IOPS) | 1m            (IOPS)
  ------   | ---            ----  | ----           ----
Read       | 206.43 MB/s    (403) | 205.54 MB/s    (200)
Write      | 217.40 MB/s    (424) | 219.23 MB/s    (214)
Total      | 423.83 MB/s    (827) | 424.78 MB/s    (414)
------------流媒体解锁--基于oneclickvirt/CommonMediaTests开源-----------
服务器综合测试脚本
curl -L https://gitlab.com/spiritysdx/za/-/raw/main/ecs.sh -o ecs.sh && chmod +x ecs.sh && bash ecs.sh前期准备
重装Debian12
推荐用DD网络重装一个干净的Debian12,厂商自带的Debian12带了插件可能安装PVE不成功。一键网络重装Debian12,密码自行设置一下,执行完reboot开始安装
wget --no-check-certificate -qO InstallNET.sh 'https://raw.githubusercontent.com/leitbogioro/Tools/master/Linux_reinstall/InstallNET.sh' && chmod a+x InstallNET.sh && bash InstallNET.sh -debian 12 -pwd '密码'放行8006端口
在UCloud后台的安全组给该VPS放行TCP协议8006端口
Debian12安装PVE8
手动部署
查看VPS网络信息
查看VPS的网卡名,IP,网关信息,使用ip -c a和ip route命令查询
root@10-11-60-14:~# ip -c a
1: lo: <LOOPBACK,UP,LOWER_UP> mtu 65536 qdisc noqueue state UNKNOWN group default qlen 1000
    link/loopback 00:00:00:00:00:00 brd 00:00:00:00:00:00
    inet 127.0.0.1/8 scope host lo
       valid_lft forever preferred_lft forever
    inet6 ::1/128 scope host noprefixroute
       valid_lft forever preferred_lft forever
2: eth0: <BROADCAST,MULTICAST,UP,LOWER_UP> mtu 1500 qdisc noqueue state UP group default qlen 1000
    link/ether 52:54:00:cf:c9:bb brd ff:ff:ff:ff:ff:ff
    altname enp0s4
    altname ens4
    inet 10.11.60.14/16 brd 10.11.255.255 scope global eth0
       valid_lft forever preferred_lft forever
    inet6 fe80::5054:ff:fecf:c9bb/64 scope link
       valid_lft forever preferred_lft forever
3: eth1: <BROADCAST,MULTICAST,UP,LOWER_UP> mtu 1500 qdisc fq_codel master eth0 state UP group default qlen 1000
    link/ether 52:54:00:cf:c9:bb brd ff:ff:ff:ff:ff:ff
    altname enp0s4nsby
    altname ens4nsby
    inet6 fe80::5054:ff:fecf:c9bb/64 scope link
       valid_lft forever preferred_lft forever
4: eth2: <BROADCAST,MULTICAST,UP,LOWER_UP> mtu 1500 qdisc mq master eth0 state UP group default qlen 1000
    link/ether 52:54:00:cf:c9:bb brd ff:ff:ff:ff:ff:ff
    altname enp0s6
    altname ens6
    inet6 fe80::5054:ff:fecf:c9bb/64 scope link
       valid_lft forever preferred_lft forever
root@10-11-60-14:~# ip route
default via 10.11.0.1 dev eth0 onlink
10.11.0.0/16 dev eth0 proto kernel scope link src 10.11.60.14
VPS信息如下:
网卡名:eth0
IP/子网:10.11.60.14/16
网关:10.11.0.1
编辑网络配置文件
nano /etc/network/interfaces删除里面所有内容,替换成以下内容,网卡名,IP/子网,网关根据自己VPS修正
# network interface settings; autogenerated
# Please do NOT modify this file directly, unless you know what
# you're doing.
#
# If you want to manage parts of the network configuration manually,
# please utilize the 'source' or 'source-directory' directives to do
# so.
# PVE will preserve these directives, but will NOT read its network
# configuration from sourced files, so do not attempt to move any of
# the PVE managed interfaces into external files!

auto lo
iface lo inet loopback

iface eth0 inet manual

auto vmbr0
iface vmbr0 inet static
        address 10.11.60.14/16
        gateway 10.11.0.1
        bridge-ports eth0
        bridge-stp off
        bridge-fd 0

source /etc/network/interfaces.d/*
修改主机名
nano /etc/hosts删除里面所有内容,替换成以下内容,IP根据自己VPS修正
127.0.0.1 localhost.localdomain localhost
10.11.60.14 pve8.lan pve8

# The following lines are desirable for IPv6 capable hosts

::1     ip6-localhost ip6-loopback
fe00::0 ip6-localnet
ff00::0 ip6-mcastprefix
ff02::1 ip6-allnodes
ff02::2 ip6-allrouters
ff02::3 ip6-allhosts
# 主机名修改为`pve8`
hostnamectl set-hostname pve8添加PVE存储库
echo "deb [arch=amd64] http://download.proxmox.com/debian/pve bookworm pve-no-subscription" > /etc/apt/sources.list.d/pve-install-repo.list
wget https://enterprise.proxmox.com/debian/proxmox-release-bookworm.gpg -O /etc/apt/trusted.gpg.d/proxmox-release-bookworm.gpg
更新系统
apt update && apt full-upgrade安装PVE内核
apt install proxmox-default-kernel安装PVE软件
apt install proxmox-ve postfix open-iscsi chrony选择local only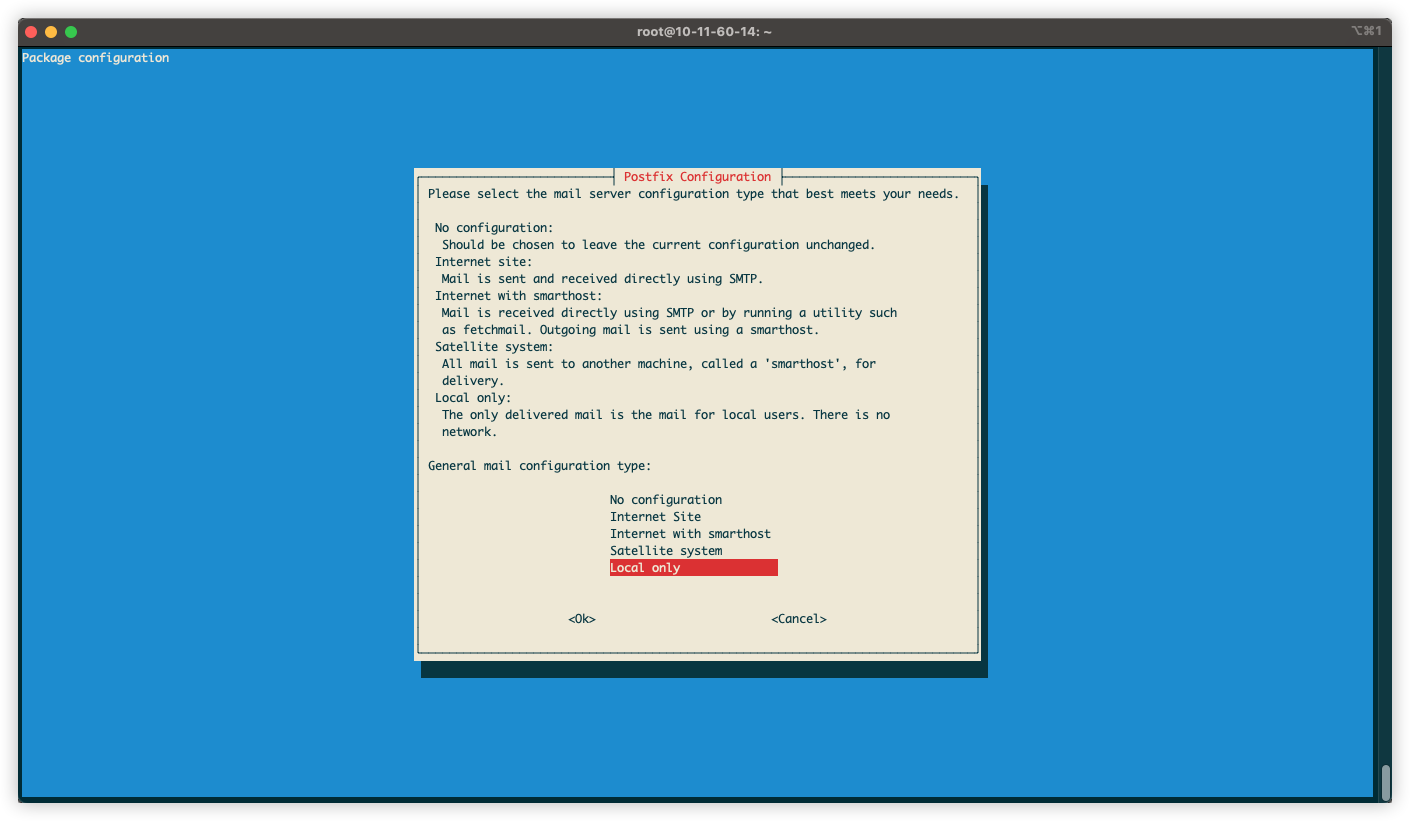
设置个邮箱名称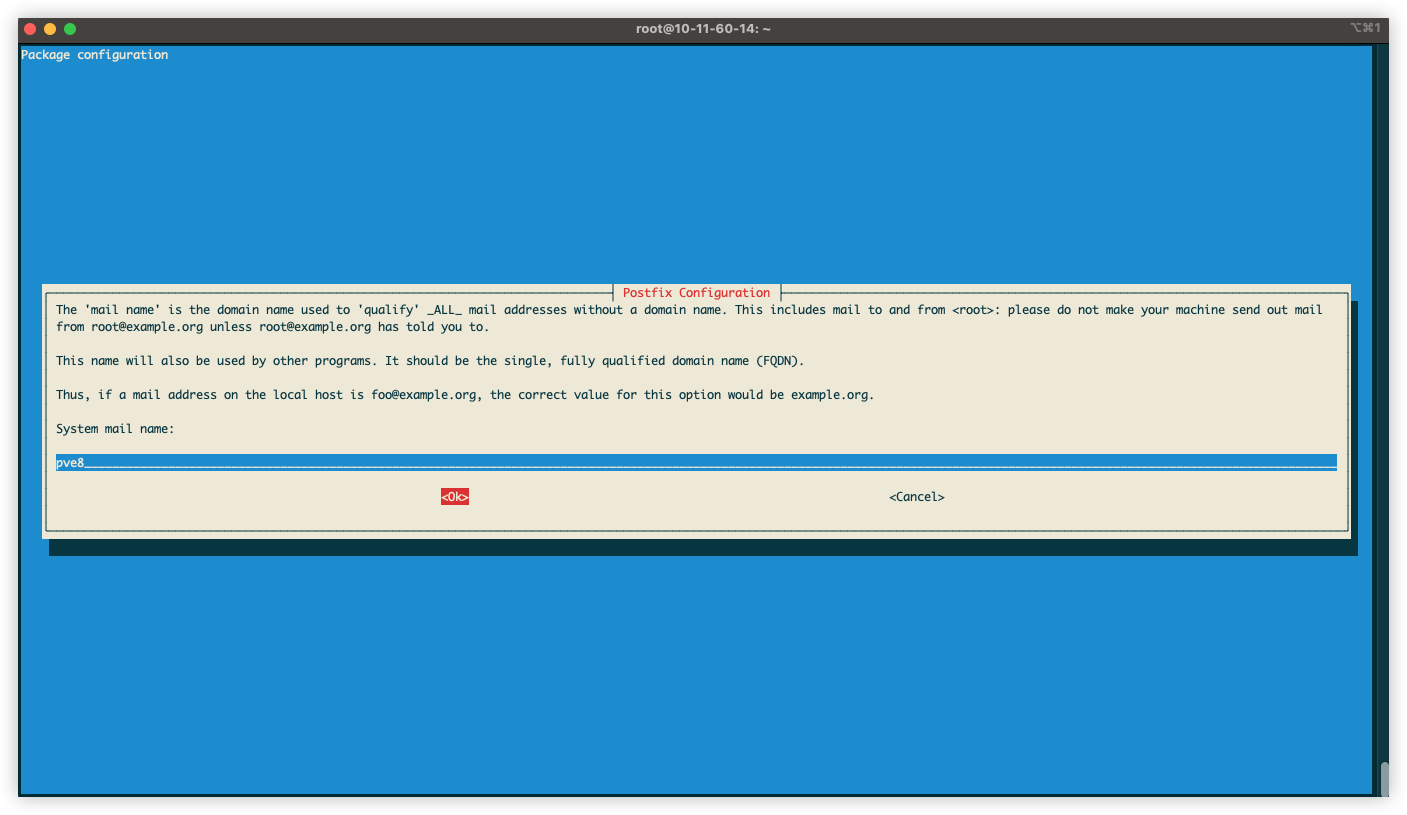
删除Debian12 内核
apt remove linux-image-amd64 'linux-image-6.1*'是否终止内核删除,选N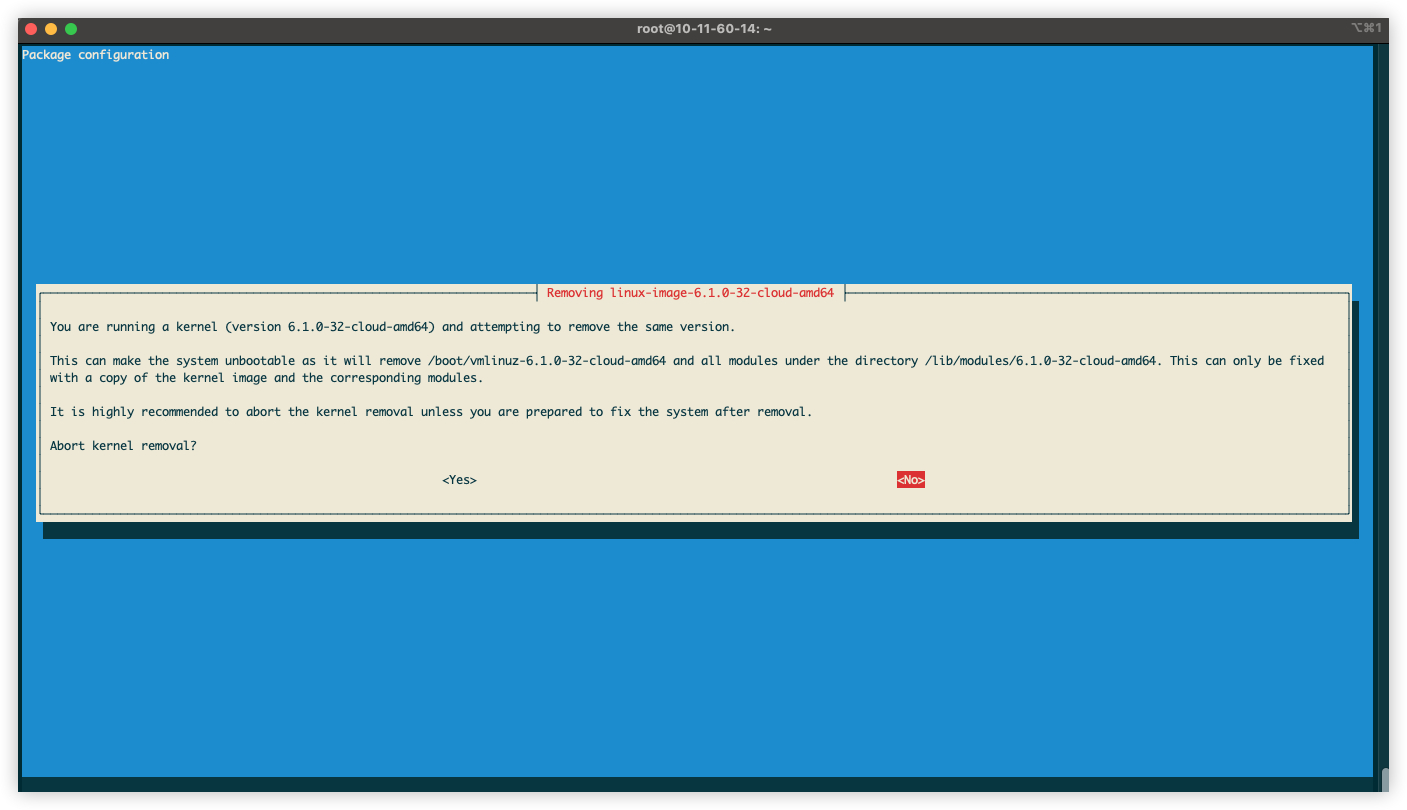
删除os-prober
apt remove os-prober更新update-grub
# 更新update-grub
update-grub
# 重启
reboot
重启后输入https://公网ip:8006访问PVE后台即可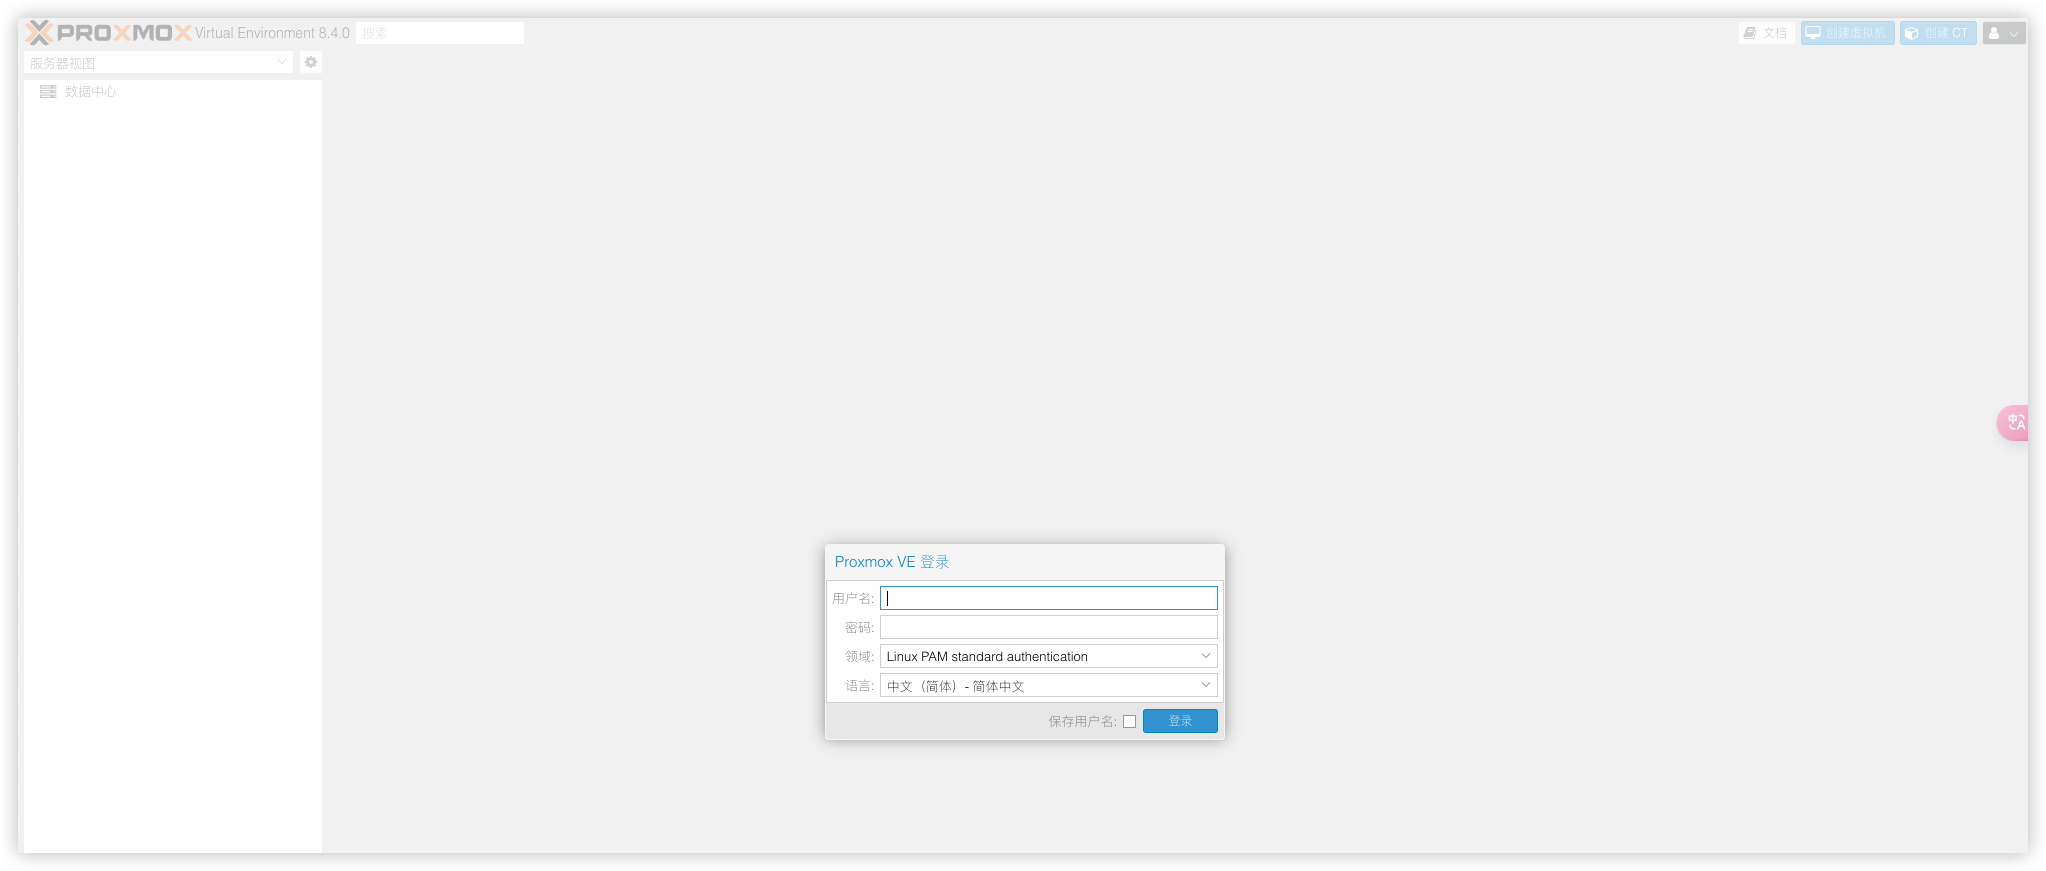
一键脚本
不想手动安装PVE,可以尝试下边的一键脚本安装PVE,项目地址:一键虚拟化
一键安装PVE
# 国际版(VPS在国外用这个)
curl -L https://raw.githubusercontent.com/oneclickvirt/pve/main/scripts/install_pve.sh -o install_pve.sh && chmod +x install_pve.sh && bash install_pve.sh
# 国内版(VPS在国内用这个)
curl -L https://cdn.spiritlhl.net/https://raw.githubusercontent.com/oneclickvirt/pve/main/scripts/install_pve.sh -o install_pve.sh && chmod +x install_pve.sh && bash install_pve.sh
配置SNAT和DHCP
由于VPS上只给了一个IPv4,PVE内部的虚拟机和LXC容器无法直接获取到IP地址,导致它们无法直接访问互联网。需要通过PVE的SNAT(源地址转换)和DHCP(自动分配IP地址给内部的虚拟机和容器),让这些虚拟机和容器能够上网。
安装dnsmasq
为了使用DHCP功能,需要额外安装 dnsmasq。通过以下命令执行:
apt install dnsmasq禁用默认的 dnsmasq 服务
systemctl disable --now dnsmasq配置SDN
创建Simple区域
步骤:数据中心 → SDN → 区域 → 添加Simple → 填写名称ID → 勾选DHCP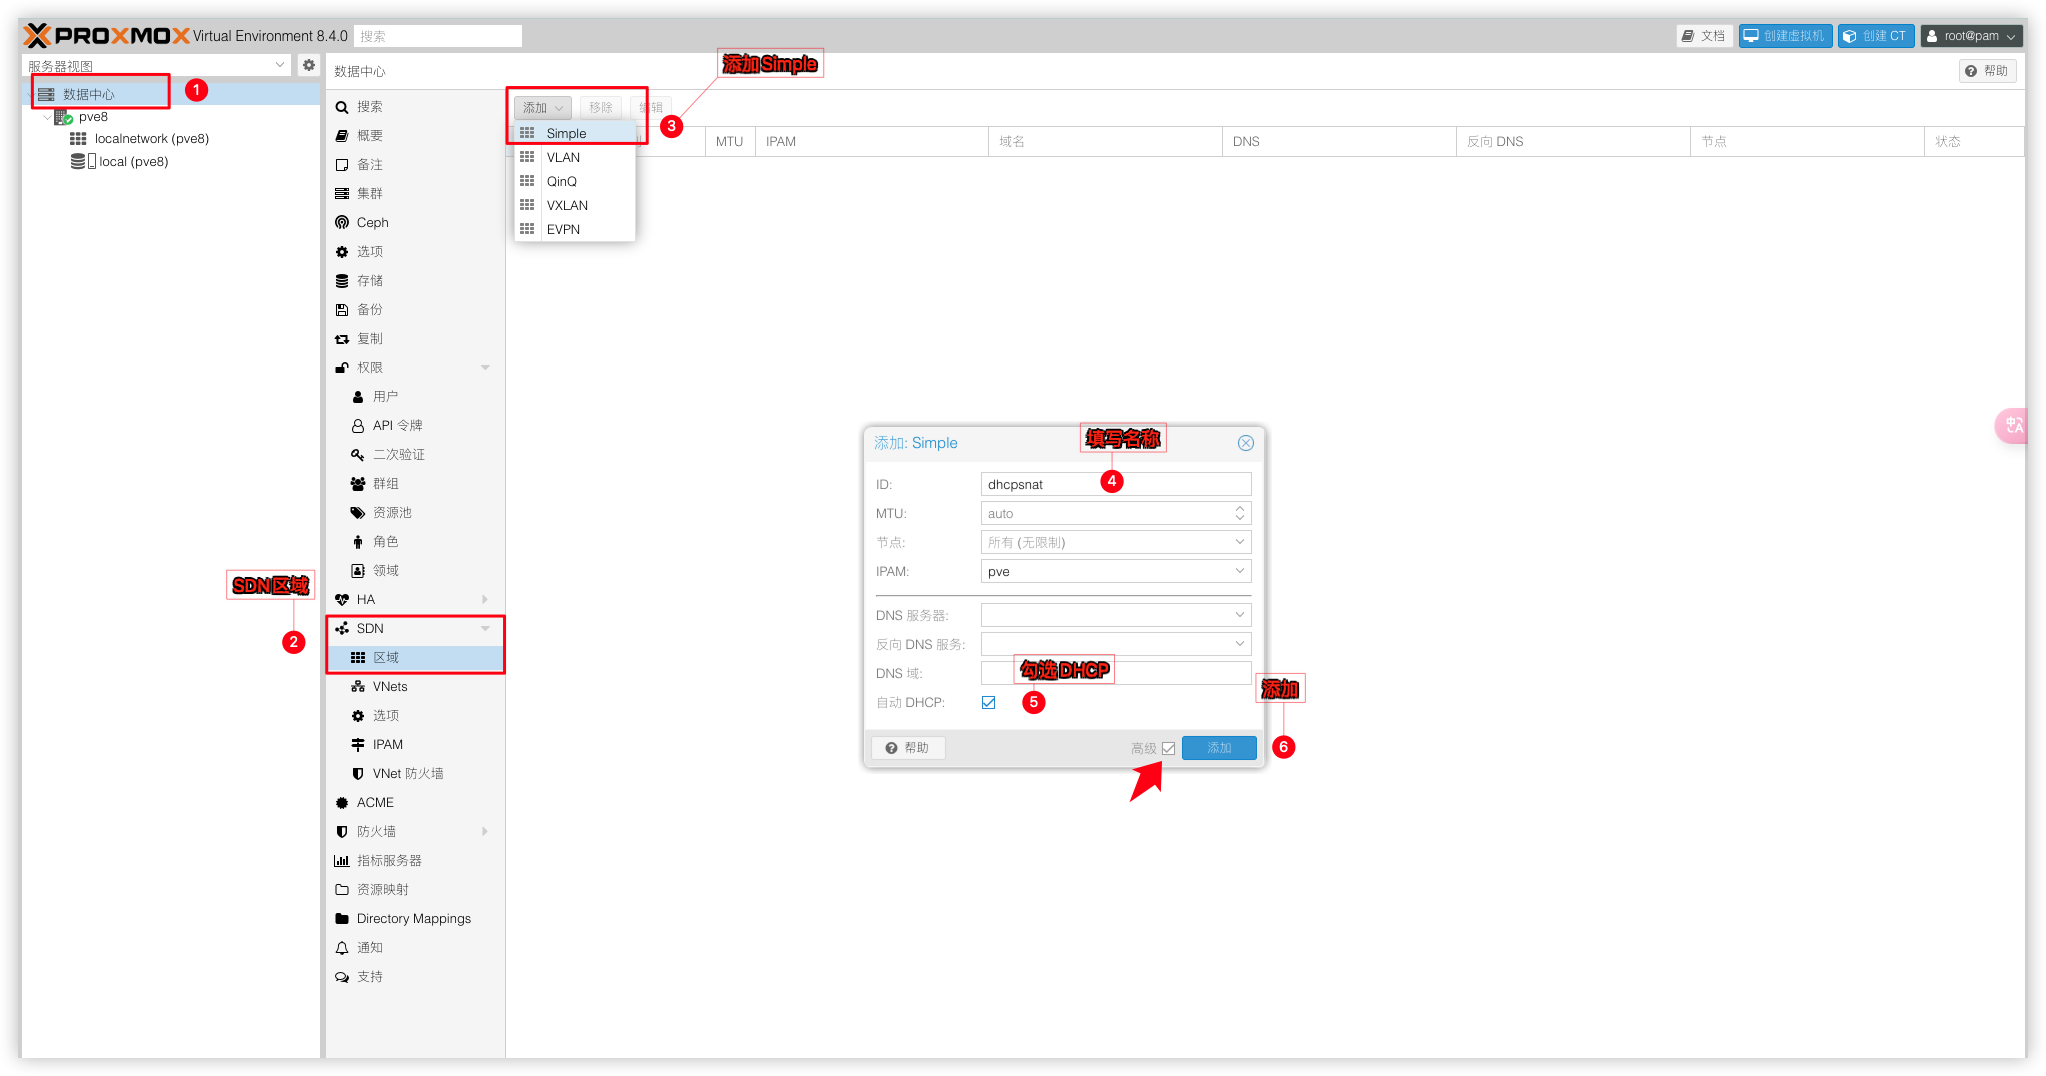
创建Vnets
步骤:数据中心 → SDN → Vnets → 创建VNet → 填写名称 → 勾选区域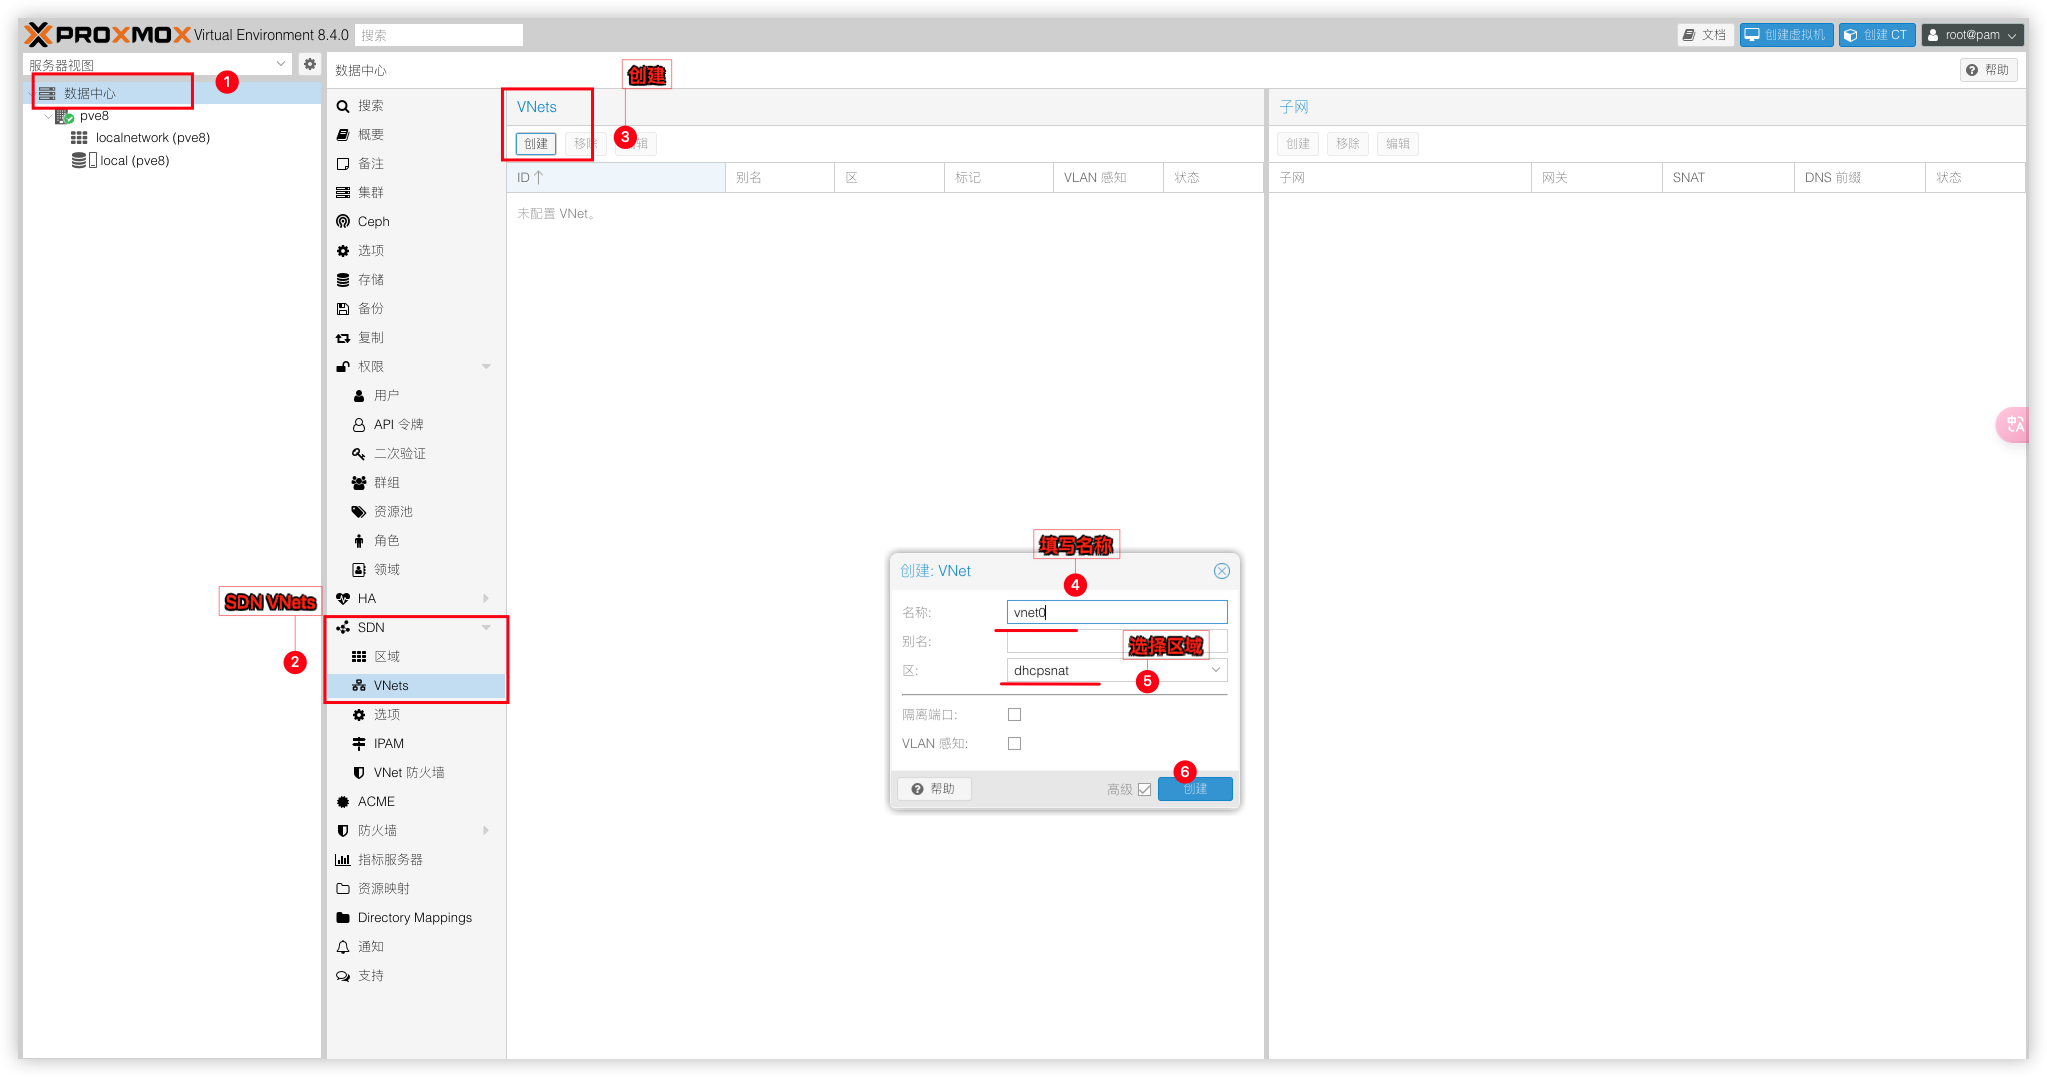
创建子网
步骤:数据中心 → SDN → Vnets → 选中创建好的VNet → 创建子网 → 填写子网网段和网关 → 勾选SNAT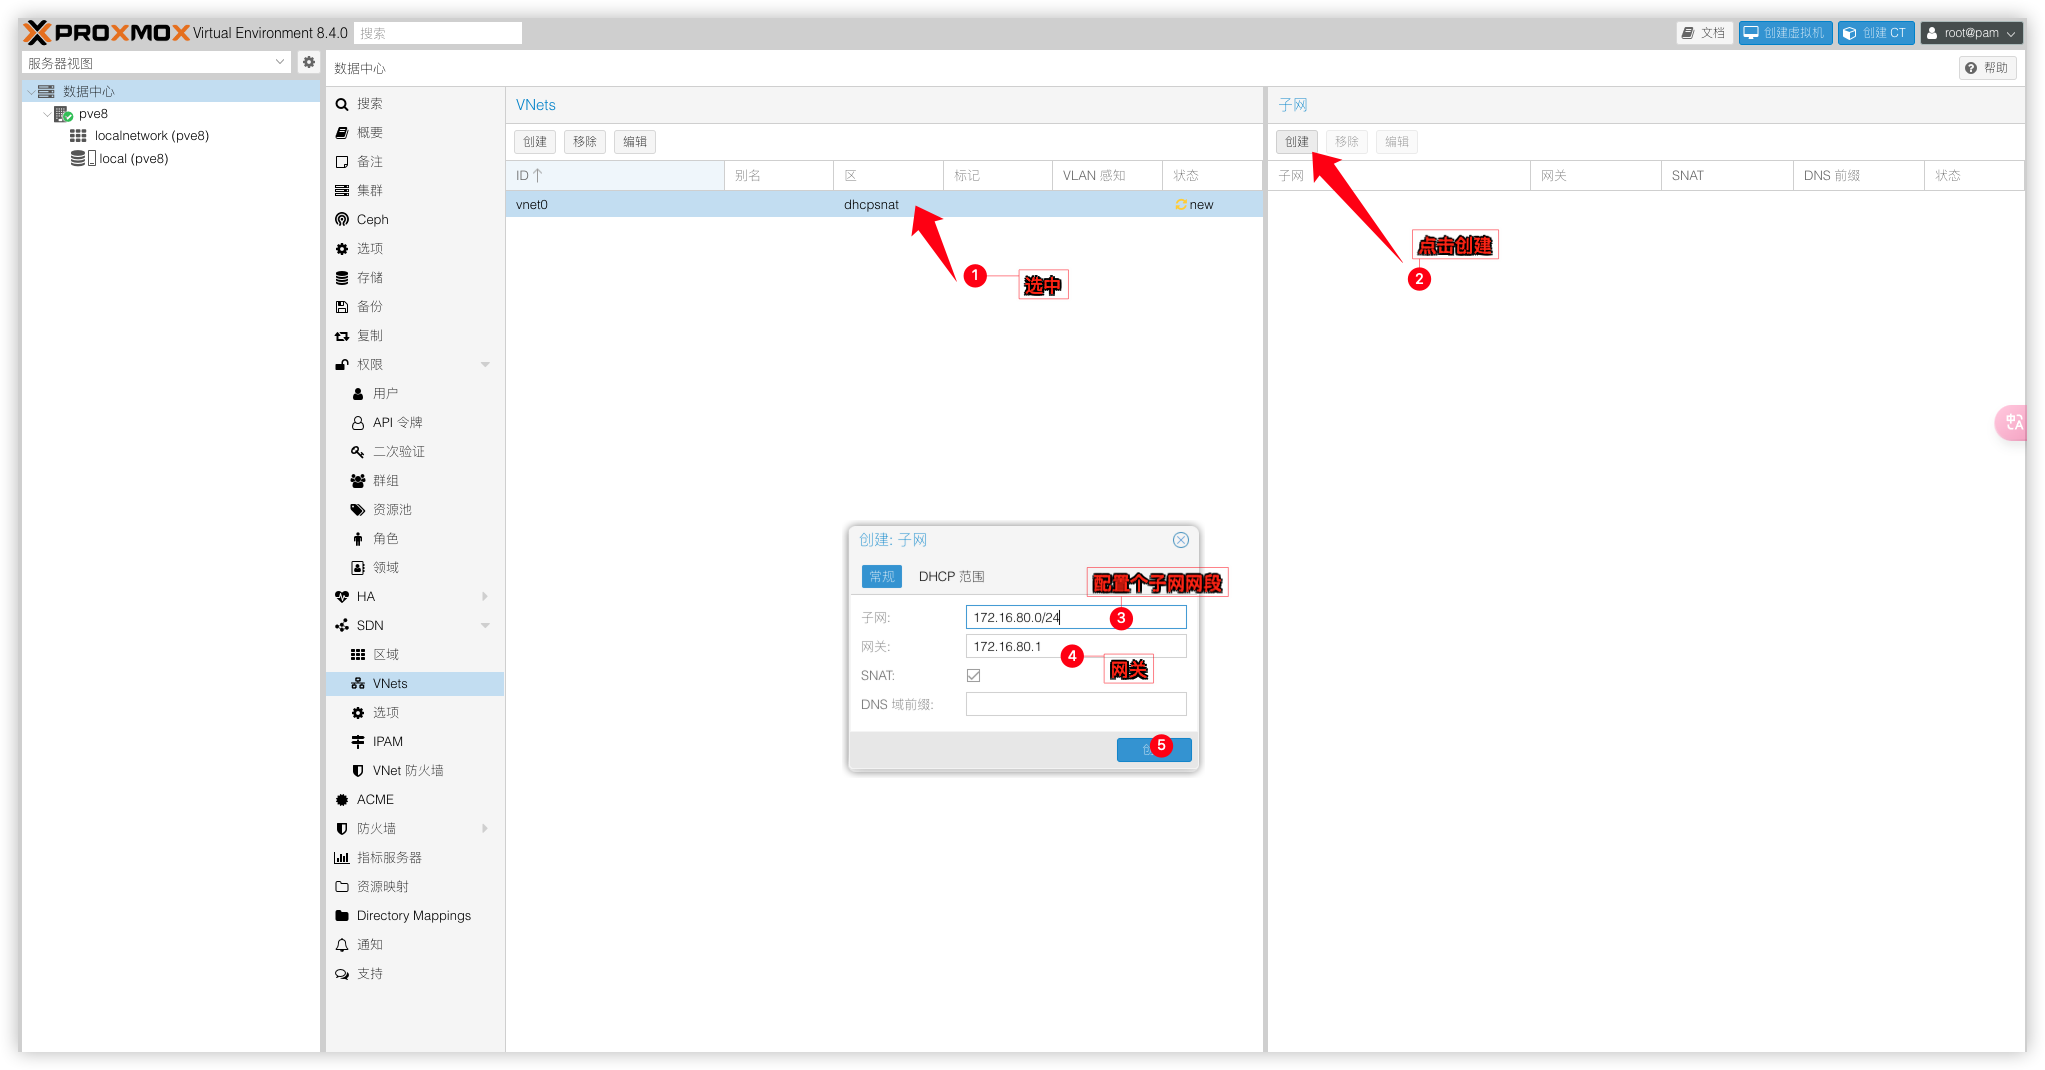
配置DHCP范围
步骤:数据中心 → SDN → Vnets → 选中创建好的VNet → 选中子网 → DHCP范围 → 添加IP范围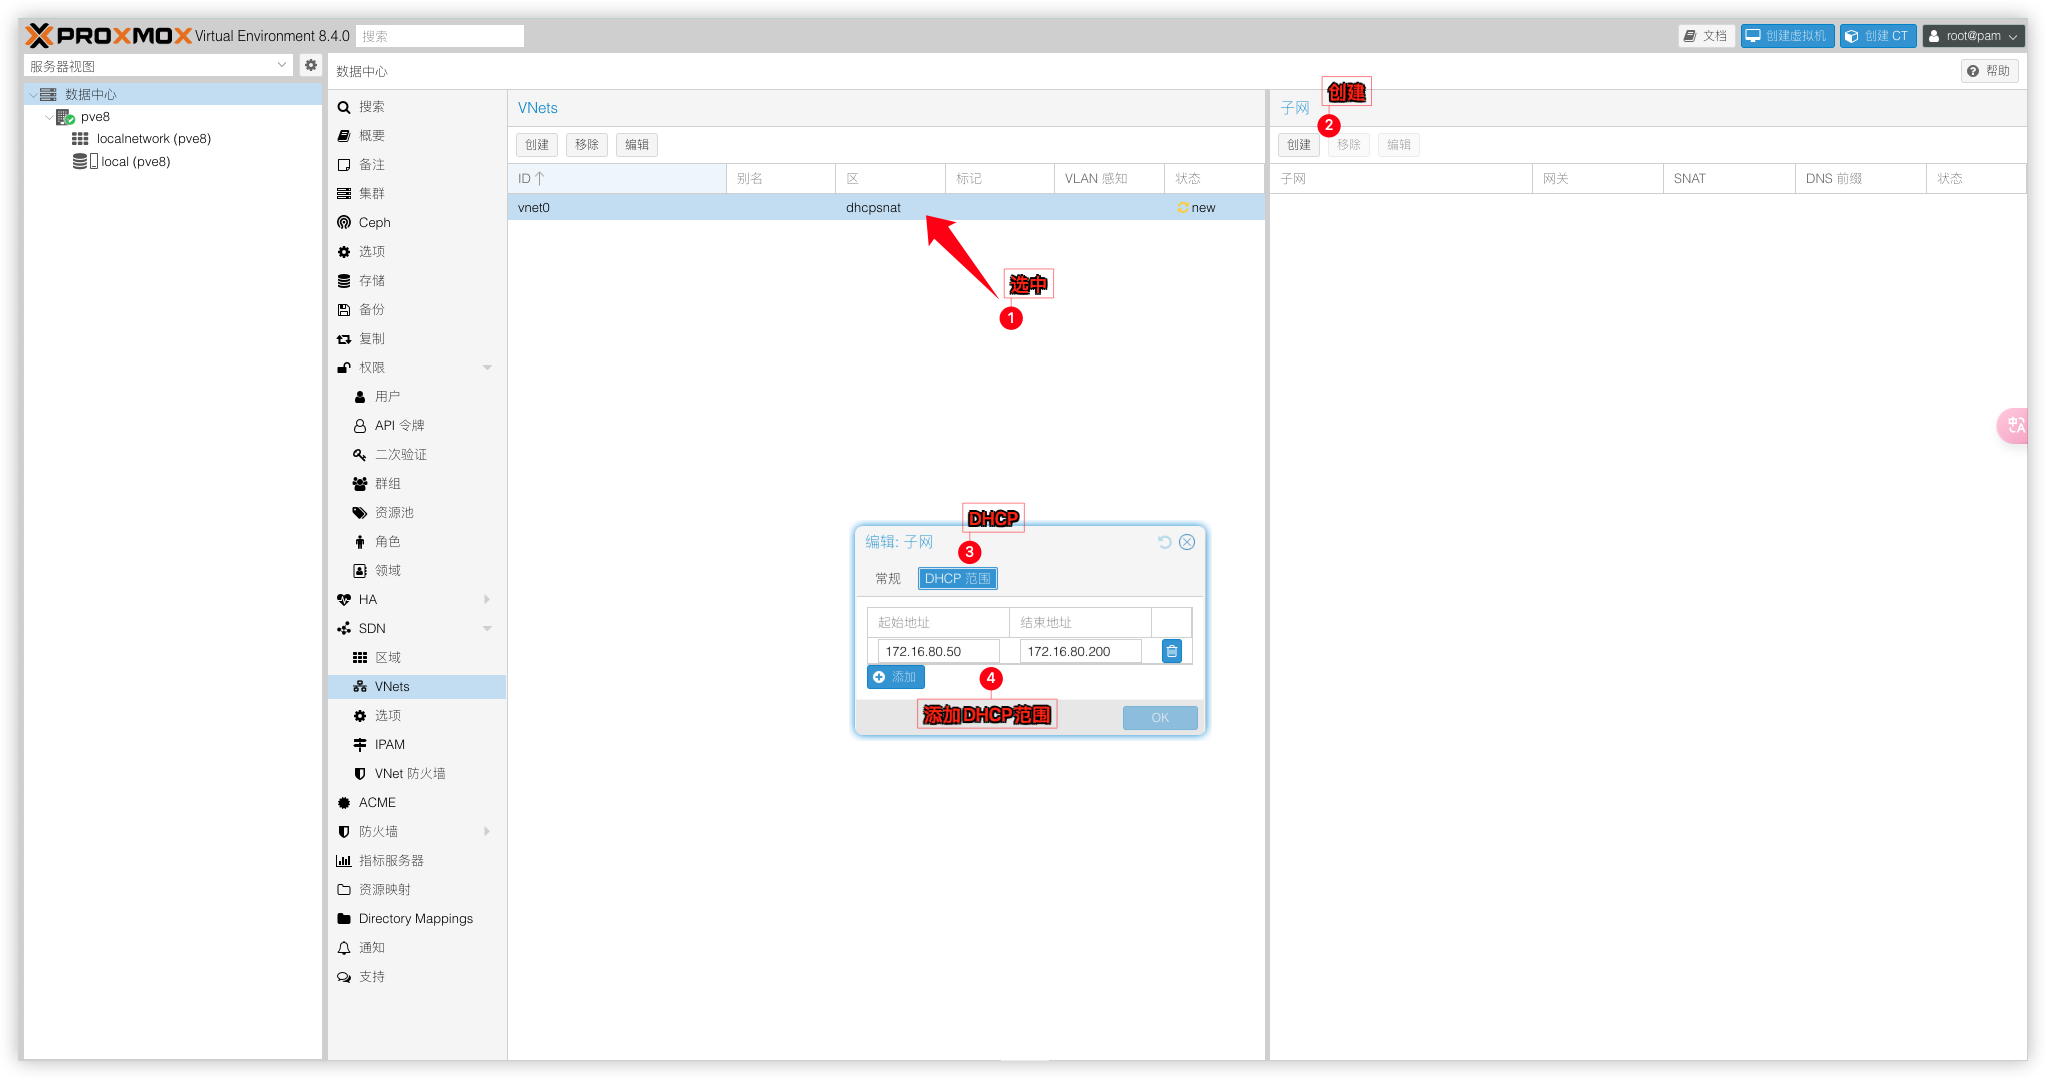
都已设置完毕,我们需要应用更改。在SDN面板并单击“应用”来完成。确保网络重新加载任务成功完成。如果它完成且没有任何错误或警告,您应该能够使用新创建的 VNet。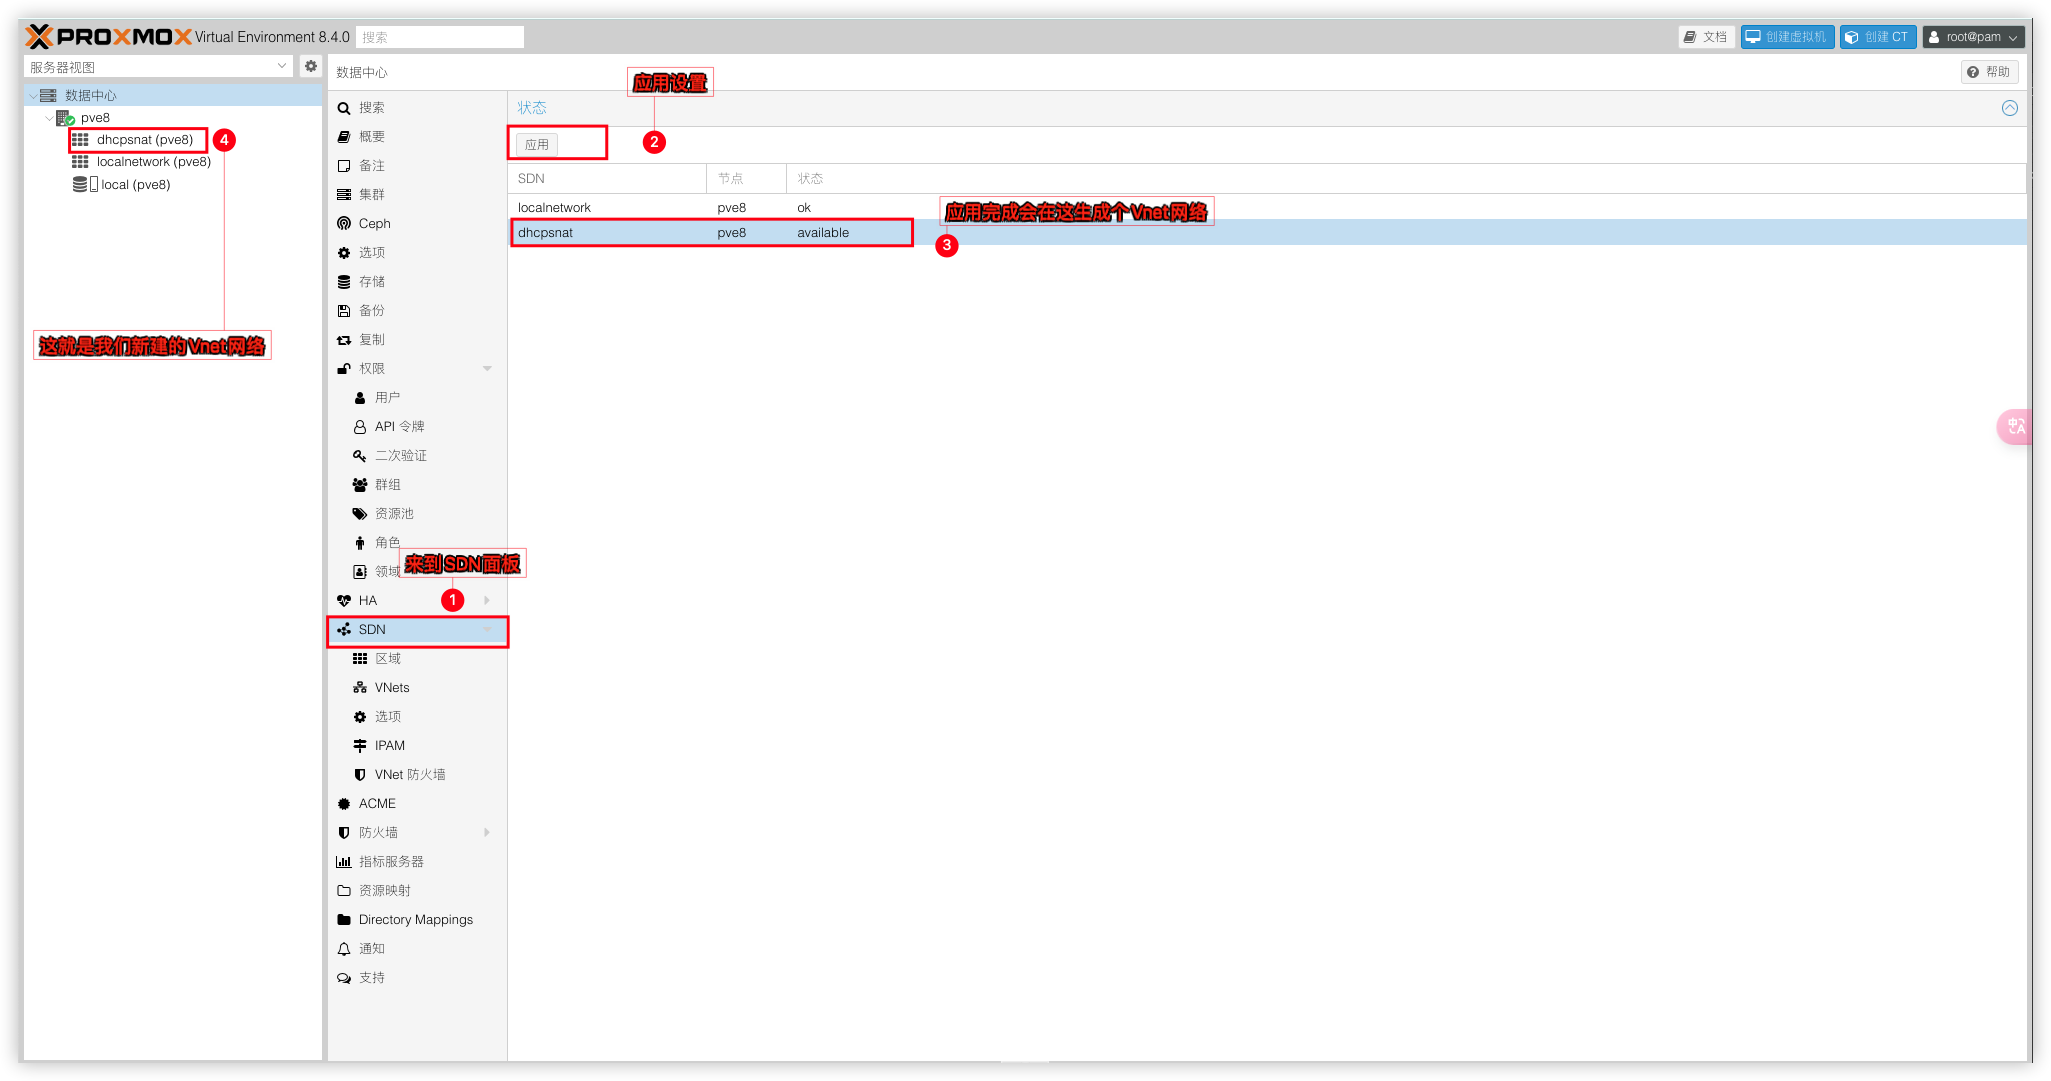
配置防火墙
如果使用 PVE 防火墙,则还需要在 VNet 接口上允许 DHCP 转发和 DNS 流量。否则,您的访客将无法联系 dnsmasq 进行 DHCP 租约和 DNS 查询。为此,请向数据中心防火墙添加两个规则:一个用于 DNS 查询,另一个用于 DHCP 转发。这两个规则都应使用方向 “in”、作 “ACCEPT” 和 VNet 名称作为接口名称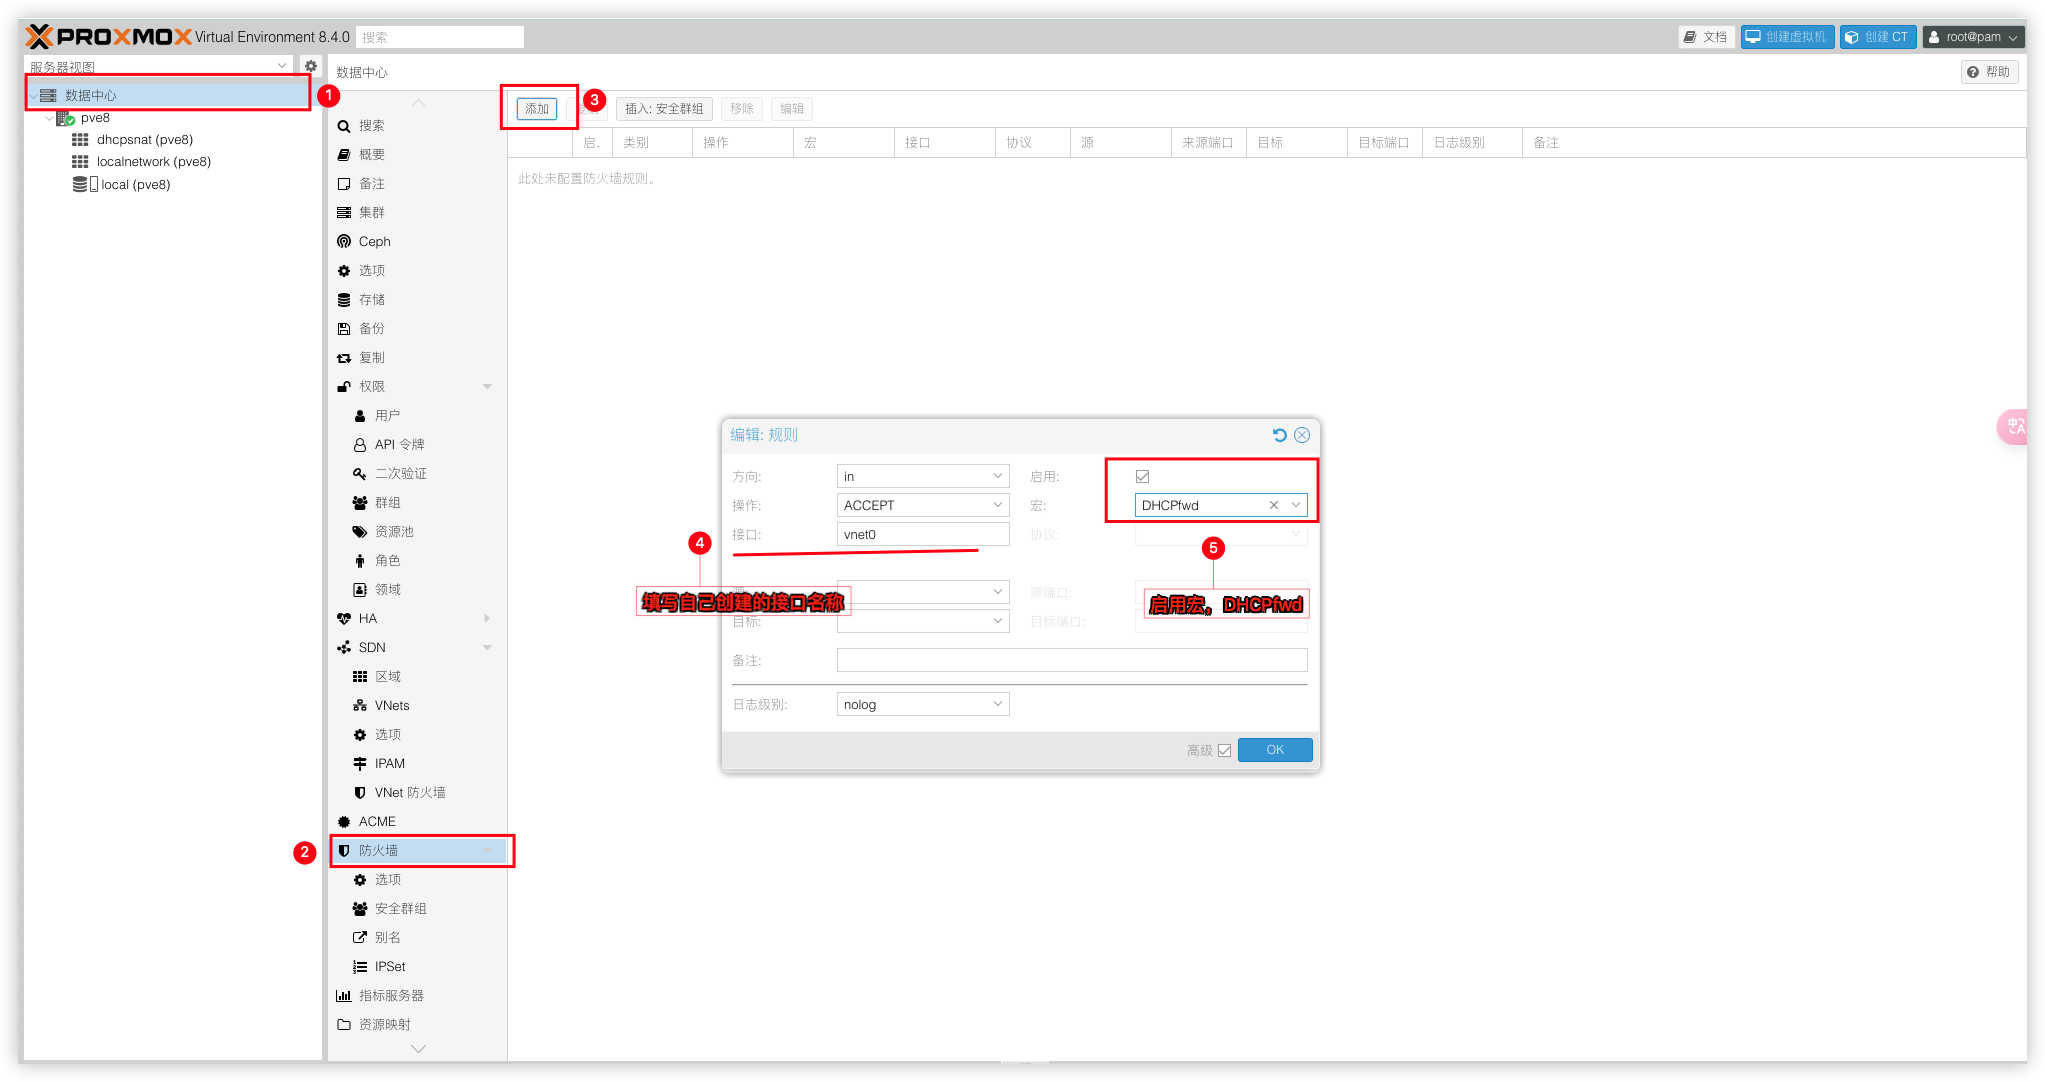
对于 DNS 规则,您还应将目标地址设置为网络网关。这只允许 dnsmasq 服务器的 DNS 流量。如果您不设置它,则将允许所有 DNS 流量,这可用于规避其他防火墙规则。不能以相同的方式限制 DHCP,因为它需要首先能够发出广播消息。最后,将两者标记为已启用并保存规则。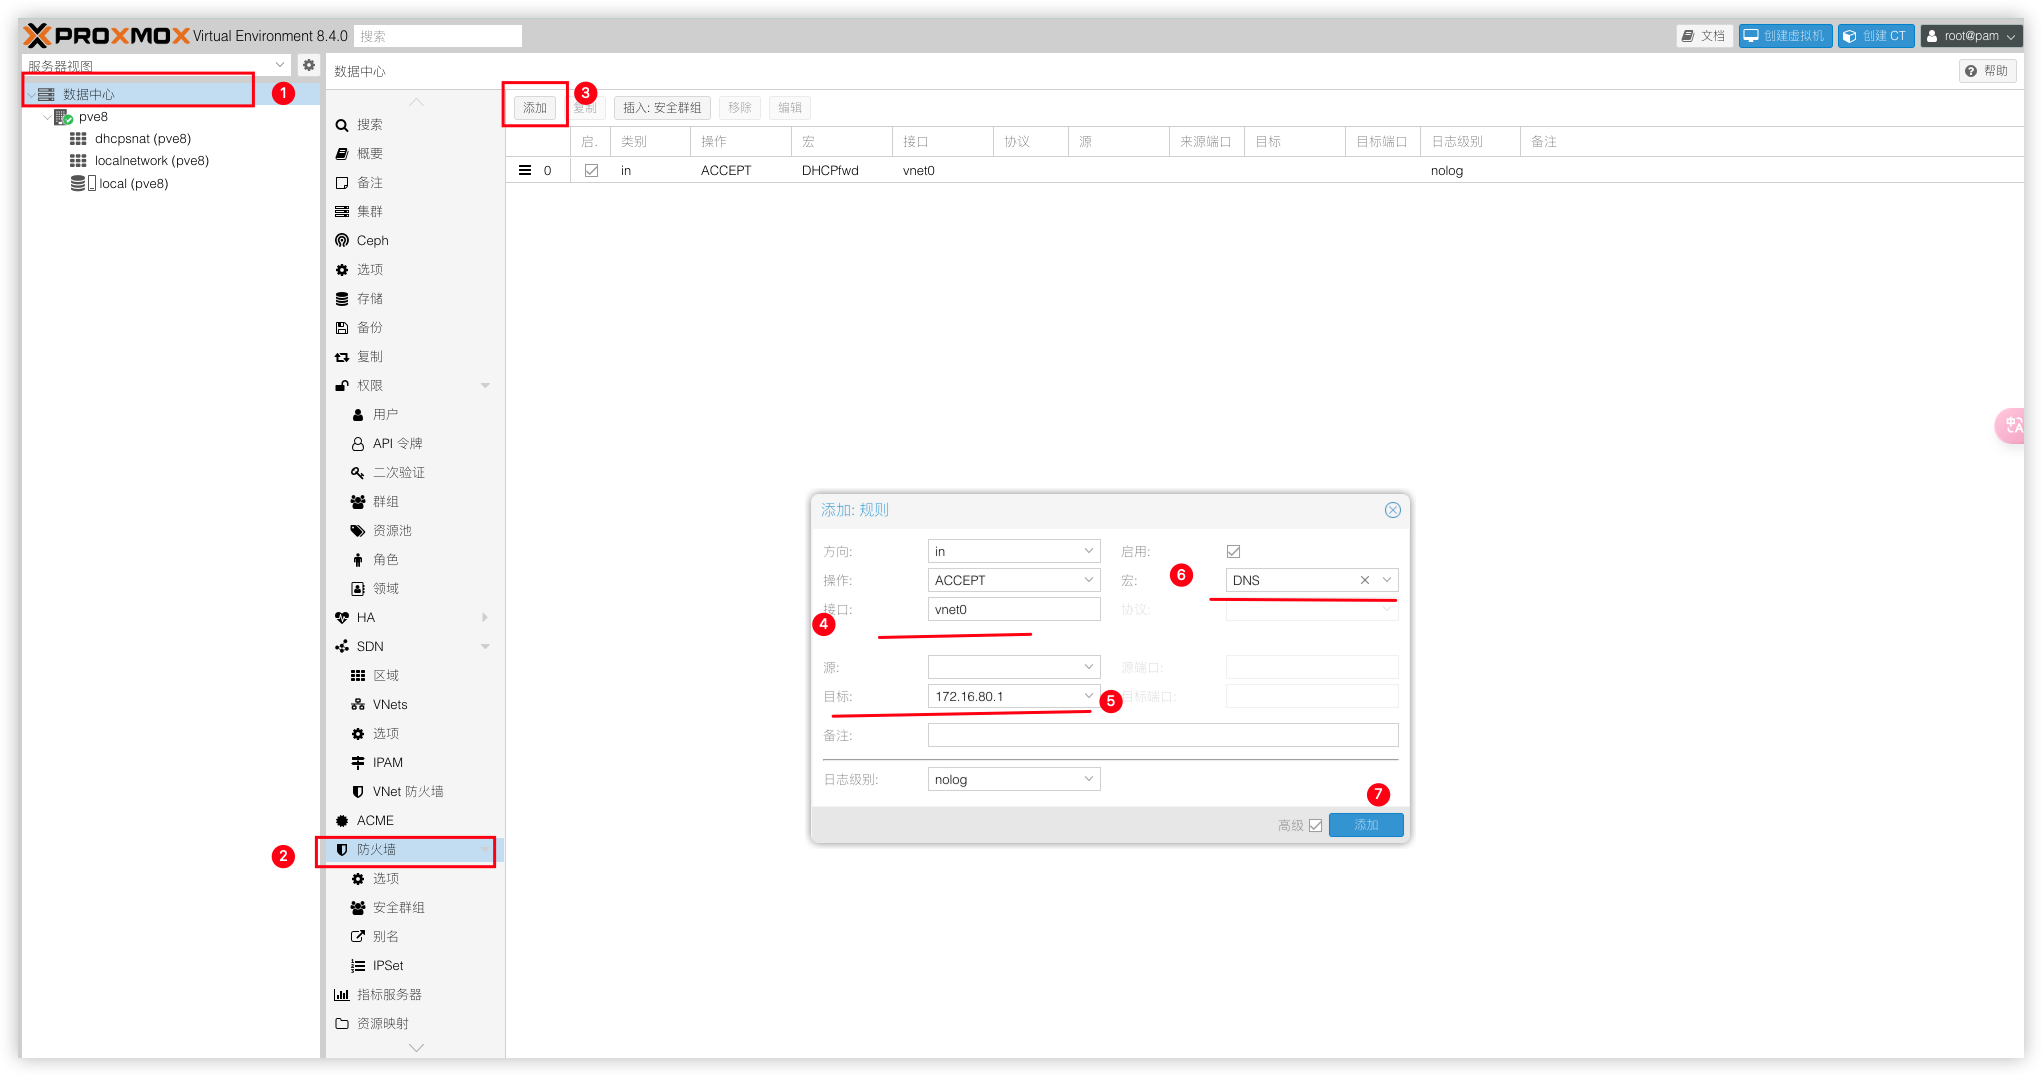
创建LXC容器验证上网
创建虚拟机或者容器配置网络时,记得选择VNet作为网桥,并将IPv4设置为 DHCP,获取的IP段取决于您配置的子网。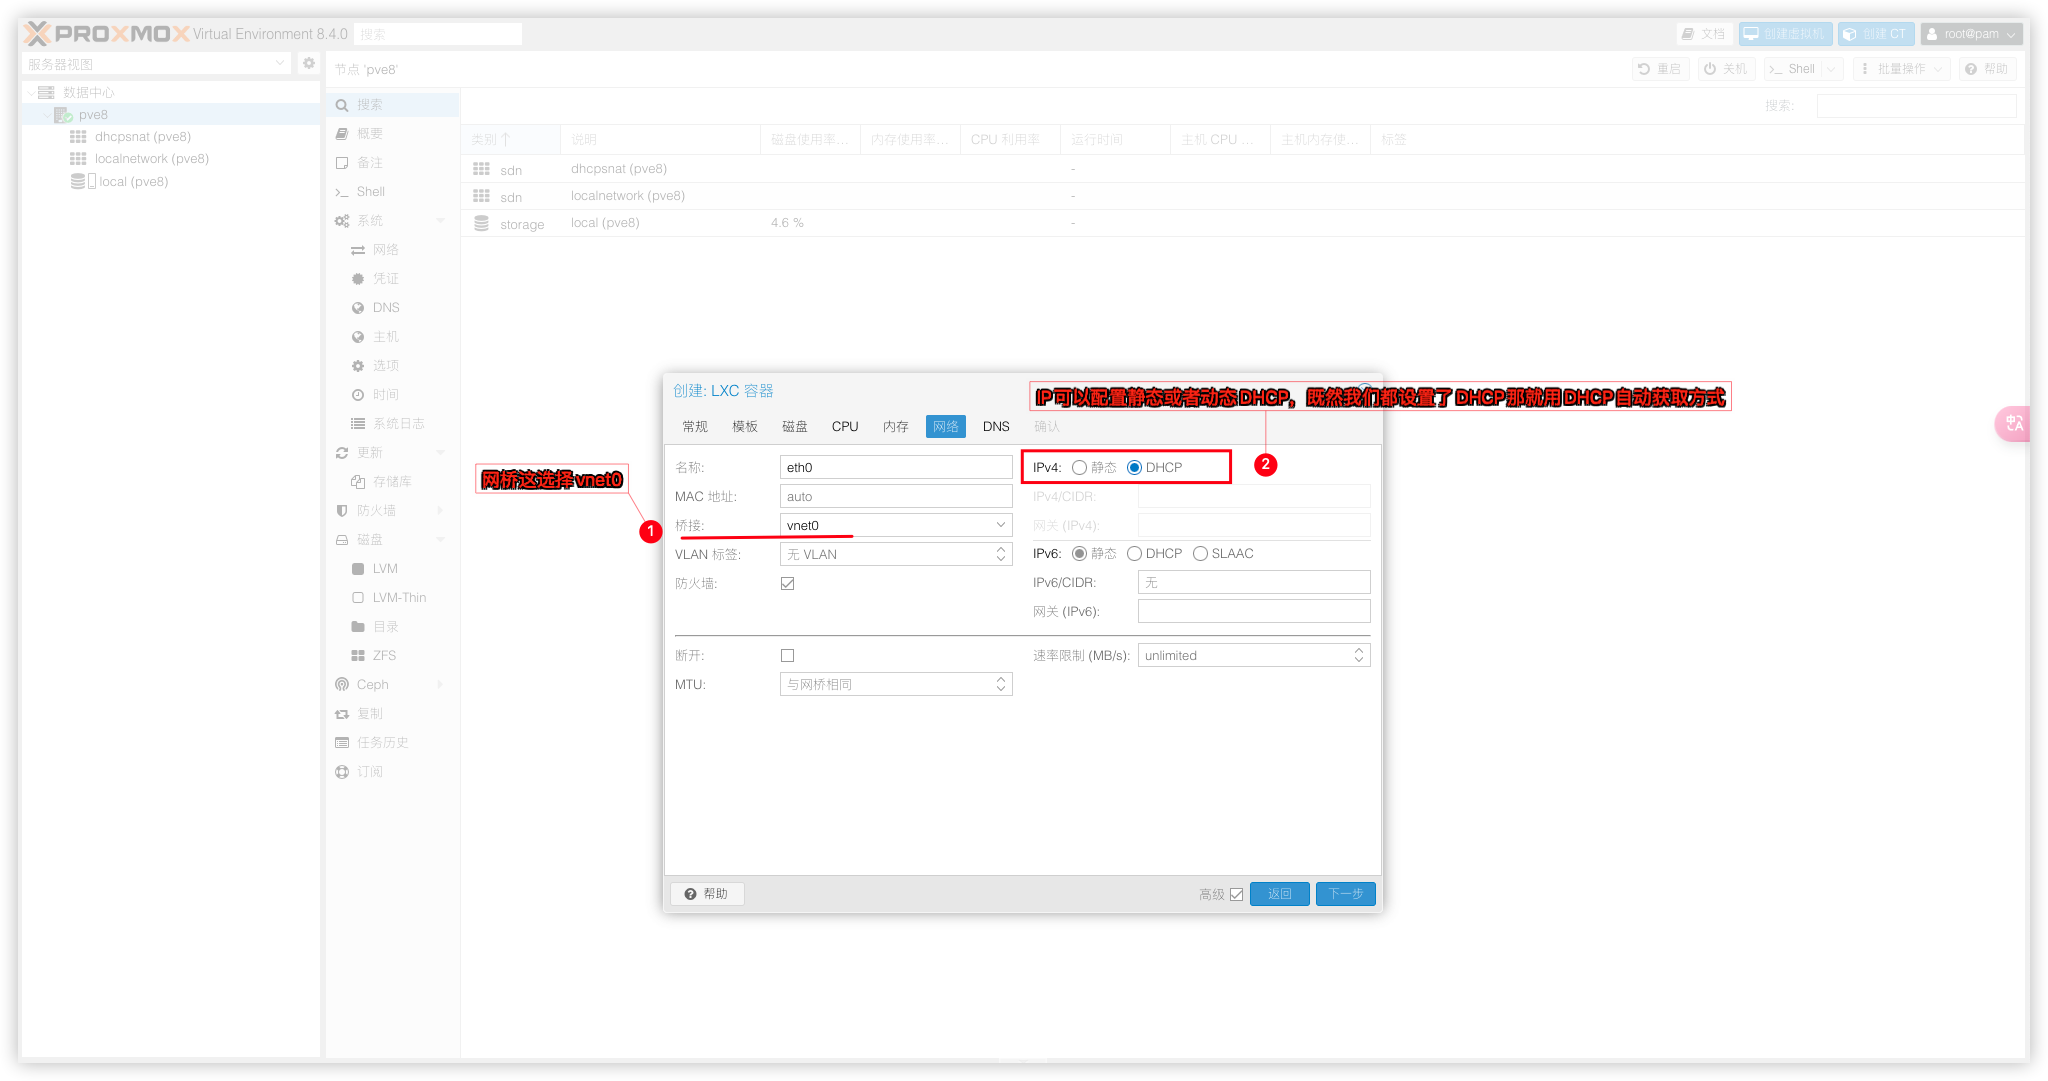
访问外网成功
自定义DNS
Dnsmasq还可以为整个VNet提供DNS。如果要为VNet配置自定义DNS服务器,则需要通过编辑文件 /etc/pve/sdn/subnets.cfg并设置dhcp-dns-server配置来完成。
使用nano命令编辑nano /etc/pve/sdn/subnets.cfg,在里面加入一行dhcp-dns-server 8.8.8.8即可。
subnet: dhcpsnat-172.16.80.0-24
        vnet vnet0
        dhcp-range start-address=172.16.80.50,end-address=172.16.80.200
        gateway 172.16.80.1
        dhcp-dns-server 8.8.8.8
        snat 1
Socat端口转发
LXC容器目前只能在局域网下访问使用,还得做个端口转发才能外部访问。通过socat端口转发将容器IP映射到VPS的公网ipv4上。
PVE预装了socat端口转发工具,只需要写入规则即可。
LXC容器信息
IP:172.16.80.99
ssh端口:22
转发TCP协议(在PVE Shell执行)
使用nohup命令后台侦听本机22222端口,并连接LXC容器172.16.80.99:22的TCP端口将日志输出到/root/socat.log
nohup socat TCP4-LISTEN:22222,reuseaddr,fork TCP4:172.16.80.99:22 >> /root/socat.log 2>&1 &转发UDP协议(在PVE Shell执行)
使用nohup命令后台侦听本机22222端口,并连接LXC容器172.16.80.99:22的UDP端口将日志输出到/root/socat.log
nohup socat -T 600 UDP4-LISTEN:22222,reuseaddr,fork UDP4:172.16.80.99:22 >> /root/socat.log 2>&1 &配置开机自启
执行以上规则,重启PVE就失效了,所以将规则写入开机自启让其永久生效。
创建rc-local.service自启服务
echo "[Unit]
Description=/etc/rc-local
ConditionPathExists=/etc/rc-local

[Service]
Type=forking
ExecStart=/etc/rc-local start
TimeoutSec=0
StandardOutput=tty
RemainAfterExit=yes
SysVStartPriority=99

[Install]
WantedBy=multi-user.target
" > /etc/systemd/system/rc-local.service
编辑rc-local文件
nano /etc/rc-local写入以下内容,并把容器需要转发的规则写入进来。
#!/bin/sh -e
#
# rc.local
#
# This script is executed at the end of each multiuser runlevel.
# Make sure that the script will "exit 0" on success or any other
# value on error.
#
# In order to enable or disable this script just change the execution
# bits.
#
# By default this script does nothing.
# 转发TCP协议
nohup socat TCP4-LISTEN:22222,reuseaddr,fork TCP4:172.16.80.99:22 >> /root/socat.log 2>&1 &
# 转发UDP协议
nohup socat -T 600 UDP4-LISTEN:22222,reuseaddr,fork UDP4:172.16.80.99:22 >> /root/socat.log 2>&1 &
设置开机自启
# 授予可执行权限
chmod +x /etc/rc-local
# 设置开机启动
systemctl enable rc-local.service
systemctl start rc-local.service
到这里就能愉快的用上LXC容器了,折腾结束。
iptables端口转发
除了用Socat端口转发外,也可以使用Iptables进行转发,支持TCP/UDP和端口范围转发。
安装iptables
apt update && apt install iptables iproute2 iptables-persistent启用转发
永久生效需修改 /etc/sysctl.conf,设置 net.ipv4.ip_forward=1 并运行 sysctl -p
echo 1 > /proc/sys/net/ipv4/ip_forward添加端口转发规则(DNAT)
单个端口转发
DNAT 规则
# 外部端口22转发到172.16.80.99:22(tcp)
iptables -t nat -A PREROUTING -p tcp --dport 22 -j DNAT --to-destination 172.16.80.99:22
# 外部端口22转发到172.16.80.99:22(udp)
iptables -t nat -A PREROUTING -p udp --dport 22 -j DNAT --to-destination 172.16.80.99:22
允许转发流量
iptables -A FORWARD -p tcp -d 172.16.80.99 --dport 22 -j ACCEPT
iptables -A FORWARD -p udp -d 172.16.80.99 --dport 22 -j ACCEPT
SNAT 规则(内网返回数据)
iptables -t nat -A POSTROUTING -p tcp -d 172.16.80.99 --dport 22 -j SNAT --to-source 172.16.80.1
iptables -t nat -A POSTROUTING -p udp -d 172.16.80.99 --dport 22 -j SNAT --to-source 172.16.80.1
保存规则
netfilter-persistent save端口范围转发
DNAT 规则
# 外部端口5000-6000转发到172.16.80.99:5000:6000(tcp)
iptables -t nat -A PREROUTING -p tcp --dport 5000:6000 -j DNAT --to-destination 172.16.80.99:5000-6000
# 外部端口5000-6000转发到172.16.80.99:5000:6000(udp)
iptables -t nat -A PREROUTING -p udp --dport 5000:6000 -j DNAT --to-destination 172.16.80.99:5000-6000
允许转发流量
iptables -A FORWARD -p tcp -d 172.16.80.99 --dport 5000:6000 -j ACCEPT
iptables -A FORWARD -p udp -d 172.16.80.99 --dport 5000:6000 -j ACCEPT
SNAT 规则(内网返回数据)
iptables -t nat -A POSTROUTING -p tcp -d 172.16.80.99 --dport 5000:6000 -j SNAT --to-source 172.16.80.1
iptables -t nat -A POSTROUTING -p udp -d 172.16.80.99 --dport 5000:6000 -j SNAT --to-source 172.16.80.1
保存规则
netfilter-persistent save