在ESXI 8.0下使用NVIDIA vGPU19.0显卡虚拟化拆分技术---应用于Windows/Ubuntu系统
来更新一篇ESXI版本的NVIDIA vGPU教程,本次用到的版本是ESXI8.0,由于ESXI9.0的授权模式变为了订阅制且放弃了中文语言,无法再用【神秘代码】激活白嫖了。所以白嫖党停留到了ESXI8,富哥们可以使用ESXI9.0,安装方式是一样的。
本次演示的NVIDIA vGPU 版本是19.0版本,这个版本也是最后一个支持老架构的vGPU显卡了,以后的版本只会支持Ampere/Ada/Blackwell架构及其他新架构GPU卡。
由于NVIDIA vGPU相关设置都需要在vCenter操作,所以还需要安装VCSA,需要将ESXI主机加入到vCenter进行管理,才能完整使用vGPU。
硬件配置
| 配置 | 型号 |
|---|---|
| ESXI版本 | ESXI 8.0U2-22380479 |
| VCSA版本 | VCSA 8.0.2-22617221 |
| 主板 | 技嘉 Z370 HD3 大板 |
| CPU | Intel(R) CC150 CPU @ 3.50GHz 8核16线程 |
| 内存 | 64G DDR4 |
| 显卡 | NVIDIA L4 |
| NVIDIA vGPU驱动 | 580.65.05 |
点我展开
适用于vGPU显卡型号和支持的版本,后续更新可以前往官网查询:https://docs.nvidia.com/vgpu/gpus-supported-by-vgpu.html
| GPU架构 | GPU名称 | 首个支持的版本 | 最后支持的版本 |
|---|---|---|---|
| Maxwell | Tesla M10 | 4.0 | 19.x |
| Maxwell | Tesla M60 | 2.0 | 16.x |
| Maxwell | Tesla M6 | 2.0 | 16.x |
| Pascal | Tesla P100 | 5.0 | 16.x |
| Pascal | Tesla P40 | 5.0 | 16.x |
| Pascal | Tesla P4 | 5.0 | 16.x |
| Pascal | Tesla P6 | 5.0 | 16.x |
| Volta | Tesla V100 | 6.0 | 19.x |
| Turing | Quadro RTX 6000 | 8.0 | 19.x |
| Turing | Quadro RTX 6000 passive | 10.0 | 19.x |
| Turing | Quadro RTX 8000 | 8.0 | 19.x |
| Turing | Quadro RTX 8000 passive | 10.0 | 19.x |
| Turing | Tesla T4 | 7.1 | 待定 |
| Ampere | NVIDIA A2 | 14.0 | 待定 |
| Ampere | NVIDIA A10 | 12.2 | 待定 |
| Ampere | NVIDIA A16 | 13.0 | 待定 |
| Ampere | NVIDIA A40 | 12.0 | 待定 |
| Ampere | NVIDIA RTX A5000 | 12.2 | 待定 |
| Ampere | NVIDIA RTX A5500 | 14.0 | 待定 |
| Ampere | NVIDIA RTX A6000 | 12.0 | 待定 |
| Ada | NVIDIA L2 | 16.3 | 待定 |
| Ada | NVIDIA L4 | 15.2 | 待定 |
| Ada | NVIDIA L20 | 16.3 | 待定 |
| Ada | NVIDIA L40 | 15.2 | 待定 |
| Ada | NVIDIA L40S | 16.1 | 待定 |
| Ada | NVIDIA RTX 5000 Ada | 16.1 | 待定 |
| Ada | NVIDIA RTX 5880 Ada | 17.0 | 待定 |
| Ada | NVIDIA RTX 6000 Ada | 15.2 | 待定 |
| Blackwell | NVIDIA RTX PRO 6000 | 19.0 | 待定 |
NVIDIA vGPU Host 驱动安装
进入维护模式
1)在ESXI界面开启SSH服务,并进入维护模式(把ESXI里运行的虚拟机关闭电源否则无法进入维护模式)后面要通过SSH工具登录到ESXI后台安装驱动
2)将下载下来的NVIDIA VGPU驱动进行解压,把Host_Drivers文件夹里的nvd-gpu-mgmt-daemon_580.65.05-0.0.0000.zip和NVD-VGPU-800_580.65.05-1OEM.800.1.0.20613240.zip并上传到ESXI的/tmp路径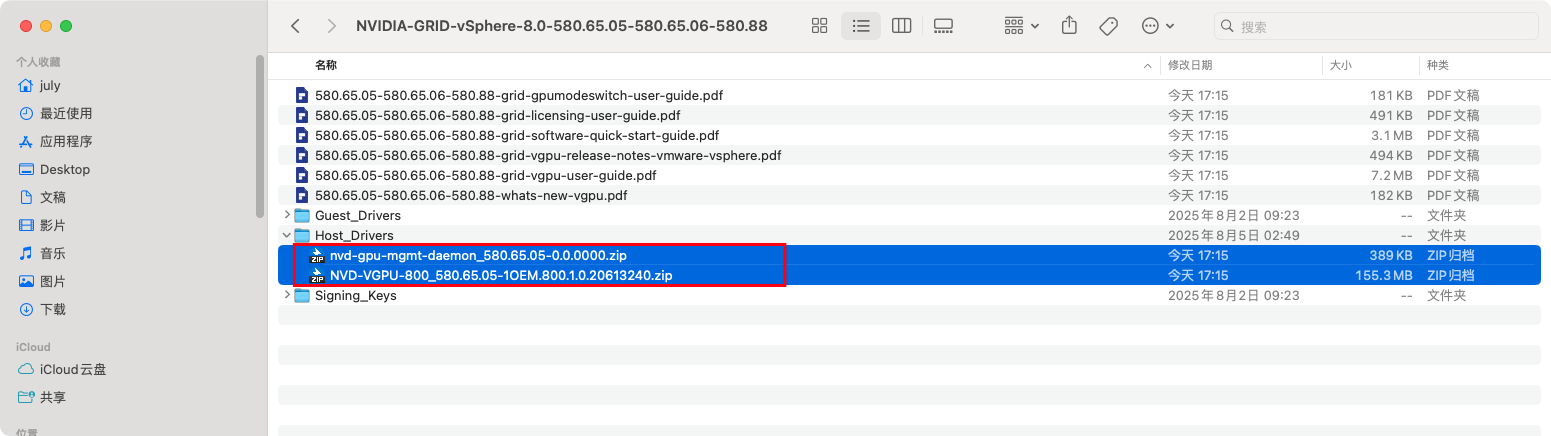
安装vGPU host驱动
1)通过SSH工具登录到ESXI,安装NVIDIA vGPU host驱动
# 安装 NVD-VGPU-800_580.65.05-1OEM.800.1.0.20613240.zip
esxcli software component apply -d /tmp/NVD-VGPU*.zip
# 安装 nvd-gpu-mgmt-daemon_580.65.05-0.0.0000.zip
esxcli software component apply -d /tmp/nvd-gpu-mgmt-daemon*.zip
# 安装完成后,执行重启
reboot
2)安装记录如下:
Last login: Sat Aug 17 23:47:48 on ttys001
july@JulysiMac ~ % ssh root@10.10.10.251
(root@10.10.10.251) Password:
The time and date of this login have been sent to the system logs.

WARNING:
   All commands run on the ESXi shell are logged and may be included in
   support bundles. Do not provide passwords directly on the command line.
   Most tools can prompt for secrets or accept them from standard input.

VMware offers powerful and supported automation tools. Please
see https://developer.vmware.com for details.

The ESXi Shell can be disabled by an administrative user. See the
vSphere Security documentation for more information.
[root@ESXI8:~] ls /tmp
NVD-VGPU-800_580.65.05-1OEM.800.1.0.20613240.zip  vmware-root
nvd-gpu-mgmt-daemon_580.65.05-0.0.0000.zip        vmware-uid_0
[root@ESXI8:~] esxcli software component apply -d /tmp/NVD-VGPU*.zip
Installation Result
   Message: Operation finished successfully.
   Components Installed: NVD-VGPU-800_580.65.05-1OEM.800.1.0.20613240
   Components Removed:
   Components Skipped:
   Reboot Required: false
   DPU Results:
[root@ESXI8:~] esxcli software component apply -d /tmp/nvd-gpu-mgmt-daemon*.zip
Installation Result
   Message: The update completed successfully, but the system needs to be rebooted for the changes to be effective.
   Components Installed: nvd-gpu-mgmt-daemon_580.65.05-0.0.0000
   Components Removed:
   Components Skipped:
   Reboot Required: true
   DPU Results:
[root@ESXI8:~] reboot
[root@ESXI8:~] Connection to 10.10.10.251 closed by remote host.
Connection to 10.10.10.251 closed.
3) 重启后执行nvidia-smi命令来验证驱动是否正常,输出类似如下信息:
[root@ESXI8:~] nvidia-smi
Sat Aug 17 16:14:41 2024
+-----------------------------------------------------------------------------------------+
| NVIDIA-SMI 580.65.05              Driver Version: 580.65.05      CUDA Version: N/A      |
+-----------------------------------------+------------------------+----------------------+
| GPU  Name                 Persistence-M | Bus-Id          Disp.A | Volatile Uncorr. ECC |
| Fan  Temp   Perf          Pwr:Usage/Cap |           Memory-Usage | GPU-Util  Compute M. |
|                                         |                        |               MIG M. |
|=========================================+========================+======================|
|   0  NVIDIA L4                      On  |   00000000:01:00.0 Off |                  N/A |
| 24%   54C    P8              26W / 75W       25MiB /  24576MiB   |      0%      Default |
|                                         |                        |                  N/A |
+-----------------------------------------+------------------------+----------------------+

+---------------------------------------------------------------------------------------+
| Processes:                                                                            |
|  GPU   GI   CI        PID   Type   Process name                            GPU Memory |
|        ID   ID                                                             Usage      |
|=======================================================================================|
|    0   N/A  N/A   1050448      G   Xorg                                          4MiB |
|    1   N/A  N/A   1050467      G   Xorg                                          4MiB |
+---------------------------------------------------------------------------------------+
4)确认驱动正常没有问题后退出维护模式(在UI界面或者使用命令退出都行),并将ESXI接入到vCenter进行管理。
# 命令退出维护模式
esxcli system maintenanceMode set --enable false
VCSA开启vGPU设置
图形设备设置
vGPU相关设置都需要在vCenter进行,所以得把ESXI主机接入到vCenter。登录到vCenter将显卡和ESXI主机从默认的共享类型(VSGA)改为直接共享类型(SR-IOV)步骤:vCenter → ESXI主机 → 配置 → 图形 → 图形设备 → 编辑 → 直接共享 → vGPU模式 → 混合大小 → 确定
命令下开启混合大小模式:
一些VCSA版本过低的话,在页面上是没有vGPU模式选项的,那么可以在Esxi ssh里用命令开启,重启也不会失效。
# 开启混合大小模式,把下边的device-id值改为自己显卡实际所在的PCI设备地址
esxcli graphics device set --device-id=0000:06:00.0 --type SharedPassthru --vgpu-mode=MixedSize
# 刷新让其生效
esxcli graphics host refresh
# 查看是否处于混合大小模式
esxcli graphics device list
# 输出如下结果说明混合大小模式以开启
0000:06:00.0
   Vendor Name: NVIDIA Corporation
   Device Name: Tesla L4
   Module Name: nvidia
   Graphics Type: SharedPassthru MixedSize
vGPU模式
从vGPU 18版本开始,vGPU模式支持相同大小模式和混合大小模式。相同大小模式: 如其中一台虚拟机选了nvidia_l4-4q模型后,后面的虚拟机都将只能使用了nvidia_l4-4q模型,相同大小模式。
混合大小模式: 如其中一台虚拟机选了nvidia_l4-4q模型后,后面的虚拟机既可以使用nvidia_l4-4q模型又可以使用其他模型,混合大小模式。
主机图形设置
步骤:vCenter → ESXI主机 → 配置 → 图形 → 主机图形 → 编辑 → 直接共享 → 确定
共享GPU分配策略
GPU分配策略有2种模式,最佳性能模式和GPU整合模式。最佳性能模式:最大化利用所有GPU资源,避免单块GPU过载;适用AI推理、实时渲染、科学计算的用户
GPU整合模式:先填满一块GPU,再开始使用下一块;适用测试或开发环境,面向于对性能要求不高的用户

然后就可以在虚拟机配置文件添加vGPU设备了,选择添加PCI设备,然后选择自己要使用的模型

比如我这里给Ubuntu分配个24G显存,因为L4显卡总显存就24GB,如果把显存都分配给了这台虚拟机,那么其他虚拟机就没得用了,按自己需求给就行。
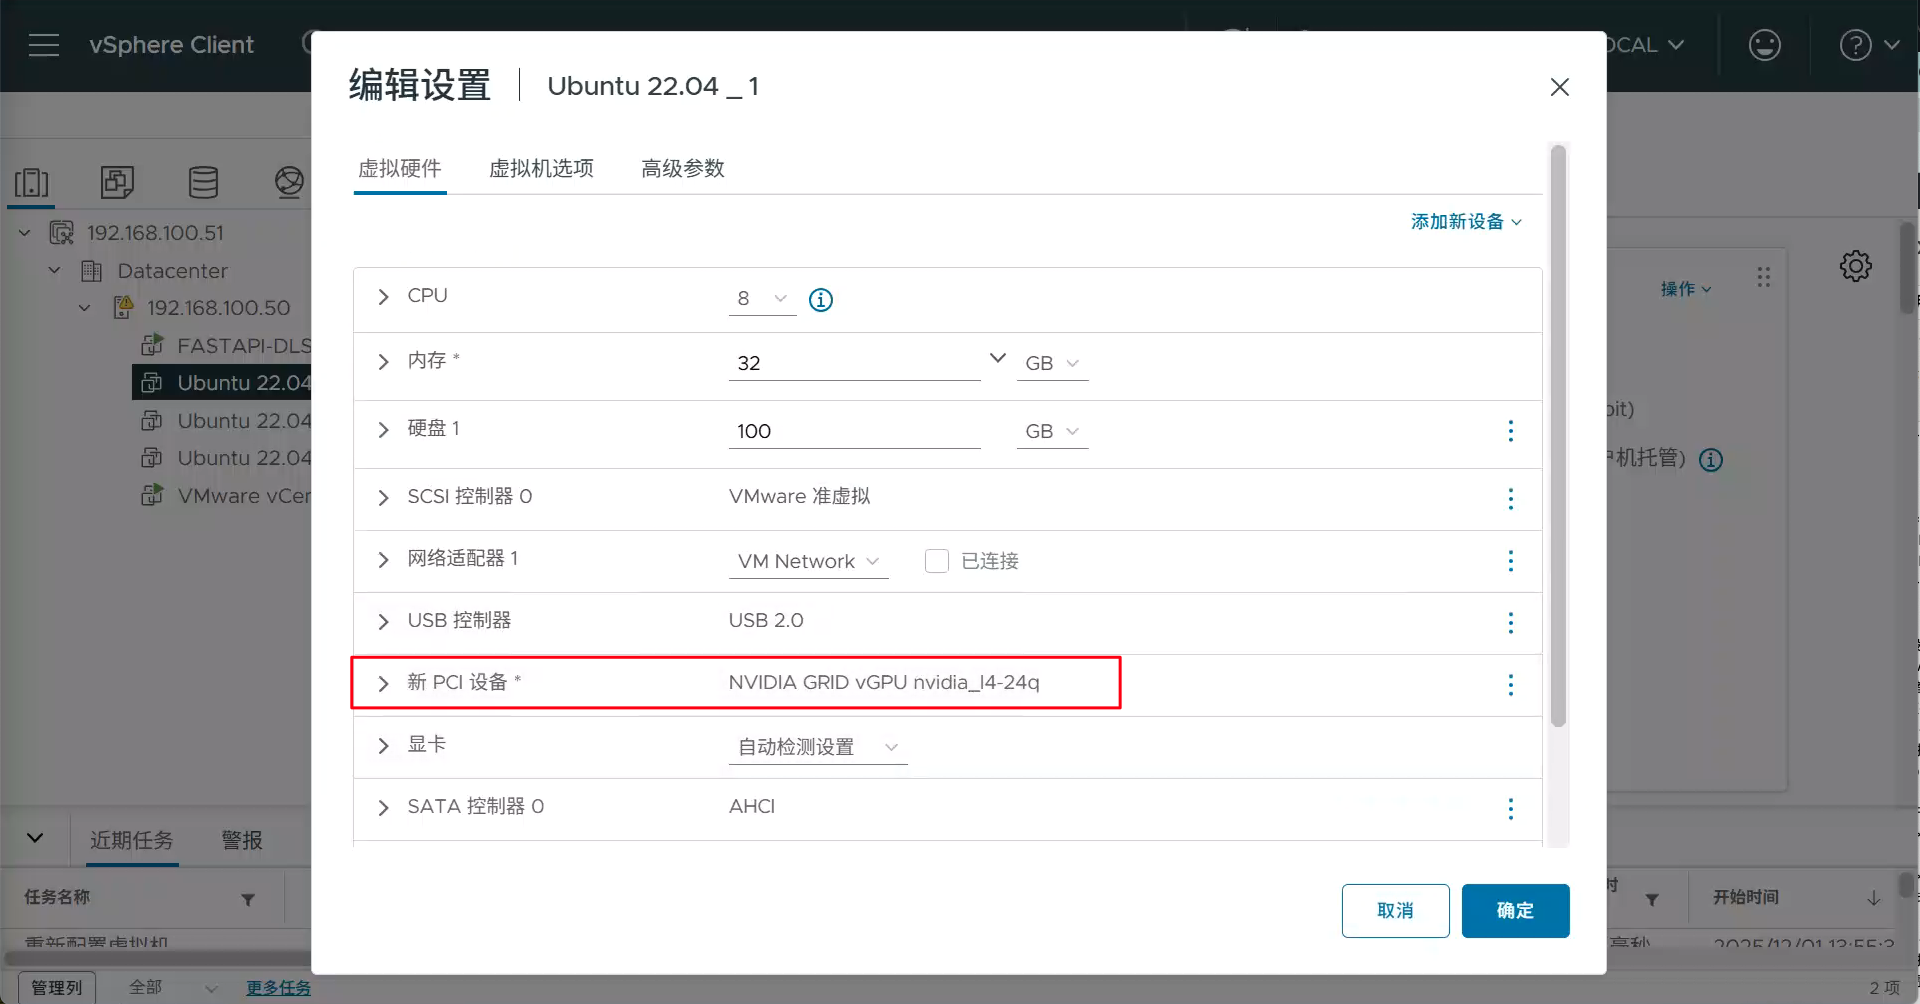
其中 NVIDIA GRID vGPU nvidia_l4-24q 是 mdev 的名字,nvidia_l4--显卡名,24--24G 显存,q 代表 vWS关于最后一位字母,如下:
A = Virtual Applications (vApps)适用于虚拟应用/共享桌面等场景B = Virtual Desktops (vPC)-适用于拥有标准PC应用程序、浏览器和多媒体的虚拟桌面。常用于办公场景Q = Virtual Workstations (vWS)-适用于专业级图形应用程序,如Al、深度学习和数据科学。性能最佳搭建fastapi-dls授权服务
NVIDIA vGPU并非免费产品,需要对vGPU驱动购买许可才能正常使用vGPU,这里我用的是开源社区fastapi-dls项目来取得90天的试用许可。你可以在ESXI上安装一个Ubuntu虚拟机,然后安装Docker来搭建fastapi-dls授权服务。
创建fastapi-dls授权服务
1)自行安装好Ubuntu虚拟机和Docker服务,然后执行以下指令创建fastapi-dls授权服务注意下边的IP 10.10.10.99改为自己虚拟机获取到的IP,虚拟机最好固定IP防止IP变动。
# 创建fastapi-dls授权服务
docker run --restart always --name fastapi-dls -d -e DLS_URL=10.10.10.99 -e DLS_PORT=443 -p 443:443 makedie/fastapi-dls:2.0.2
# 检查fastapi-dls容器是否正在运行
docker ps
检查fastapi-dls授权服务
1)fastapi-dls服务好后就可以通过浏览器尝试访问你的vGPU授权服务了。授权服务器地址:https://10.10.10.99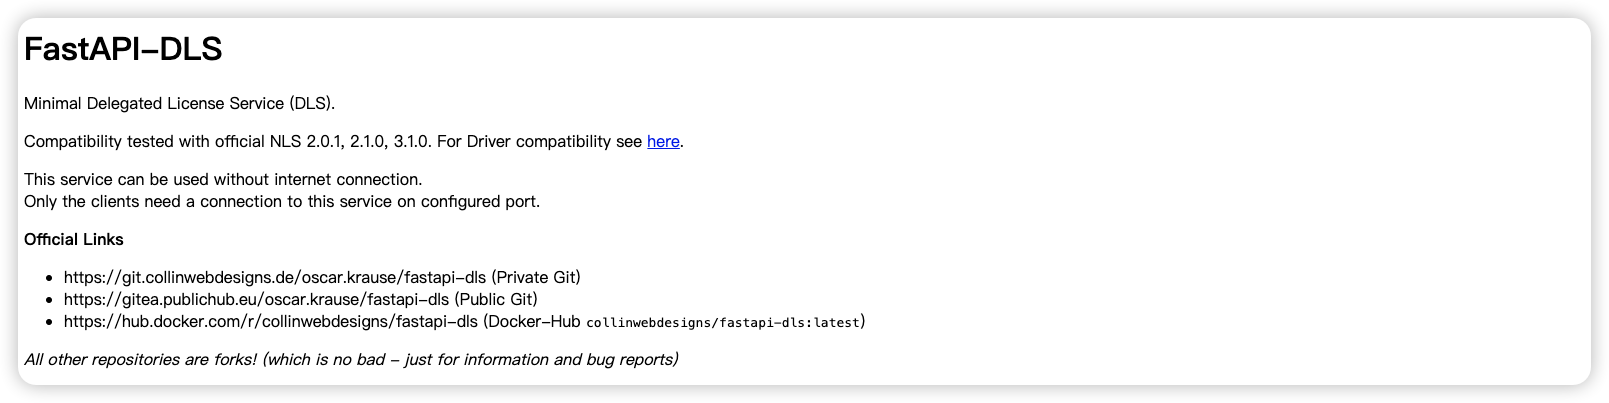
为虚拟机安装Guest驱动(Win11)
安装驱动
1)安装Win11虚拟机略过,自行在ESXI上安装好Win11虚拟机并安装好VM Tools工具。(如果你装的是Win10,则你的系统版本需要在22h2及以上才能正常使用vGPU。因为这是vGPU19.0版本的最低要求。)然后在VCSA上面添加好vGPU的PCI设备,选择自己需要的模型。
2)从vGPU 18.x开始(17及以下的版本直接双击安装即可不需要补丁),NVIDIA技术团队添加了 NLS ROOT CA 证书验证来保护vGPU授权数据,所以要想正常使用GRID显卡驱动还得想办法把驱动证书强校验给破解。以下是在网上找到的破解方法patched-nvidia-grid-drivers,通过FastAPI-DLS搭配patched-nvidia-grid-driver来跳过证书检查。
将GRID驱动和nvxdapix.dll补丁复制到虚拟机
# Windows GRID驱动程序
580.88_grid_win10_win11_server2022_dch_64bit_international.exe
# vGPU19.0的nvxdapix.dll补丁用于修补WIN GRID驱动程序
https://github.com/rbqvq/patched-nvidia-grid-drivers/blob/master/patched/19.0/nvxdapix.dll
3)双击打开GRID驱动程序,等待程序解压完成,并前往程序解压好的路径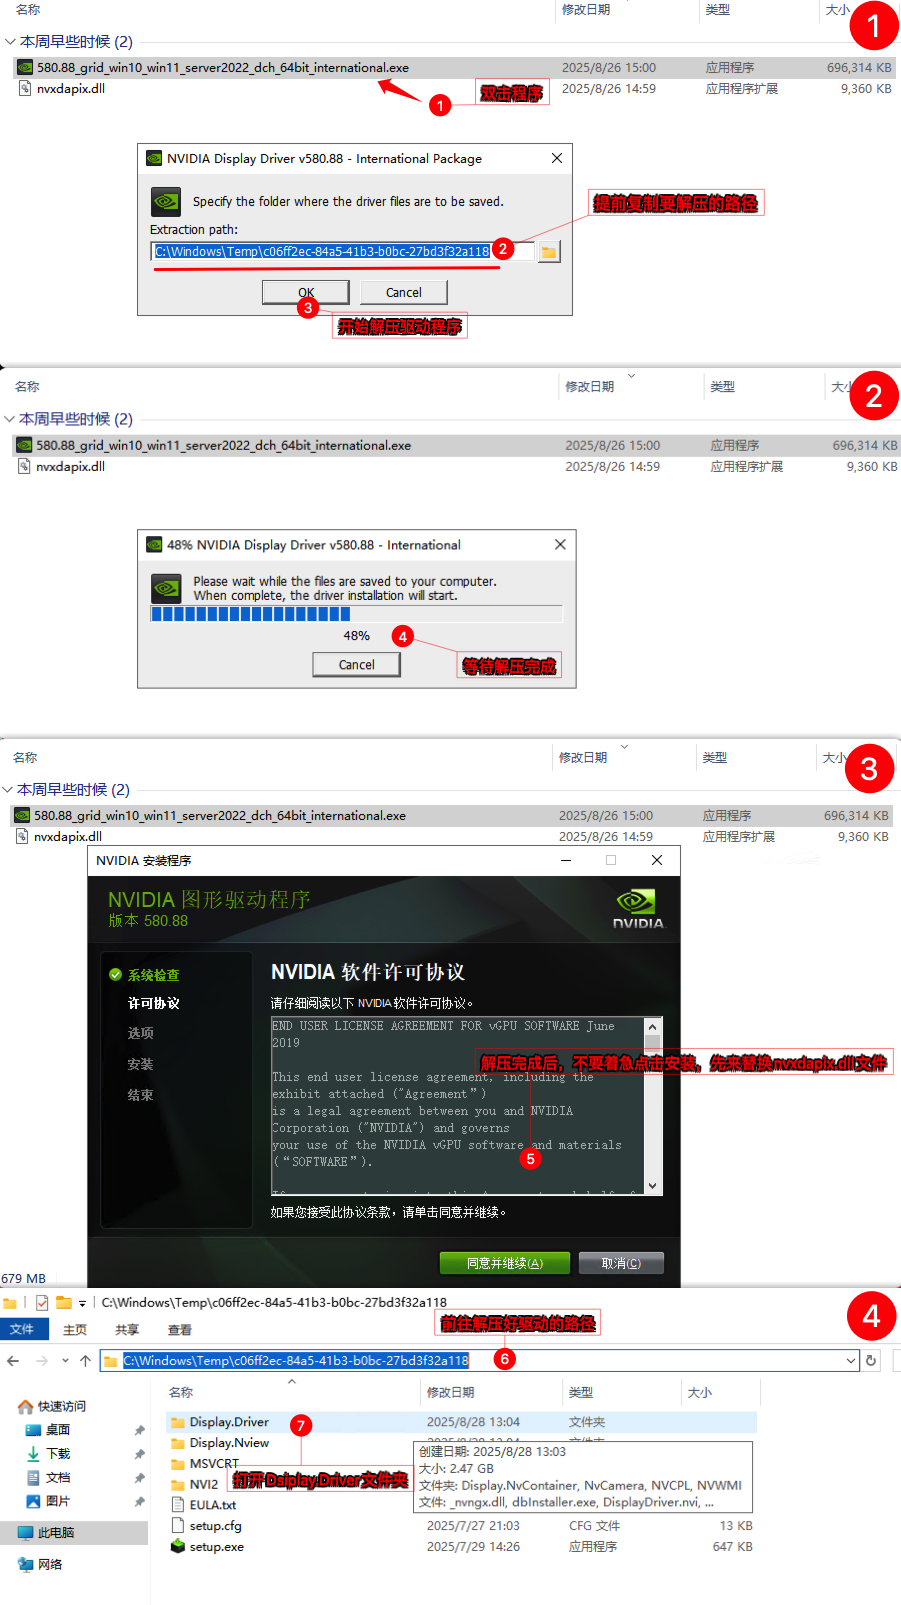
4)将下载下来的nvxdapix.dll补丁替换到Display.Driver文件夹下,然后开始安装GRID驱动程序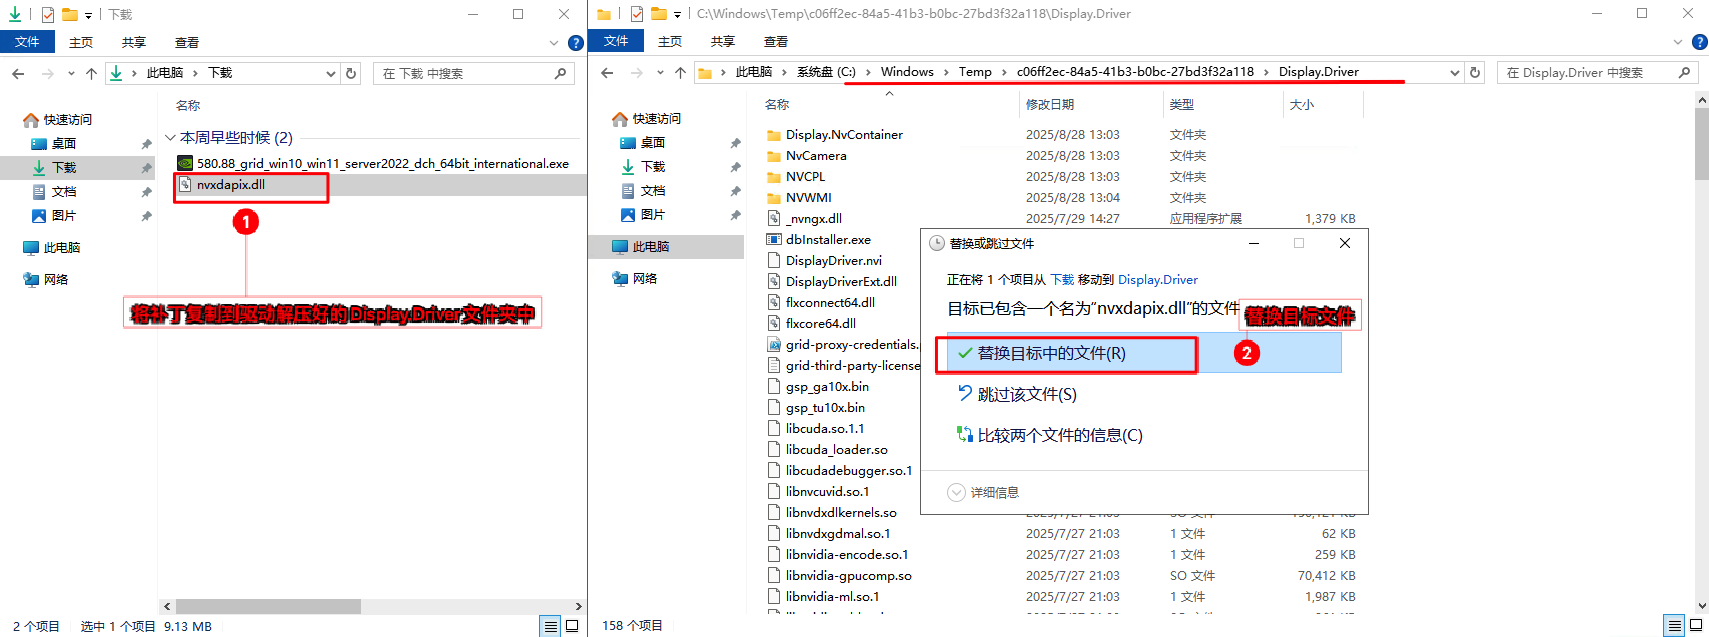
5)安装GRID驱动选择精简安装,遇到Windows安全中心的弹窗选择始终安装此驱动程序软件即可。
启用授权
1)授权GRID驱动
在浏览器访问fastapi-dls授权服务:https://10.10.10.99/-/client-token会自动下载好授权文件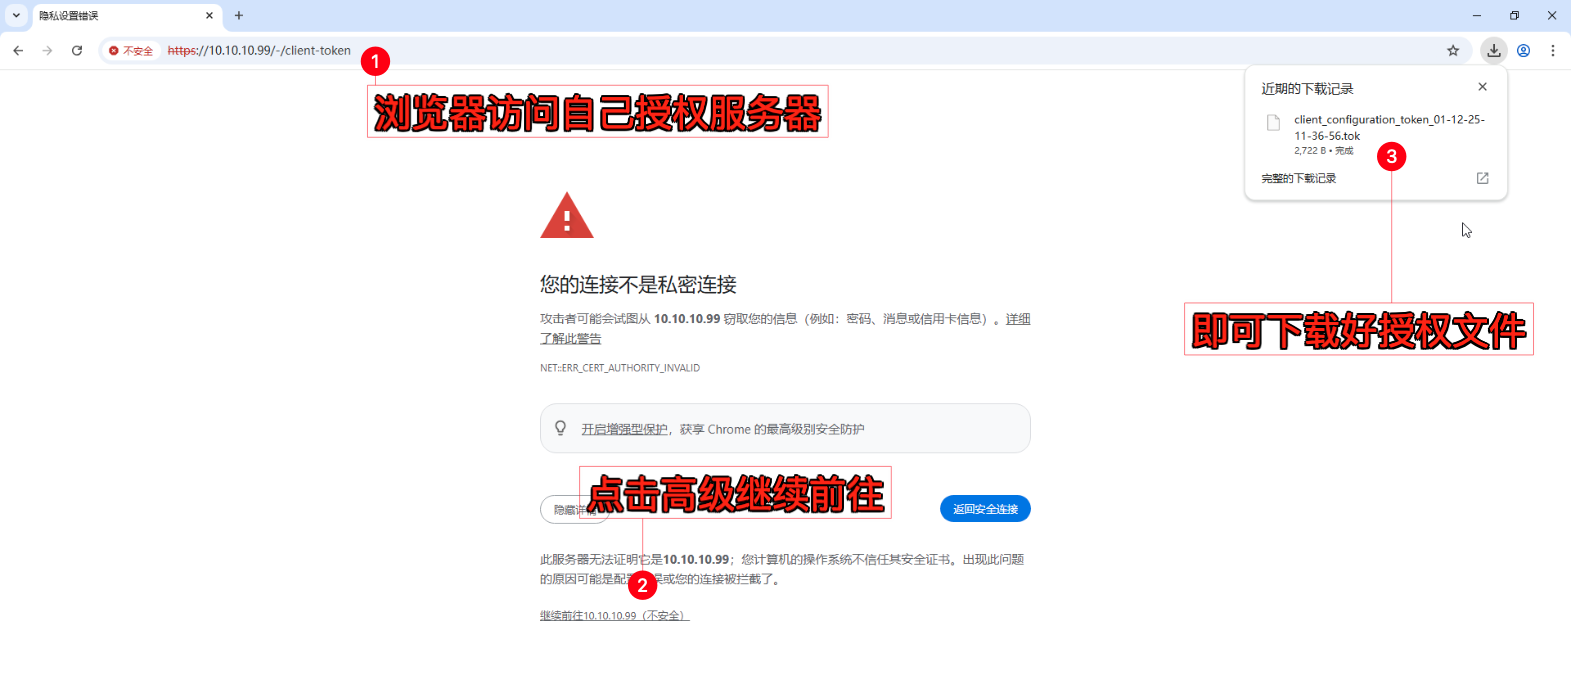
将文件放入C:\Program Files\NVIDIA Corporation\vGPU Licensing\ClientConfigToken\这个目录下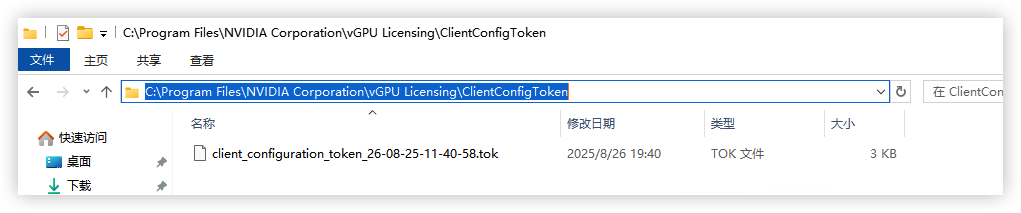
2) 重启NVIDIA Display Container Ls服务,即可获得授权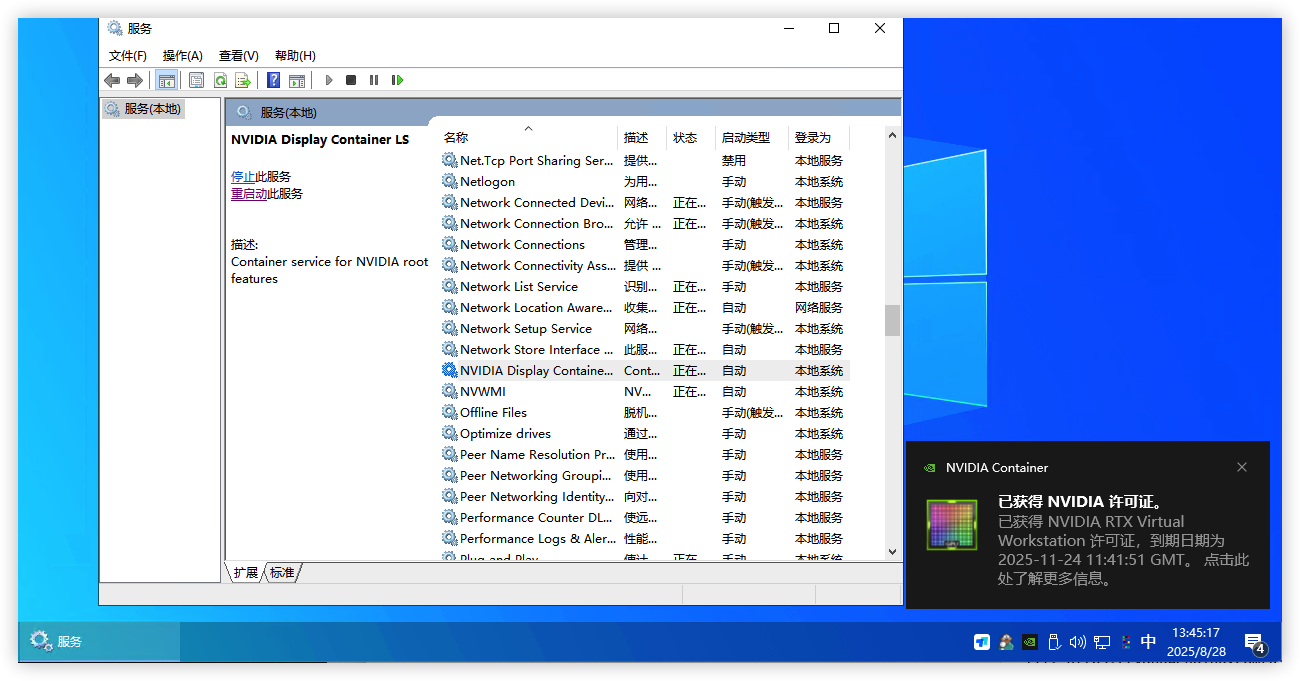
授权失败怎么办? ① 需要检查虚拟机的时间是否对得上授权服务器时间;② fastapi-dls授权服务是否为2.X版本,vGPU18.x后版本必须升级到2.X版本;③ vGPU18/19需要替换nvxdapix.dll补丁才能正常授权
开启RDP
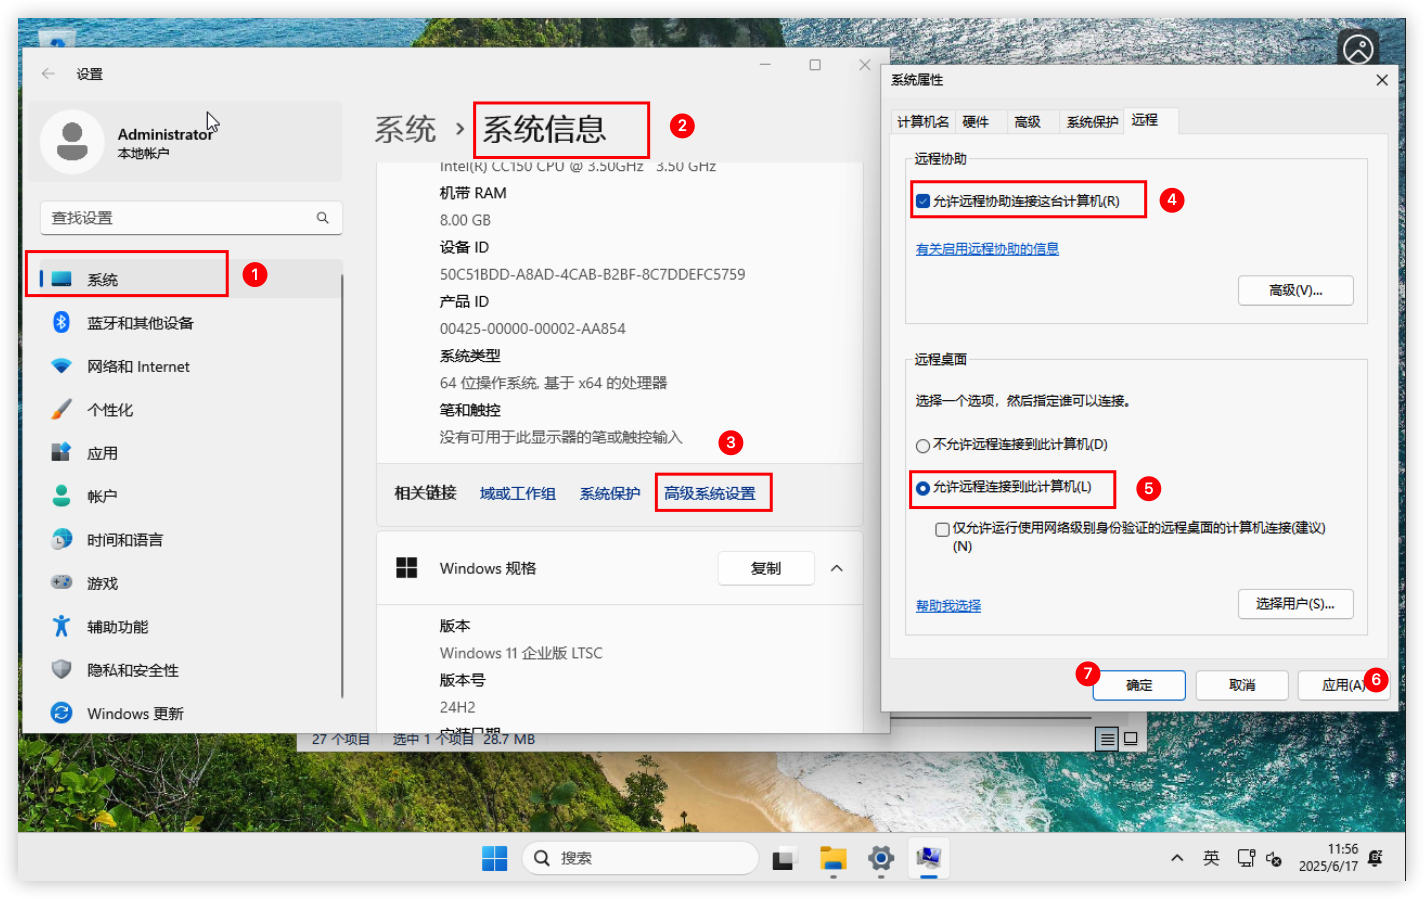
注意:我们的vGPU虚拟机是需要使用远程方式来连接虚拟机的,这样才会调用GPU,如果直接在浏览器Web端操作虚拟机是不会调用到vGPU资源的,Windows虚拟机可以使用RDP协议远程连接到虚拟机。以下是Win开启RDP远程的操作:1)开启RDP远程桌面
在系统设置开启RDP远程桌面
2)允许RDP显卡加速
RDP 支持无显卡运行,在远程桌面的时候默认是不调用显卡,可以开启它,让它支持显卡加速。
首先打开虚拟机上的组策略
gpedit.msc,依次找到计算机配置->管理模板->Windows组件->远程桌面服务->远程桌面会话主机->远程会话环境在右边选择将硬件图形适配器应用于所有远程桌面服务会话 右键编辑,选择已启用,确定保存。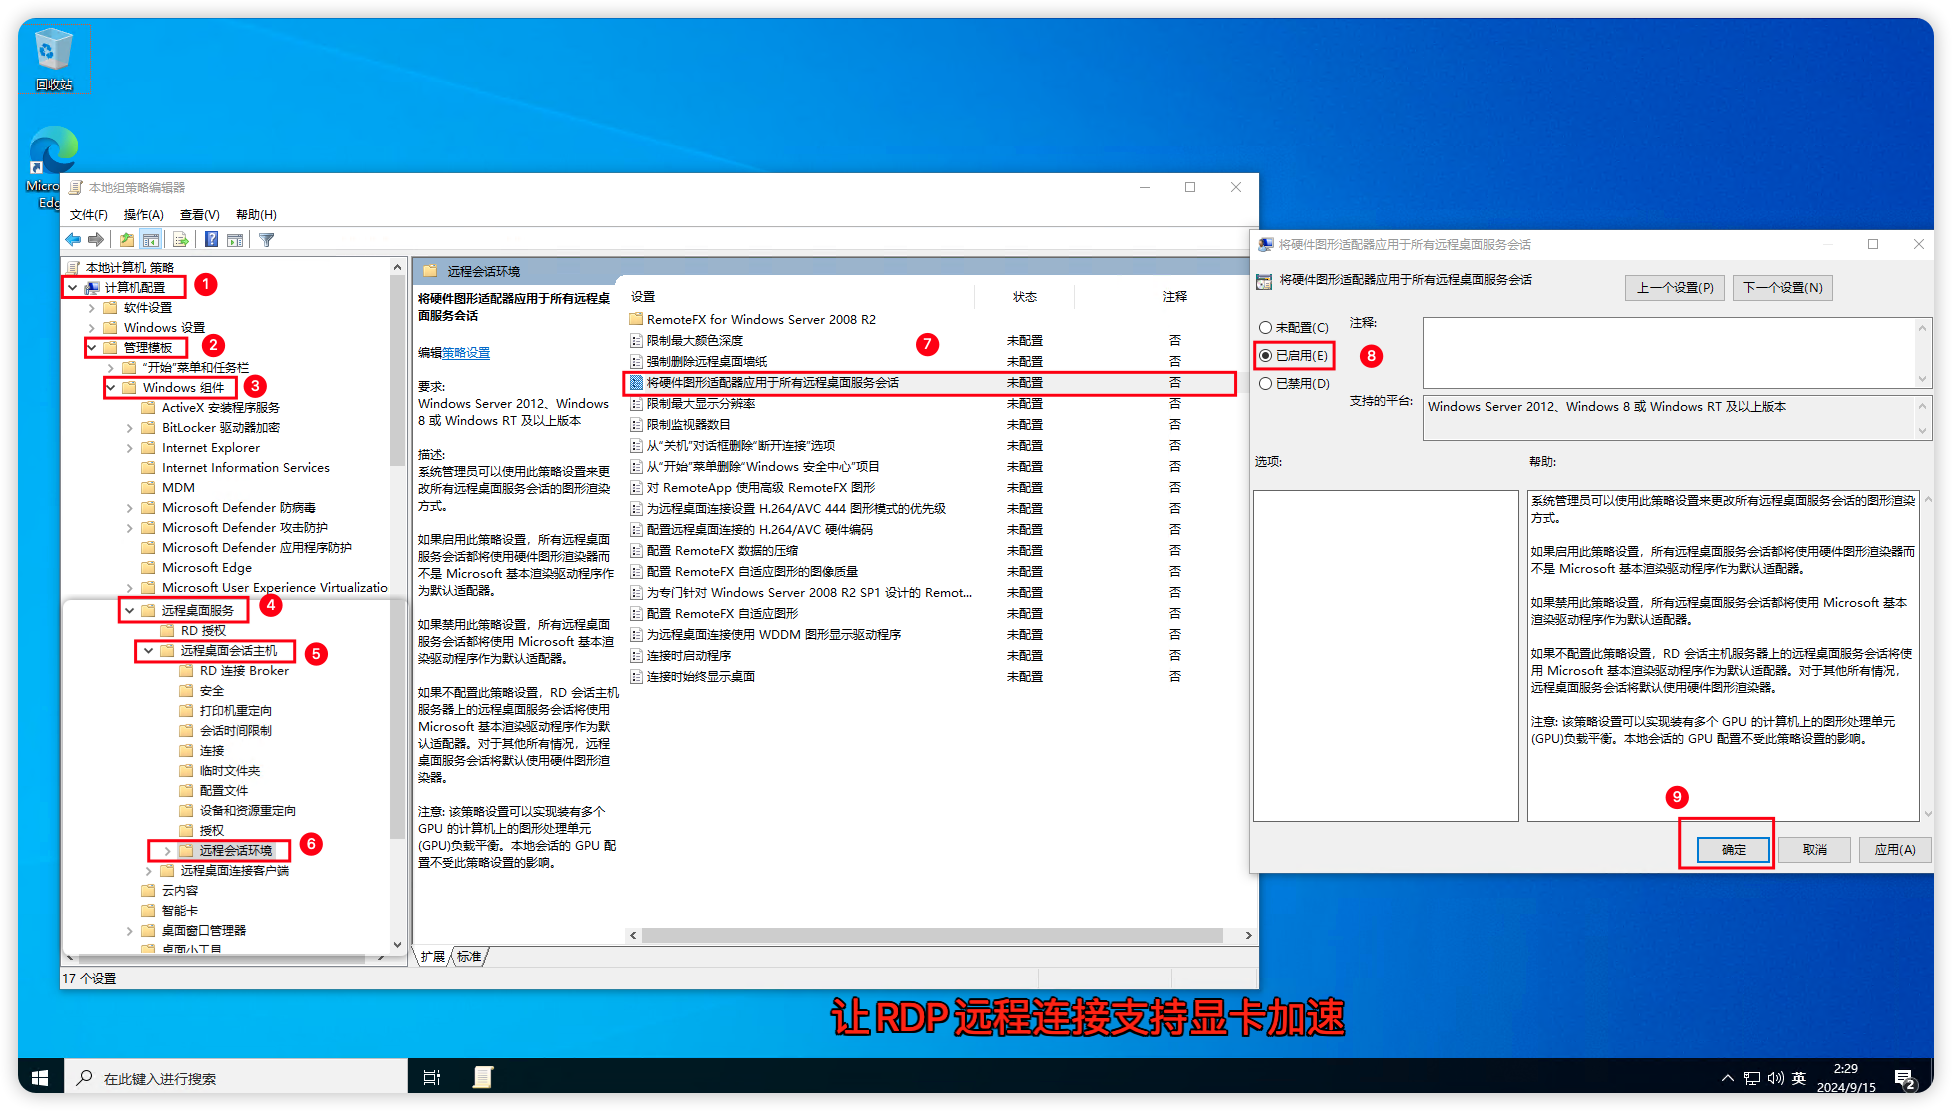
3)解除RDP 30帧限制
RDP 默认的帧率限制在30帧,可以设置为60帧传输。
在注册表打开该路径
HKEY_LOCAL_MACHINE\SYSTEM\CurrentControlSet\Control\Terminal Server\WinStations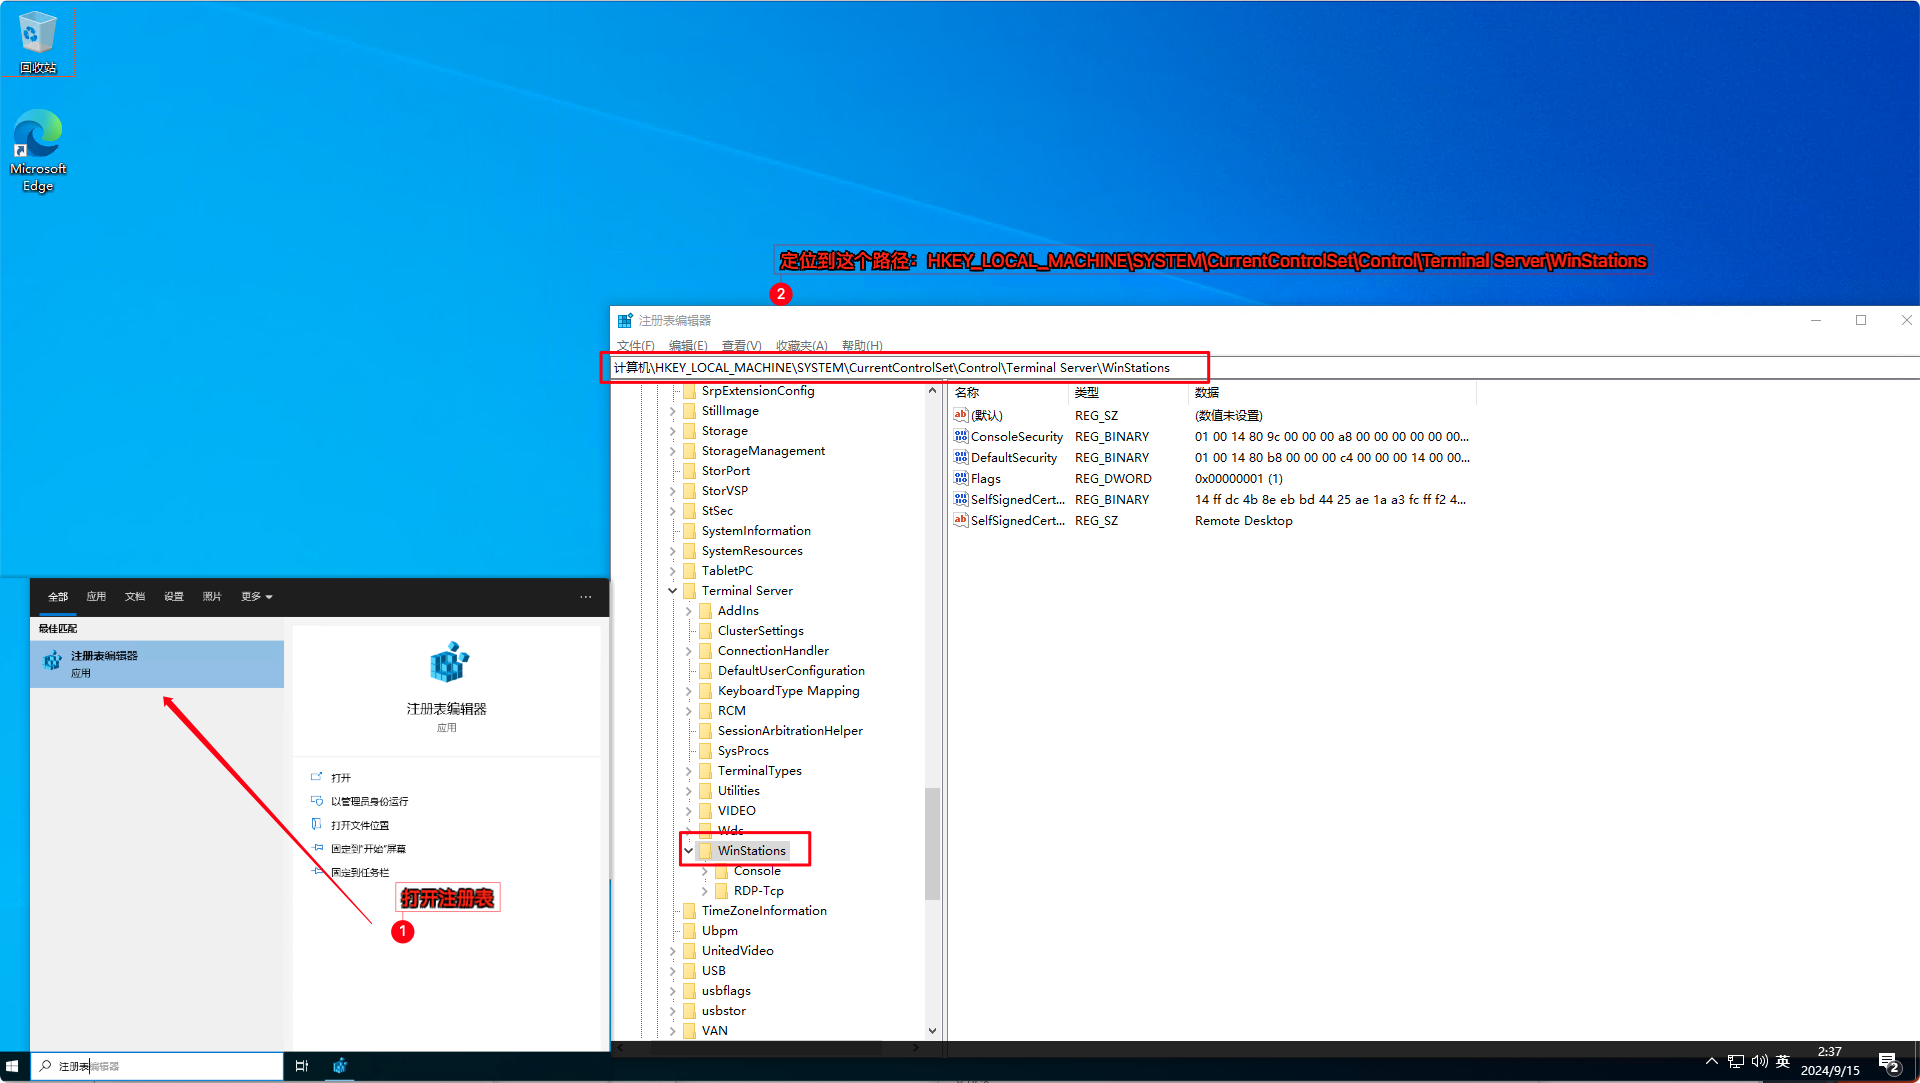
在空白处
右键->新建->DWORD(32位)值,命名为DWMFRAMEINTERVAL,双击刚添加的这一项,基数选择为十进制,数值数据填写15,确定保存重启生效。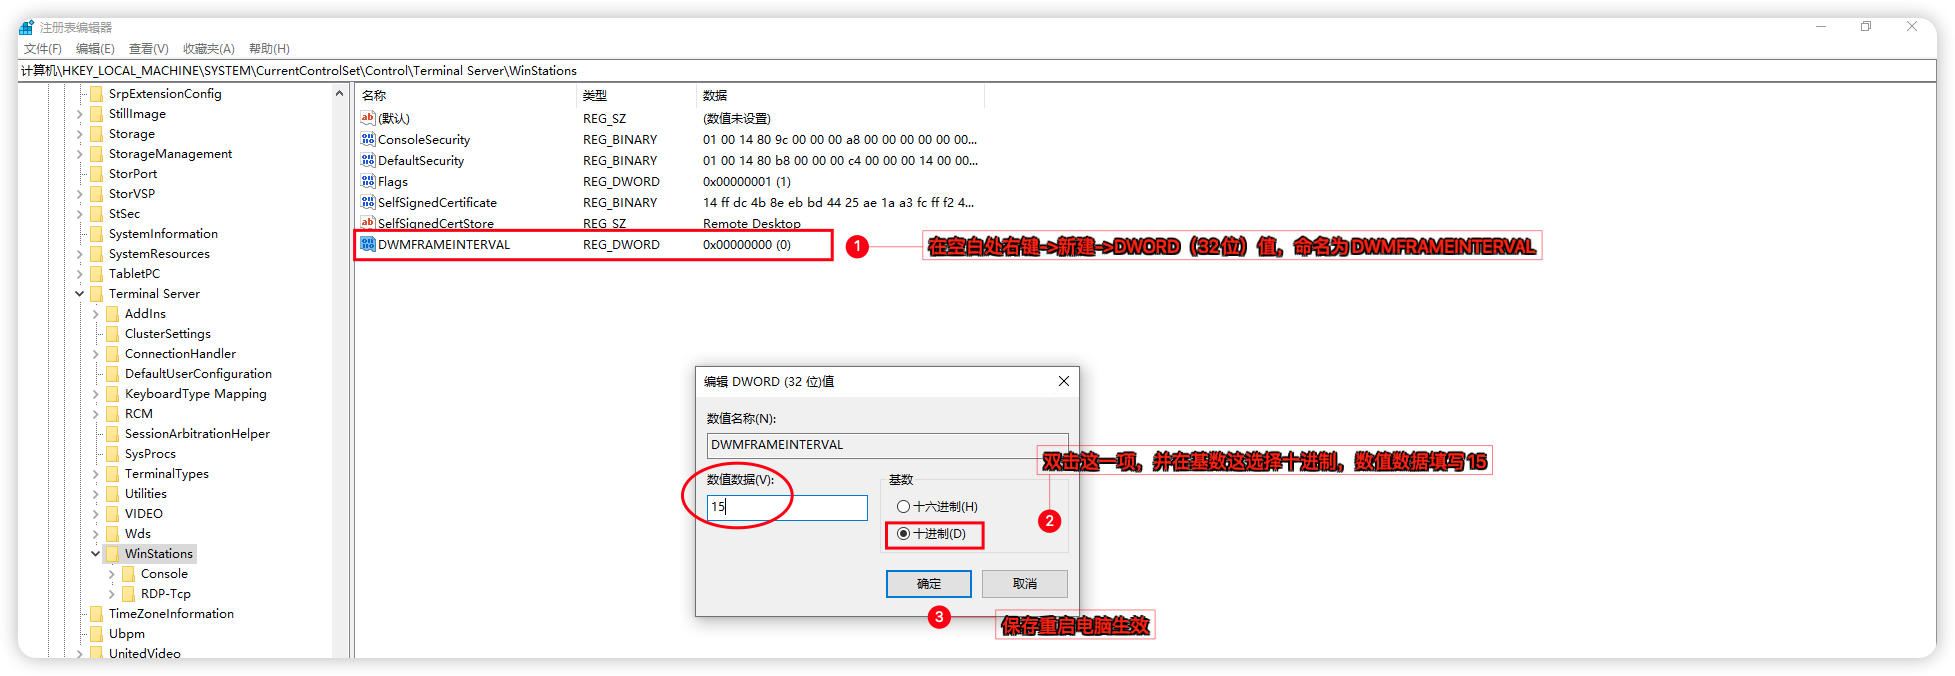
4)关闭防火墙
关闭Windows防火墙,或者放行
3389远程桌面端口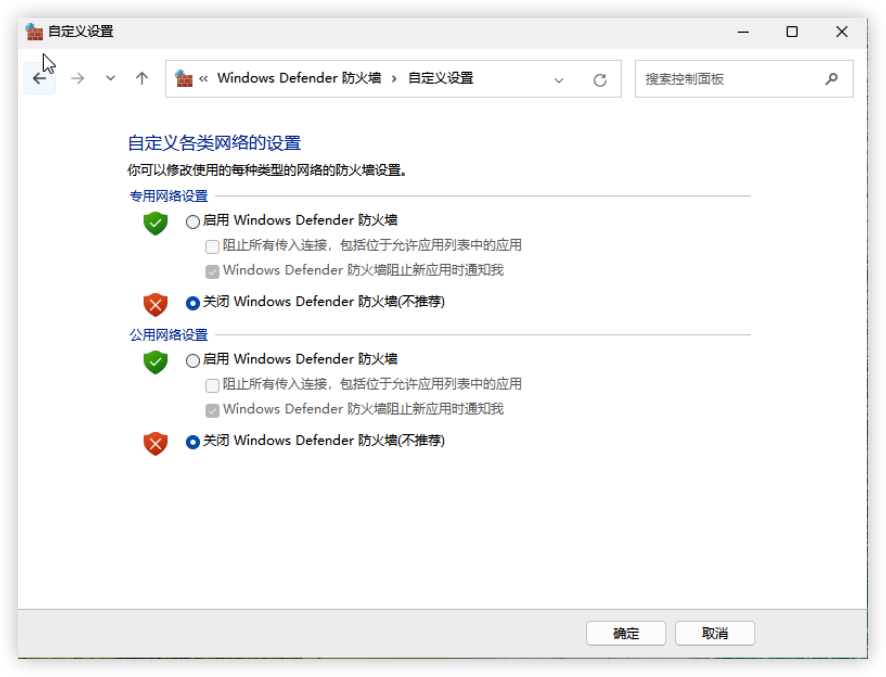
5)关闭睡眠/屏幕
在系统设置中,把屏幕超时改为
从不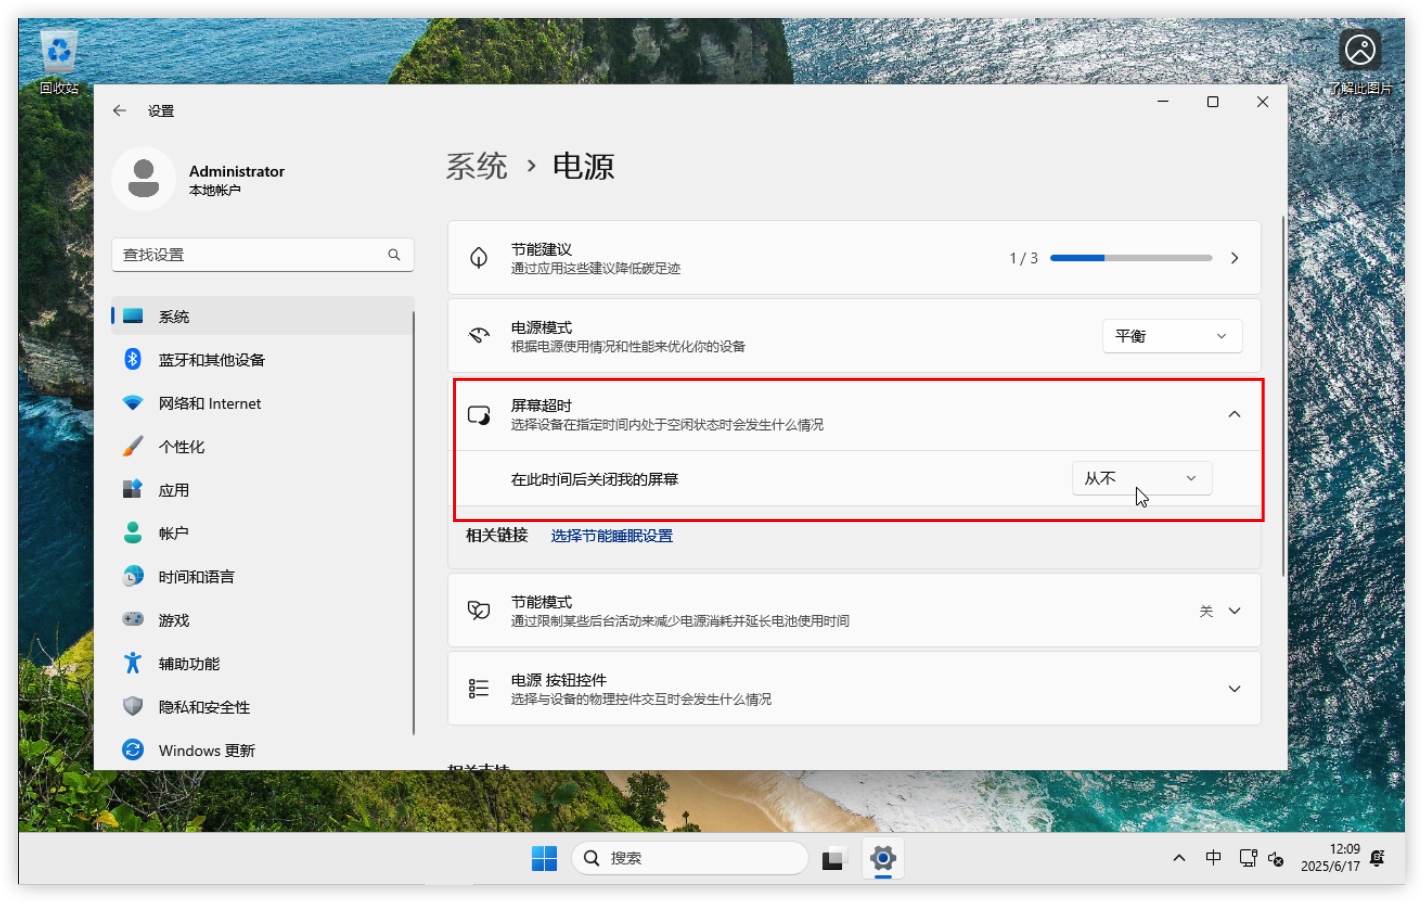
为虚拟机安装Guest驱动(Ubuntu 2504)
安装Ubuntu 2504虚拟机略过,自行在ESXI上安装好Ubuntu虚拟机并安装好VM Tools工具。(安装Ubuntu虚拟机请采用UEFI安装,不要使用BIOS安装)然后在VCSA上面添加好vGPU的PCI设备,选择自己需要的模型。
内核知识
您需要知道的内核小知识:
因为NVIDIA Driver需要对应内核才能正常安装驱动,比如535版本可能需要在6.5内核,550版本可能需要在6.8内核...一般我们安装Ubuntu的时候,系统会默认将内核升级到最新版本,所以我们在打驱动时需要将内核指定到对应版本才能安装NVIDIA Driver。Ubuntu推荐使用mainline内核管理程序来快速切换任意版本的Linux内核。1)查看当前系统内核版本,如果内核满足驱动安装,那么直接跳过安装内核步骤直接去安装驱动即可。
uname -r2)安装 mainline 的软件包,需要添加它的软件源,然后用 apt 安装。
sudo add-apt-repository ppa:cappelikan/ppa -y
sudo apt update && sudo apt install mainline -y
3)安装好后,可以指定想要安装的内核版本。比如要安装 6.8.12 版本:
# 安装`6.8.12` 内核
sudo mainline install 6.8.12
# 以下信息是安装过程
mainline 1.4.13
Updating Kernels...
Downloading 6.8.12-060812-generic
▓▓▓▓▓▓▓▓░░░░░░░░░░░░░░░░░░░░░░░░░░░ 27%  19/54 MB - file 3/4
4)内核安装好后,你需要知道系统里已经安装了哪些内核
# 查看当前已安装的内核列表
dpkg --list | grep linux-image
# 你会看到类似下面的输出:
rc  linux-image-6.14.0-29-generic                  6.14.0-29.29~24.04.1                     amd64        Signed kernel image generic
hi linux-image-unsigned-6.8.12-060812-generic 6.8.12-060812.202501300202 amd64 Linux kernel image for version 6.8.12 on 64 bit x86 SMP这里linux-image-6.14.0-29-generic 和 linux-image-unsigned-6.8.12-060812-generic 就是已安装的内核包名
5)修改 GRUB 配置,指定内核启动,我们将通过修改 /etc/default/grub 文件来设置默认内核
# nano编辑grub文件
sudo nano /etc/default/grub
# 例如,如果你想将 linux-image-unsigned-6.8.12-060812-generic 设置为默认,配置行可能看起来像这样:
GRUB_DEFAULT="Advanced options for Ubuntu>Ubuntu, with Linux 6.8.12-060812-generic"
# 配置grub读秒,让你有足够的时间在启动时看到 GRUB 菜单并进行选择
GRUB_TIMEOUT=5
# 确保这一行是 ‘menu’ 而不是 ‘hidden’
GRUB_TIMEOUT_STYLE=menu我的完整grub参数如下:
# If you change this file, run 'update-grub' afterwards to update
# /boot/grub/grub.cfg.
# For full documentation of the options in this file, see:
#   info -f grub -n 'Simple configuration'

GRUB_DEFAULT="Advanced options for Ubuntu>Ubuntu, with Linux 6.8.12-060812-generic"
GRUB_TIMEOUT_STYLE=menu
GRUB_TIMEOUT=5
GRUB_DISTRIBUTOR=`( . /etc/os-release; echo ${NAME:-Ubuntu} ) 2>/dev/null || echo Ubuntu`
GRUB_CMDLINE_LINUX_DEFAULT="quiet splash"
GRUB_CMDLINE_LINUX=""

# If your computer has multiple operating systems installed, then you
# probably want to run os-prober. However, if your computer is a host
# for guest OSes installed via LVM or raw disk devices, running
# os-prober can cause damage to those guest OSes as it mounts
# filesystems to look for things.
#GRUB_DISABLE_OS_PROBER=false

# Uncomment to enable BadRAM filtering, modify to suit your needs
# This works with Linux (no patch required) and with any kernel that obtains
# the memory map information from GRUB (GNU Mach, kernel of FreeBSD ...)
#GRUB_BADRAM="0x01234567,0xfefefefe,0x89abcdef,0xefefefef"

# Uncomment to disable graphical terminal
#GRUB_TERMINAL=console

# The resolution used on graphical terminal
# note that you can use only modes which your graphic card supports via VBE
# you can see them in real GRUB with the command `vbeinfo'
#GRUB_GFXMODE=640x480

# Uncomment if you don't want GRUB to pass "root=UUID=xxx" parameter to Linux
#GRUB_DISABLE_LINUX_UUID=true

# Uncomment to disable generation of recovery mode menu entries
#GRUB_DISABLE_RECOVERY="true"

# Uncomment to get a beep at grub start
#GRUB_INIT_TUNE="480 440 1"
6)更新并重启系统
sudo update-grub && reboot7) 重启后,系统就会自动切换到指定的内核版本
# 登录进来提示
Welcome to Ubuntu 24.04.3 LTS (GNU/Linux 6.8.12-060812-generic x86_64)
# uname -r
6.8.12-060812-generic
8)把不需要的旧内核清除一下,腾出空间
sudo apt autoremove -y这样就可以去安装Guest驱动了,如果你的gcc版本过低的话也需要升级。这样才能打上驱动。
安装驱动
1) 安装显卡驱动前先将需要的依赖文件打上
# 安装ssh工具,使用第三方SSH工具(putty,终端)连接到Ubuntu,PVE里面控制台无法复制命令
sudo apt-get install openssh-server
# 需要所需依赖
sudo apt install build-essential linux-headers-generic libglvnd-dev pkg-config -y
# 安装dkms
sudo apt install dkms -y
# 安装32位兼容库
sudo dpkg --add-architecture i386
sudo apt update
sudo apt install libc6:i386 -y
2)屏蔽自带的显卡驱动
# 创建blacklist-nouveau.conf文件
sudo nano /etc/modprobe.d/blacklist-nouveau.conf
# 在blacklist-nouveau.conf文件添加如下内容:
blacklist nouveau
options nouveau modeset=0
# 重载内核initramfs
sudo update-initramfs -u
# 重启Ubuntu
sudo reboot
# 重启完成后检查nouveau是否已禁用,没有任何输出说明已经禁用
lsmod | grep nouveau
# 切换到文本命令行控制台
sudo chvt 3
# 关闭图形界面服务
sudo service gdm stop3)安装显卡GRID驱动,将NVIDIA-Linux-x86_64-580.65.06-grid.run上传到/root目录下
# 切换root权限
sudo -i
# 给可执行权限
cd /root && chmod +x NVIDIA-Linux-x86_64-580.65.06-grid.run
# 安装驱动(默认回车直至安装完成即可)
./NVIDIA-Linux-x86_64-580.65.06-grid.run --dkms
# 安装完驱动后删除官方nvidia-gridd文件
rm -f /usr/bin/nvidia-gridd
# 下载破解好的nvidia-gridd文件
wget -O /usr/bin/nvidia-gridd https://github.com/rbqvq/patched-nvidia-grid-drivers/raw/refs/heads/master/patched/19.0/nvidia-gridd
# 授予可执行权限
chmod +x /usr/bin/nvidia-gridd
# 重启服务
systemctl restart nvidia-gridd4)使用nvidia-smi验证驱动是否正常
ubuntu@ubuntu-Standard-PC-Q35-ICH9-2009:~$ nvidia-smi
Thu Aug 28 23:02:49 2025
+-----------------------------------------------------------------------------------------+
| NVIDIA-SMI 580.65.06              Driver Version: 580.65.06      CUDA Version: 13.0     |
+-----------------------------------------+------------------------+----------------------+
| GPU  Name                 Persistence-M | Bus-Id          Disp.A | Volatile Uncorr. ECC |
| Fan  Temp   Perf          Pwr:Usage/Cap |           Memory-Usage | GPU-Util  Compute M. |
|                                         |                        |               MIG M. |
|=========================================+========================+======================|
|   0  GRID T4-1Q                     On  |   00000000:01:00.0 Off |                  N/A |
| N/A   N/A    P0            N/A  /  N/A  |      11MiB /   4096MiB |      0%      Default |
|                                         |                        |                  N/A |
+-----------------------------------------+------------------------+----------------------+

+-----------------------------------------------------------------------------------------+
| Processes:                                                                              |
|  GPU   GI   CI              PID   Type   Process name                        GPU Memory |
|        ID   ID                                                               Usage      |
|=========================================================================================|
|    0   N/A  N/A            1454      G   /usr/lib/xorg/Xorg                       10MiB |
+-----------------------------------------------------------------------------------------+
启用授权
# 获取授权文件,以下IP替换成自己的授权服务IP
wget --no-check-certificate -O /etc/nvidia/ClientConfigToken/client_configuration_token_$(date '+%d-%m-%Y-%H-%M-%S').tok https://10.10.10.99/-/client-token
# 或者
curl --insecure -L -X GET https://10.10.10.99/-/client-token -o /etc/nvidia/ClientConfigToken/client_configuration_token_$(date '+%d-%m-%Y-%H-%M-%S').tok
验证授权
# 重启服务
sudo service nvidia-gridd restart
# 验证授权获取情况
nvidia-smi -q | grep License
# 看到有Licensed字样,就授权好了。
ubuntu@ubuntu-Standard-PC-Q35-ICH9-2009:~$ nvidia-smi -q | grep License
vGPU Software Licensed Product
License Status : Licensed (Expiry: 2025-11-26 14:31:55 GMT)如果你需要用vGPU跑大模型,可能还需要安装CUDA/CuDNN,vGPU19.0支持最新的CUDA 13.0版本,当然cuda12 cuda11版本也是可以安装。安装CUDA
打开官网:https://developer.nvidia.com/cuda-toolkit-archive选择CUDA 13.0,如下图选择Linux及对应的架构、系统、版本和安装形式: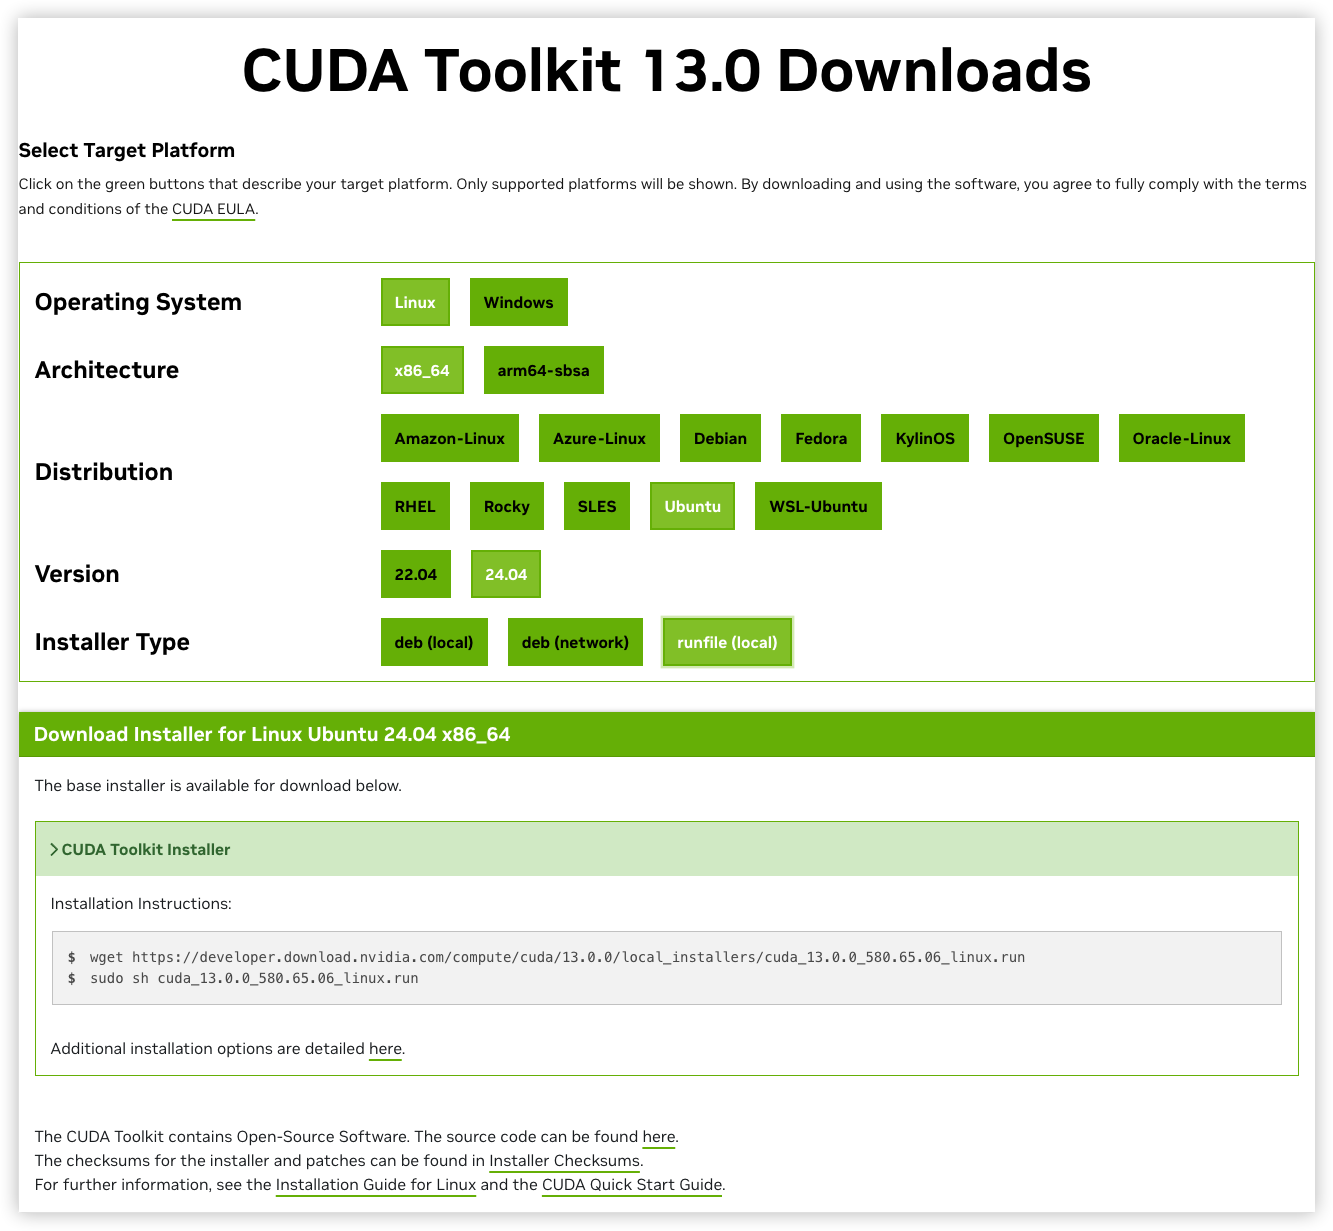
复制网站给我们的安装命令,依次在终端中输入:
# 下载cuda 13 安装程序
wget https://developer.download.nvidia.com/compute/cuda/13.0.0/local_installers/cuda_13.0.0_580.65.06_linux.run
# 执行安装cuda程序
sudo sh cuda_13.0.0_580.65.06_linux.run输入accept接受条款
┌──────────────────────────────────────────────────────────────────────────────┐
│  End User License Agreement                                                  │
│  --------------------------                                                  │
│                                                                              │
│  NVIDIA Software License Agreement and CUDA Supplement to                    │
│  Software License Agreement.                                                 │
│                                                                              │
│  The CUDA Toolkit End User License Agreement applies to the                  │
│  NVIDIA CUDA Toolkit, the NVIDIA CUDA Samples, the NVIDIA                    │
│  Display Driver, NVIDIA Nsight tools (Visual Studio Edition),                │
│  and the associated documentation on CUDA APIs, programming                  │
│  model and development tools. If you do not agree with the                   │
│  terms and conditions of the license agreement, then do not                  │
│  download or use the software.                                               │
│                                                                              │
│  Last updated: January 12, 2025                                              │
│                                                                              │
│                                                                              │
│  Preface                                                                     │
│  -------                                                                     │
│                                                                              │
│──────────────────────────────────────────────────────────────────────────────│
│ Do you accept the above EULA? (accept/decline/quit):                         │
│ accept                                                                       │
└──────────────────────────────────────────────────────────────────────────────┘注意:由于之前已经安装过驱动了,这次不要再安装驱动。在Driver这里按ENTER键将勾去掉!将2项CUDA选项勾选然后选择Install
┌──────────────────────────────────────────────────────────────────────────────┐
│ CUDA Installer                                                               │
│ - [ ] Driver                                                                 │
│      [ ] 580.65.06                                                           │
│ + [X] CUDA Toolkit 13.0                                                      │
│   [X] CUDA Documentation 13.0                                                │
│ - [ ] Kernel Objects                                                         │
│      [ ] nvidia-fs                                                           │
│   Options                                                                    │
│   Install                                                                    │
│                                                                              │
│                                                                              │
│                                                                              │
│                                                                              │
│                                                                              │
│                                                                              │
│                                                                              │
│                                                                              │
│                                                                              │
│                                                                              │
│                                                                              │
│                                                                              │
│                                                                              │
│ Up/Down: Move | Left/Right: Expand | 'Enter': Select | 'A': Advanced options │
└──────────────────────────────────────────────────────────────────────────────┘安装完成后,使用nano命令来配置环境变量:nano ~/.bashrc
# 在最后添加以下变量信息
export PATH=$PATH:/usr/local/cuda-13.0/bin
export LD_LIBRARY_PATH=$LD_LIBRARY_PATH:/usr/local/cuda-13.0/lib64
最后,使其生效
source ~/.bashrc执行nvcc -V即可查看CUDA版本
root@ubuntu-Standard-PC-Q35-ICH9-2009:~# nvcc -V
nvcc: NVIDIA (R) Cuda compiler driver
Copyright (c) 2005-2025 NVIDIA Corporation
Built on Wed_Jul_16_07:30:01_PM_PDT_2025
Cuda compilation tools, release 13.0, V13.0.48
Build cuda_13.0.r13.0/compiler.36260728_0
安装CuDNN
打开官网:https://developer.nvidia.com/cudnn-downloads选择CuDNN 9.12.0,如下图选择Linux及对应的架构、系统、版本和安装形式:
复制网站给我们的安装命令,依次在终端中输入:
wget https://developer.download.nvidia.com/compute/cudnn/9.12.0/local_installers/cudnn-local-repo-ubuntu2404-9.12.0_1.0-1_amd64.deb
sudo dpkg -i cudnn-local-repo-ubuntu2404-9.12.0_1.0-1_amd64.deb
sudo cp /var/cudnn-local-repo-ubuntu2404-9.12.0/cudnn-*-keyring.gpg /usr/share/keyrings/
sudo apt-get update
sudo apt-get -y install cudnn9-cuda-13
FAQ问答
Q1:我的是A5000/A6000显卡带视频输出接口,怎样才能使用vGPU呢?
A1:A5000/A6000显卡默认是显示模式的,如果要使用vGPU功能,需要先切换为无显示模式才能使用vGPU。
切换模式需要使用NVIDIA的displaymodeselector工具,该工具只支持在Window和linux平台使用,ESXI目前是没办法直接用的。如果你是ESXI平台,可以将显卡拆下来放到Win/Linux物理机又或者将显卡直通到Win/Linux的虚拟机里切换好在来安装vGPU。
工具下载
# displaymodeselector工具 Windows版本
https://share.feijipan.com/s/fqFt9mRH
# displaymodeselector工具 Linux版本
https://share.feijipan.com/s/AFFt9s8c
displaymodeselector工具切换教学(Window为例)
在CMD窗口,执行一下命令:
.\displaymodeselector.exe --gpumode然后根据提示关闭就行,关闭后就可以进行vGPU的安装。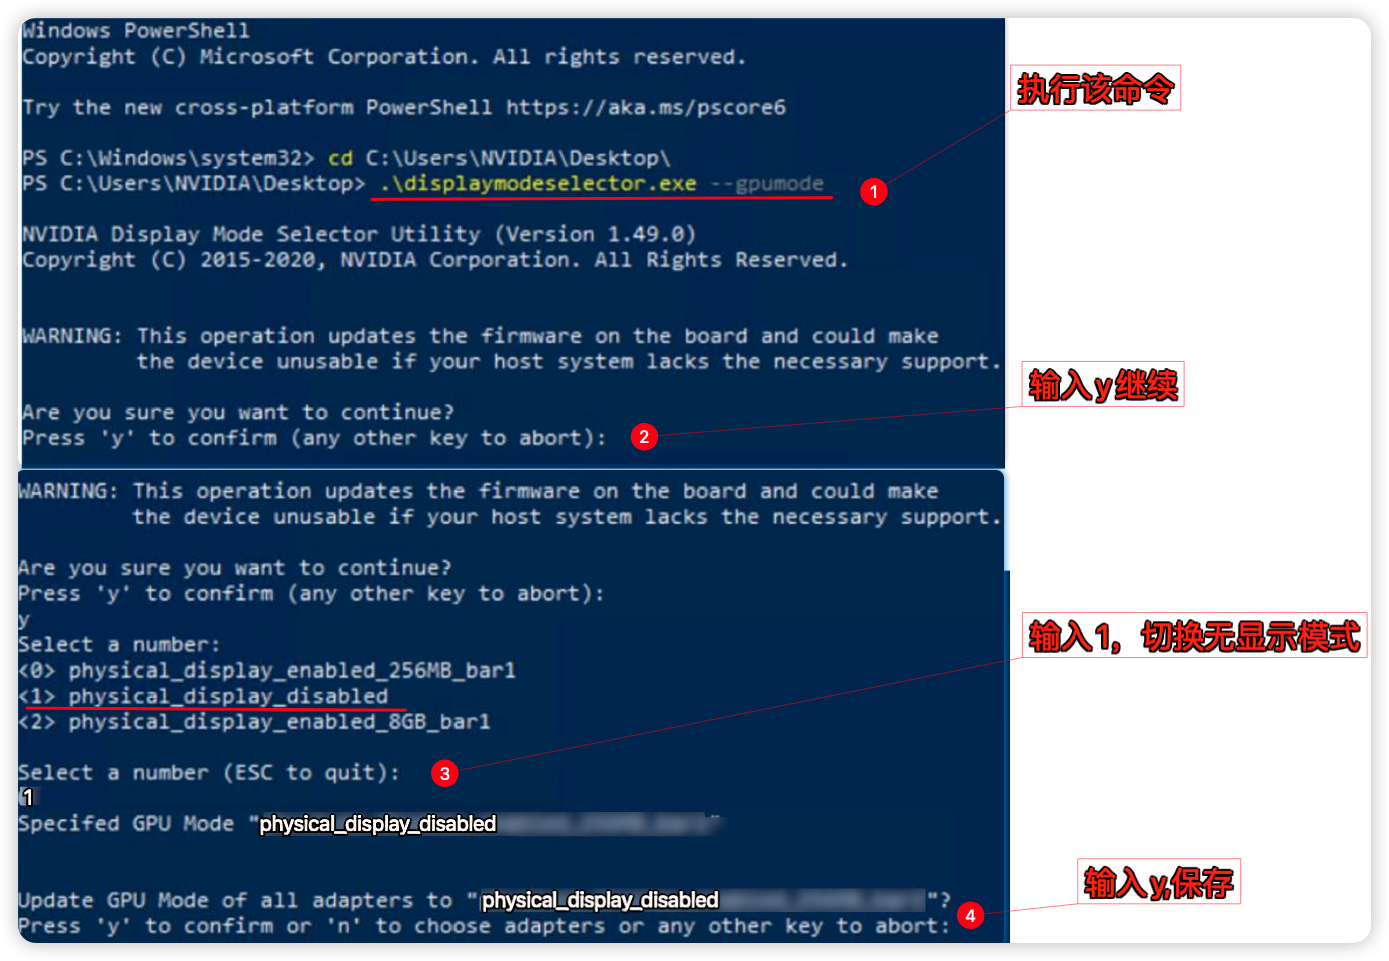
Q2:我已经用FASTAPI-DLS生成的授权文件给虚拟机NVIDIA GRID驱动成功授权了,这个有数量限制吗?
A2:目前暂未遇到数量上限,FASTAPI-DLS 授权服务器只要一直开着,GRID驱动就能长期正常使用。如遇到授权失败,需要检查虚拟机的时间是否与授权服务器一致,必须一致才能取得授权。
Q3:为啥我在网页连接的虚拟机打完显卡驱动后,就不能操作了呢?
A3:请配置好远程桌面或者安装第三方远程工具,确认能通过远程连上虚拟机再来安装显卡驱动,如果你没配置就安装了显卡驱动,则需要先删除显卡设备,配置好远程再添加上显卡设备。因为你一旦安装好显卡驱动后系统就会呈现双显示器状态,这样就会导致Web网页虚拟机控制台黑屏,或者是副屏状态,使得无法操作虚拟机。如要使用GPU资源请通过远程操作虚拟机。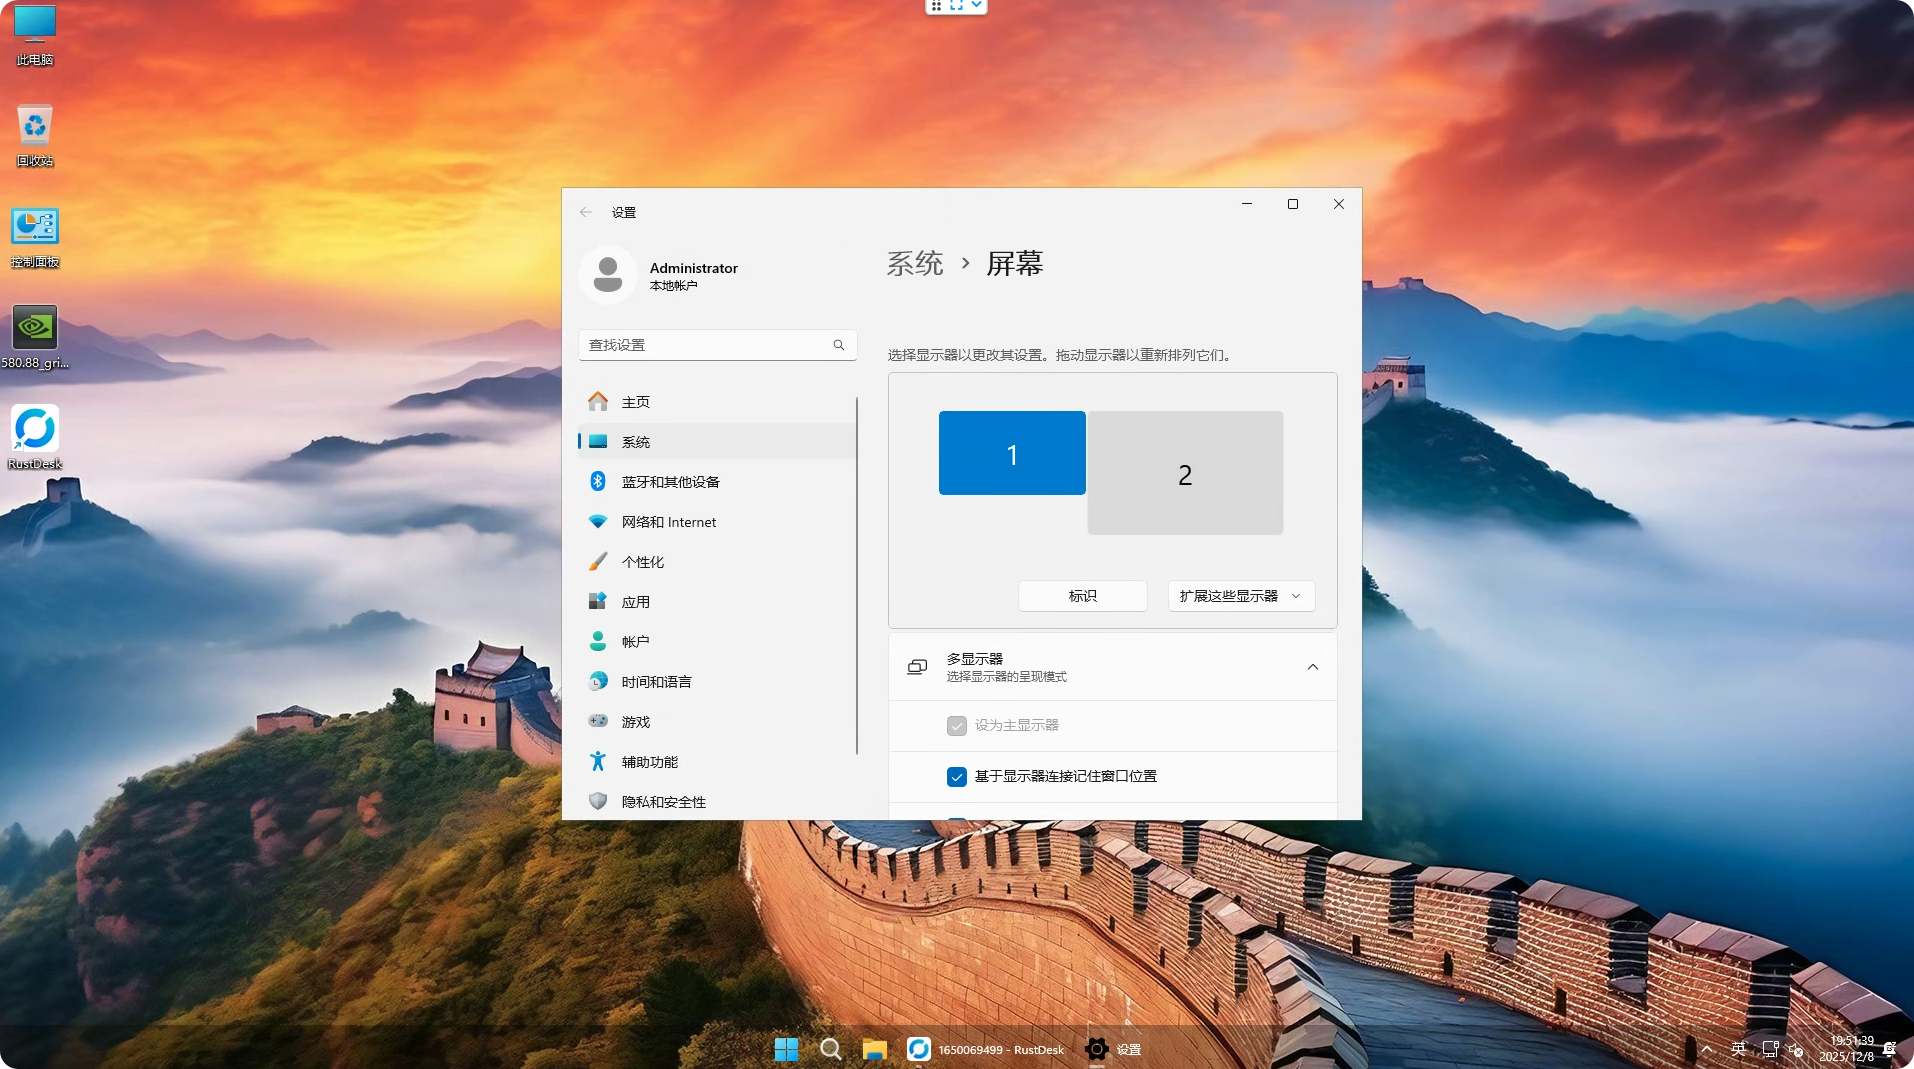
如果你要简单的在Web操作虚拟机,不想借助外部的远程工具,可以用ToDesk远程到虚拟机,把显示屏设置改为仅控制台窗口显示,这样ESXI的Web显示就能操作了。(注意:Web控制台的窗口是独立的虚拟显卡并不调用vGPU)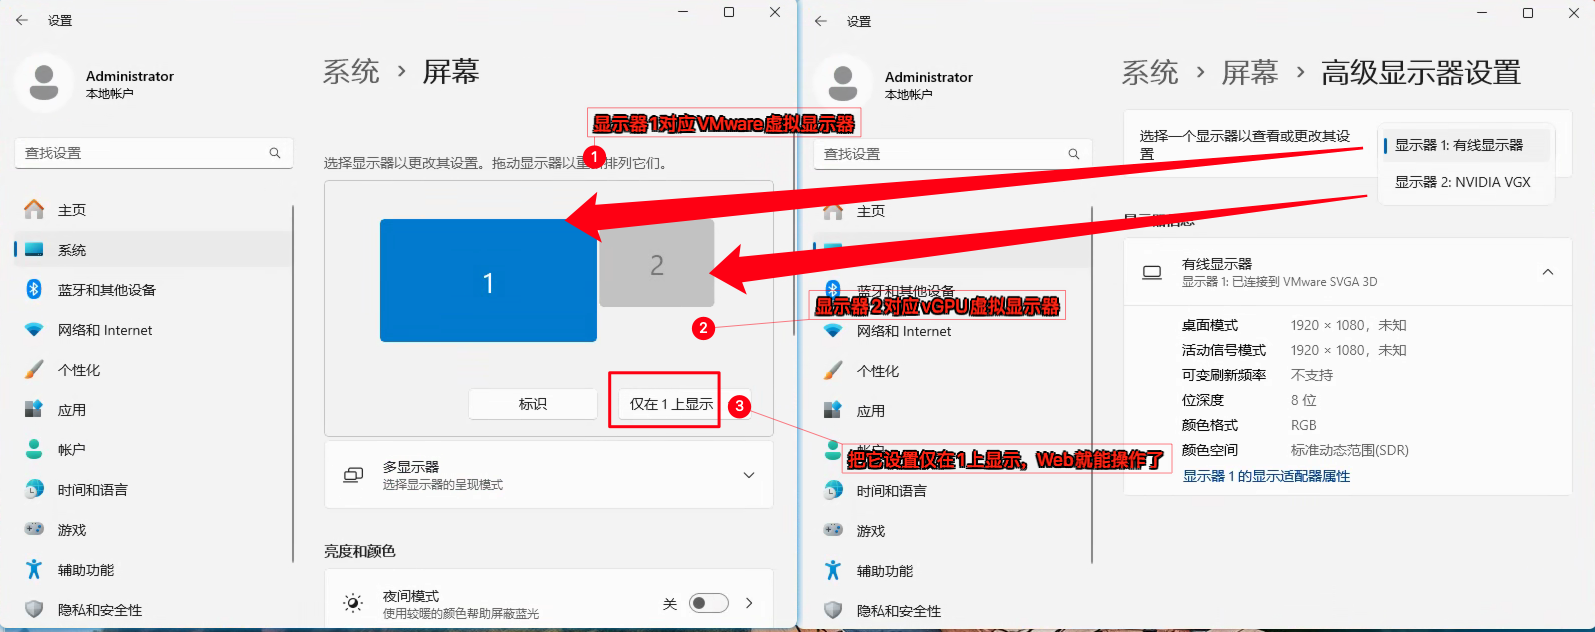
Q4:为啥帧率限制在60帧,可以解除帧率限制?
A4:可以的,vGPU调度器默认采用固定共享策略,Q系列会被限制在60帧,B系列会限制在45帧。如要解除帧率限制改为等分调度只需要在esxi ssh中执行以下命令
# 将 所有 vGPU 调度策略设置为等分调度器,并采用默认时间片长度
esxcli system module parameters set -m nvidia -p "NVreg_RegistryDwords=RmPVMRL=0x01"
# 重启Esxi,即可生效
reboot更多调度器参数设置可见官方文档:vGPU调度策略说明


2 条评论
佬 有个问题物理windows下是不是用不了vgpu授权 我按照流程走完了 就是不显示授权
佬当我放屁 原来要控制面板手动切换一下。。。 不知道为什么不能自动切换