PVE8升级PVE9 在线升级|重装还原 2 种方式
今年下半年,ESXi (6月17日)和 Proxmox VE(8月5日) 两家虚拟化平台都迎来了自己的9.0正式版。此次ESXI9.0的授权模式也变为了订阅制且放弃了中文语言,不能再用【神秘代码】激活白嫖了。 
PVE9 用上了Debian 13“Trixie”来构建,默认搭载Linux 6.14内核,软件也紧跟主流,QEMU 升级到 10.0.24 LXC 用上 6.0.4 ZFS 2.3.3 Ceph Squid 19.2.3 等。下边跟着我将 PVE8 升级到 PVE9 吧。
升级前准备
务必做好备份!务必做好备份!务必做好备份!
可以外挂个硬盘或者U盘挂载到 PVE 的/mnt/pve/media 下把 PVE 相关设置配置文件备份到外设硬盘。
PVE信息备份(必须)
PVE的存储信息,虚拟机信息,集群的设置比如标签、SDN、用户信息之类都存储在/var/lib/pve-cluster/路径下。一共三个文件config.db config.db-shm config.db-wal
cp -r /var/lib/pve-cluster /mnt/pve/mediaPVE配置备份(可选)
/etc目录还是有必要存一份的,像一些硬盘挂载文件是存放在/etc/systemd/system/下的,即使你还原了PVE配置信息,也不会帮你创建回来,需要自己拷回去。
备份 /etc 目录:这个目录包含了所有的系统配置(网络、存储、用户、证书等)。
tar -czvf /mnt/pve/media/pve8_etc_backup_$(date +%Y%m%d).tar.gz /etc备份关键配置文件:
# 主机名信息
/etc/hosts
# 网络信息
/etc/network/interfaces
# 存储信息
/etc/pve/storage.cfg
# 用户信息
/etc/pve/user.cfg
# 集群信息
/etc/pve/corosync.conf
如何还原?
PVE升级失败了,进不了系统,也别灰心。只需要重装好PVE,将前面备份的PVE信息进行还原即可。备份之前的PVE主机名必须和重装后的PVE主机名一致,比如你原来的主机名叫做PVE,那你新装了之后也要叫PVE。在新装的PVE上,挂载U盘到
/mnt/pve/media,将3个文件拷贝回去即可。cp /mnt/pve/media/config.db /var/lib/pve-cluster
cp /mnt/pve/media/config.db-shm /var/lib/pve-cluster
cp /mnt/pve/media/config.db-wal /var/lib/pve-cluster然后重启pve即可。如果你前后的主机名不一样。则会在Web上看到2个节点,一个新的节点,一个旧的节点名称,虚拟机都在旧节点上。所以一定要确保重装前后主机名一致。
在线升级(推荐)
直接从 PVE8 在线升级到 9。
更换PVE8源
升级前先对系统源替换为国内源,这个主要是为了解决网络访问问题、提升下载速度、确保系统更新的可靠性。
# 编辑sources.list
nano /etc/apt/sources.list
# 将原有的源链接在句首加 # 注释掉,更换以下中科大源信息
deb https://mirrors.ustc.edu.cn/debian/ bookworm main contrib non-free non-free-firmware
deb https://mirrors.ustc.edu.cn/debian/ bookworm-updates main contrib non-free non-free-firmware
deb https://mirrors.ustc.edu.cn/debian/ bookworm-backports main contrib non-free non-free-firmware
deb https://mirrors.ustc.edu.cn/debian-security bookworm-security main
deb https://mirrors.ustc.edu.cn/proxmox/debian bookworm pve-no-subscription
删除不需要的 ceph 源和企业订阅源
rm -rf /etc/apt/sources.list.d/执行更新
执行更新,先把PVE升级到 PVE8 的最新版本号,再来升级 PVE9
# 更新软件包并将系统升级到最新
apt update && apt dist-upgrade -y
升级检查
判断系统是否满足升级条件,没有红色警告信息就可以大胆的升级了。有的话自行按提示消灭。
pve8to9更换PVE9源
接着把 PVE8 的源换成 PVE9 的源进行升级就好了
# 编辑sources.list
nano /etc/apt/sources.list
# 将原有的源链接在句首加 # 注释掉,更换以下中科大源信息
deb https://mirrors.ustc.edu.cn/debian/ trixie main contrib non-free non-free-firmware
deb https://mirrors.ustc.edu.cn/debian/ trixie-updates main contrib non-free non-free-firmware
deb https://mirrors.ustc.edu.cn/debian/ trixie-backports main contrib non-free non-free-firmware
deb https://mirrors.ustc.edu.cn/debian-security trixie-security main
deb https://mirrors.ustc.edu.cn/proxmox/debian trixie pve-no-subscription
执行更新
执行更新,把PVE8升级到 PVE9 的最新版本号, 升级期间不得重启设备,提示选择信息时默认回车继续就行,直至更新完成。
# 更新软件包并将系统升级到最新
apt update && apt dist-upgrade -y
清理旧内核
升级完成后,必须重启 让服务器以加载新的内核和所有更新。
# 重启
reboot
# 升级后,旧的内核包会保留。查看已安装的kernel
dpkg --get-selections | grep -i 'kernel'例如:
root@pve8:~# dpkg --get-selections | grep -i 'kernel'
proxmox-default-kernel                          install
proxmox-kernel-6.14                             install
proxmox-kernel-6.14.8-2-pve-signed              install
proxmox-kernel-6.8                              install
proxmox-kernel-6.8.12-13-pve-signed             install
proxmox-kernel-6.8.12-9-pve-signed              install
proxmox-kernel-helper                           install
移除不需要的版本(例如 6.8系列):
apt remove --purge proxmox-kernel-6.8.12-13-pve-signed
apt remove --purge proxmox-kernel-6.8.12-9-pve-signed
配置 PVE9 源
由于Debian13 软件源变更为DEB822格式。不再是以传统格式/etc/apt/sources.list,而是以/etc/apt/sources.list.d/debian.sources呈现。所以还需要调整一下源这块设置。
# 删除sources.list文件
rm -rf /etc/apt/sources.list
# 新建个sources.list.d文件夹
mkdir /etc/apt/sources.list.d/
创建系统源(中科大源)
cat > /etc/apt/sources.list.d/debian.sources <<EOF
Types: deb
URIs: http://mirrors.ustc.edu.cn/debian/
Suites: trixie trixie-updates
Components: main contrib non-free-firmware
Signed-By: /usr/share/keyrings/debian-archive-keyring.gpg

Types: deb
URIs: http://mirrors.ustc.edu.cn/debian-security/
Suites: trixie-security
Components: main contrib non-free-firmware
Signed-By: /usr/share/keyrings/debian-archive-keyring.gpg
EOF
创建无订阅企业源(中科大源)
cat > /etc/apt/sources.list.d/pve-subscription.sources <<EOF
Types: deb
URIs: https://mirrors.ustc.edu.cn/proxmox/debian/pve
Suites: trixie
Components: pve-no-subscription
Signed-By: /usr/share/keyrings/proxmox-archive-keyring.gpg
EOF
创建无订阅Ceph源(中科大源)
cat > /etc/apt/sources.list.d/ceph.sources <<EOF
Types: deb
URIs: https://mirrors.ustc.edu.cn/proxmox/debian/ceph-squid
Suites: trixie
Components: no-subscription
Signed-By: /usr/share/keyrings/proxmox-archive-keyring.gpg
EOF
重装还原(100%成功)
重装会清空系统盘,会导致丢失数据。请务必按上面的升级前准备步骤备份pve配置,如果你的虚拟机虚拟磁盘也是放到系统盘的,那么需要迁移到其他非系统盘的存储池。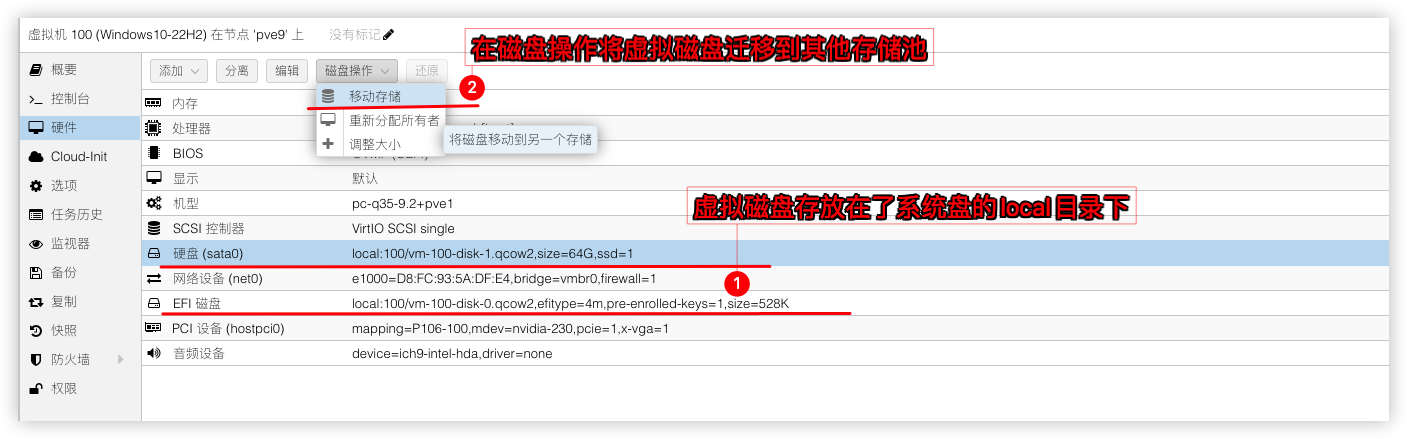
这些工作做好后,就可以重装pve9。重装好后按升级前准备步骤还原pve配置即可。顺带把PVE9的基本还原和优化设置给做了。
更换系统源
中科大源
# 替换 Debian 官方源和安全源为中科大源
sed -i 's/deb.debian.org/mirrors.ustc.edu.cn/g' /etc/apt/sources.list.d/debian.sources
sed -i 's/security.debian.org/mirrors.ustc.edu.cn/g' /etc/apt/sources.list.d/debian.sources
更换企业源
中科大源
# 关闭官方订阅企业源
sed -i '/Types:/a Enabled: false' /etc/apt/sources.list.d/pve-enterprise.sources
# 新增无订阅企业源为中科大源
cat > /etc/apt/sources.list.d/pve-no-subscription.sources <<EOF
Types: deb
URIs: https://mirrors.ustc.edu.cn/proxmox/debian/pve
Suites: trixie
Components: pve-no-subscription
Signed-By: /usr/share/keyrings/proxmox-archive-keyring.gpg
EOF
更换Ceph源
# 匹配当前Ceph版本和系统版本并更换为社区无订阅的中科大源
if [ -f /etc/apt/sources.list.d/ceph.sources ]; then
  CEPH_CODENAME=`ceph -v | grep ceph | awk '{print $(NF-1)}'`
  source /etc/os-release
  cat > /etc/apt/sources.list.d/ceph.sources <<EOF
Types: deb
URIs: https://mirrors.ustc.edu.cn/proxmox/debian/ceph-$CEPH_CODENAME
Suites: $VERSION_CODENAME
Components: no-subscription
Signed-By: /usr/share/keyrings/proxmox-archive-keyring.gpg
EOF
fi
执行更新
# 更新软件包并将系统升级到最新
apt update && apt dist-upgrade -y
LXC容器更源
国内清华源
# 备份APLInfo.pm
cp /usr/share/perl5/PVE/APLInfo.pm /usr/share/perl5/PVE/APLInfo.pm_back
# 替换为清华源:
sed -i 's|http://download.proxmox.com|https://mirrors.tuna.tsinghua.edu.cn/proxmox|g' /usr/share/perl5/PVE/APLInfo.pm
# 重启服务后生效
systemctl restart pvedaemon.service
PVE常用优化脚本
# 一键给PVE增加温度和CPU频率显示;硬盘信息;取消弹窗订阅;
(curl -Lf -o /tmp/temp.sh https://raw.githubusercontent.com/a904055262/PVE-manager-status/main/showtempcpufreq.sh || curl -Lf -o /tmp/temp.sh https://mirror.g hproxy.com/https://raw.githubusercontent.com/a904055262/PVE-manager-status/main/showtempcpufreq.sh) && chmod +x /tmp/temp.sh && /tmp/temp.sh remod
删除local-lvm将空间合并到local
删除local-lvm将空间合并到local目录池让空间最大化。
# 使用命令删除local-lvm
lvremove /dev/pve/data
# 输入y,确认,输出以下信息即成功
Do you really want to remove active logical volume pve/data? [y/n]: y
  Logical volume "data" successfully removed.
# 再将local-lvm的空间转移到pve-root
lvextend -rl +100%FREE /dev/pve/root
# 输出以下信息即合并local分区成功
Size of logical volume pve/root changed from <9.75 GiB (2495 extents) to <19.50 GiB (4991 extents).
  Logical volume pve/root successfully resized.
resize2fs 1.47.0 (5-Feb-2023)
Filesystem at /dev/mapper/pve-root is mounted on /; on-line resizing required
old_desc_blocks = 2, new_desc_blocks = 3
The filesystem on /dev/mapper/pve-root is now 5110784 (4k) blocks long.删除了lvm-thin之后,还需要在Web删除local-lvm才算完成。
总结
升级流程可以简化为:备份 -> 更新 -> 换源 -> 升级 -> 重启 -> 验证。成功的关键在于 充分准备 和 完整备份。祝您升级顺利!